Friday, November 16, 2018

Dressing Room Curtain with Attached Valance

Here's something different from what we usually do around here!
A retail store needed curtains for a dressing room and a storage area.
 They chose an awning-striped outdoor fabric, for durability and to help keep it clean.  It was heavy fabric, and I was glad I had my new walking foot machine to handle it. 
With limited yardage, I had to find a way to make everything work with what was available.  A flip-over valance was the most efficient way to use the fabric.
I decided to use shirring tape for the panels- there was less than 1.5x fullness, so tape seemed the best way to manage minimal shirring with an unusually heavy fabric.
The valance shape was sewn before cutting.  This method helps keep the curves from stretching on the bias.  The fabric and lining were laid out, right sides together, and I drew the shape with disappearing pen. 
 I backstitched on each side of the V to reinforce the fabric.  Careful clipping right up to the point makes a clean turn.
The panel and valance were joined wrong sides together- backwards from how we normally think of joining fabrics.  Then the valance was flipped over, pressed, and sewn 2" down to form a pocket.
It was kind of bulky inside that pocket so we tested it to make sure the pole would fit through!  Because the dressing area pole was curved, there was a little more take-up than usual, going around the curves. 
We added a loop on the lead edge so the curtain can be held back when the dressing room is not in use.  With some creative piecing, we eked out enough to self-line this panel so it would be pretty when tied back!


Monday, November 12, 2018

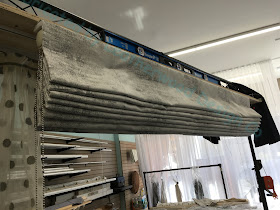
Outside Mount Hobbled Shade

For outside mounted hobbled shades, I often like to eliminate the top fold and replace it with a flat topper, the same size as a fold, and wrap it around the ends of the board.
Without the topper, the length of the top of the shade is the equivalent of two folds.
There is still a row of rings for the top fold, even though it's imaginary.
When the shade is fully raised, the top fold looks nearly continuous with the other folds.  Because the stack of folds kicks forward, I do not strive to make them tuck under the topper- the bulk of the fold stack would just distort the topper.
If you prefer a "picture area" you could leave the top this way, and have a deeper flat section.  This could be perfect when there is a large motif.
The pattern repeat was 15", so we multiplied by 2 and divided by 3 to make every third fold match.  I think this attention to detail gives the shade a subtle orderliness.
I recently added a walking foot machine to my collection.
This type of machine feeds the fabric layers at different rates, so when you come to the end of your seam, the layers have remained aligned.  With a straight stitch machine, the top layer of many fabrics will "walk" forward as the seam is sewn, resulting in layers that are out of alignment with each other.  Velvet is one such fabric.  The shade fabric is a sort-of velvet- it has a pile, though it isn't high, and the layers did not slide with my new machine.
For the weight bar pocket, I was especially grateful for the walking foot machine.
When I got to the end of the pocket, everything was perfectly aligned!  With a straight stitch machine, it would've been a struggle to get them somewhat even.  Those days are over!  More on the walking foot in future posts.