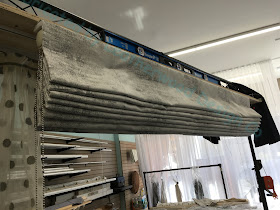
For outside mounted hobbled shades, I often like to eliminate the top fold and replace it with a flat topper, the same size as a fold, and wrap it around the ends of the board.
Without the topper, the length of the top of the shade is the equivalent of two folds.
There is still a row of rings for the top fold, even though it's imaginary.
When the shade is fully raised, the top fold looks nearly continuous with the other folds. Because the stack of folds kicks forward, I do not strive to make them tuck under the topper- the bulk of the fold stack would just distort the topper.
If you prefer a "picture area" you could leave the top this way, and have a deeper flat section. This could be perfect when there is a large motif.
The pattern repeat was 15", so we multiplied by 2 and divided by 3 to make every third fold match. I think this attention to detail gives the shade a subtle orderliness.
I recently added a walking foot machine to my collection.
This type of machine feeds the fabric layers at different rates, so when you come to the end of your seam, the layers have remained aligned. With a straight stitch machine, the top layer of many fabrics will "walk" forward as the seam is sewn, resulting in layers that are out of alignment with each other. Velvet is one such fabric. The shade fabric is a sort-of velvet- it has a pile, though it isn't high, and the layers did not slide with my new machine.
For the weight bar pocket, I was especially grateful for the walking foot machine.
When I got to the end of the pocket, everything was perfectly aligned! With a straight stitch machine, it would've been a struggle to get them somewhat even. Those days are over! More on the walking foot in future posts.


Beautiful job, and so appreciate all the tips you send. Your blog is very well written and clear. Thank you! Walking foot machines are so valuable.
ReplyDelete