Monday, December 10, 2018

Exercise in efficiency: one dozen bay window valances

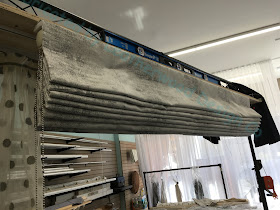
Here's what has been keeping the workroom occupied!- a dozen bay window valances.  The woven medallion patterned fabric is fire-retardant with Silky Diablo fire-retardant blackout lining.
I pulled out every efficiency process, method, and technique I've ever developed, to streamline getting these valances cut, sewn, and mounted.   A full bolt of fabric was sliced into 65 cuts, and another full bolt of lining was sliced into railroaded strips.   Then each section was trimmed to size and the valances assembled.  Of course none of the windows were exactly the same size!  The new walking foot machine eliminated the walking and puckering that would otherwise result from sewing cross-cut face fabric to railroaded lining.
I think I spent 8 hours just ironing. 
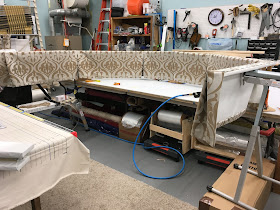
Creating a mounting space is the biggest challenge, so we wanted to get all of them stapled in one go, so we could get the workroom back to normal asap.
We used a combination of stands to create a stable space.
 I was lucky in that all the boards were cut and delivered to me!  John assembled them then covered the undersides with lining, in preparation for stapling the valances..
These all were hinged in the center to make them easy to transport.


We asked Merrill Y. Landis to fabricate the 206 single width panels.  They're a great company to partner with!  Here's about 10% of the panels, ready to be loaded.  This was an adventure!

Friday, November 16, 2018

Dressing Room Curtain with Attached Valance

Here's something different from what we usually do around here!
A retail store needed curtains for a dressing room and a storage area.
 They chose an awning-striped outdoor fabric, for durability and to help keep it clean.  It was heavy fabric, and I was glad I had my new walking foot machine to handle it. 
With limited yardage, I had to find a way to make everything work with what was available.  A flip-over valance was the most efficient way to use the fabric.
I decided to use shirring tape for the panels- there was less than 1.5x fullness, so tape seemed the best way to manage minimal shirring with an unusually heavy fabric.
The valance shape was sewn before cutting.  This method helps keep the curves from stretching on the bias.  The fabric and lining were laid out, right sides together, and I drew the shape with disappearing pen. 
 I backstitched on each side of the V to reinforce the fabric.  Careful clipping right up to the point makes a clean turn.
The panel and valance were joined wrong sides together- backwards from how we normally think of joining fabrics.  Then the valance was flipped over, pressed, and sewn 2" down to form a pocket.
It was kind of bulky inside that pocket so we tested it to make sure the pole would fit through!  Because the dressing area pole was curved, there was a little more take-up than usual, going around the curves. 
We added a loop on the lead edge so the curtain can be held back when the dressing room is not in use.  With some creative piecing, we eked out enough to self-line this panel so it would be pretty when tied back!


Monday, November 12, 2018

Outside Mount Hobbled Shade

For outside mounted hobbled shades, I often like to eliminate the top fold and replace it with a flat topper, the same size as a fold, and wrap it around the ends of the board.
Without the topper, the length of the top of the shade is the equivalent of two folds.
There is still a row of rings for the top fold, even though it's imaginary.
When the shade is fully raised, the top fold looks nearly continuous with the other folds.  Because the stack of folds kicks forward, I do not strive to make them tuck under the topper- the bulk of the fold stack would just distort the topper.
If you prefer a "picture area" you could leave the top this way, and have a deeper flat section.  This could be perfect when there is a large motif.
The pattern repeat was 15", so we multiplied by 2 and divided by 3 to make every third fold match.  I think this attention to detail gives the shade a subtle orderliness.
I recently added a walking foot machine to my collection.
This type of machine feeds the fabric layers at different rates, so when you come to the end of your seam, the layers have remained aligned.  With a straight stitch machine, the top layer of many fabrics will "walk" forward as the seam is sewn, resulting in layers that are out of alignment with each other.  Velvet is one such fabric.  The shade fabric is a sort-of velvet- it has a pile, though it isn't high, and the layers did not slide with my new machine.
For the weight bar pocket, I was especially grateful for the walking foot machine.
When I got to the end of the pocket, everything was perfectly aligned!  With a straight stitch machine, it would've been a struggle to get them somewhat even.  Those days are over!  More on the walking foot in future posts. 

Tuesday, October 16, 2018

Cinched tab panels

Nicole Gray had us make cinched tab panels out of this cool fabric.  The gold was applied on top, giving it a sort of waxy gold finish- really beautiful.
At the top there wasn't much wall room above the window, so we made sure the panels didn't droop between tabs so the window trim wouldn't be exposed.  The tabs were 7" wide, and 4.5" long, for a 1.375" pole, with 4" spaces between them.
The cinches started out 4" high, assembled strip-piece style.
They then were scrunched with three irregularly placed pleats.  Not shown is the velcro at each end to make installation easier.  A fun job!


Friday, October 5, 2018

Custom Workroom Conference

Hi blog people!
I have been out of town at the Custom Workroom Conference in Spartanburg, SC, the workroom industry's premiere educational event, packed with inspiring instructors, eager attendees, and the most attentive and helpful vendors imaginable.
I was honored to be chosen to present my class "Set Yourself Apart," addressing ways in which a small workroom can set itself apart by offering the best in service, collaboration, and fabrication.
Thanks to Penny Bruce for the photo xoxo
Before heading to CWC we were busy in the workroom- besides fabricating for our designers and their clients, we were doing new quotes for future projects, research for product sourcing for current projects, and having a blast making class samples.
The last customer product that we finished was a roman shade with grosgrain ribbon banding.  I think this little shades is a great example of "setting ourselves apart."  We used the ribbon to cover the board ends as well as the ends of the weight bar.
 We made so many samples- I love this one, showing 5 different ways to make a top tack.
I left a day early so I could spend some time exploring South Carolina.
It was hard to choose what to visit, but I think I made the best possible choices for me.
I headed first to Middleton Place National Historic Landmark, one of the early rice plantations in the Low Country.
The tours showed me a perspective of history that I had never considered before.  I think that the Eliza's House and Beyond the Fields tour should be required attendance by every American.  I could've stayed all day, listening and learning.  I hope to return to the Low Country area and visit more historic sites and natural areas.
I was determined to get some sun on my face and dip my toes in the Atlantic Ocean, so I randomly picked what turned out to be the best beach choice I could've made for me- Folly Beach, off of James Island, just across from Charleston.  I traded $10 admission for a mere but highly satisfying hour walking in the ocean and collecting shells.
I was thrilled to find plenty of Thai food in both the Charleston and Spartanburg areas.  This is one of my favorite cuisines, so I got my fill, and for awhile, at least, I won't have to pester anyone at home to go to Thai restaurants with me!
In Charleston downtown, there are so many beautiful sights, I couldn't imagine what to pick to show you.  Just google Charleston, and you'll get an idea.
But what really sparked my imagination was this: the Karpeles Manuscript Museum.  What on earth is THAT?  I don't know, yet, but I know that I want to go back and visit it.
Well, I was so busy during the conference, there's not much I can show you in the way of pictures to give you an idea of what it's like.  Our workroom community is vibrant and exhilarating, and at the conferences and trade shows the excitement spills over until you think you just can't take in any more.  

The days were filled with meeting up with old friends, meeting new attendees and even brand-new rookie workrooms, attending the extremely moving and inspiring Keynote speech from Lonnie and Kelly from Weave Gotcha Covered!, sitting in on classes with other instructors, and networking with our awesome workroom supply vendors.  

Promoters Susan Woodcock and Rodger Walker are our workroom heroes and they put on an event for us that is unmatched.

If you've never been, and think that a few days of intensive industry immersion can improve your workroom business, let me know, and I'll keep you informed as details about next year's conference are settled.  

Now I'm home, in the workroom, and supplies that I ordered are beginning to arrive.
Time to get back to what I love to do- working with beautiful fabrics!  Stay tuned!


Friday, September 7, 2018

Comments

Hey people!  For some reason, I have not been being notified of pending comments for, like, months.  So if you've left me a comment, I didn't reply, because I never saw it, and I'm very sorry!  I am going to go through them gradually and answer, though it'll take a little time. 

Many bloggers require comment moderation- we get a notice when there is a pending comment and we can either have it published or deleted.  This is because even a little blog like mine, on an esoteric topic, will get stupid spam or troll comments, and I want those to not be published.

Today I had an email asking me if I wanted comment moderation turned back on- but I had not realized that it had ever been turned off- I guess I simply thought that people were commenting more on Facebook and not on blogs anymore.  But that's not true, you've been leaving comments, and I never got them.

So keep 'em coming, I'm here!  I love having conversations with you guys.  And I'll work through the ignored comments over the next few days.

Deb

Friday, August 24, 2018

Mocking up a skinny shade with spring lift system

We hastily mocked up a skinny shade to test the smallest (1.2) Easy Spring Plus cut down for a 16" shade. There's no room in the tube for a stop on such a narrow shade, but since the spring is so small it doesn't have much "oomph" so it just naturally stops on its own. John adjusted the rotations so it stops right where we want it, without an actual stop. We mocked this up because we had a half dozen skinny shades to make and wanted to test the parameters first. FYI, I lined this sheer with a grey voile, just for fun. The shade has only two lift lines, and a self-fabric pull tab is sewn into the permanent fold in the back. I spent way more time than I should have, trying to level this stubborn little guy. Shades with two lift lines take a lot of fussing because you can't average the cord tension over a series of lift lines. I also discovered that the wavy pattern created a disparity in the fabric "give" and I didn't quite hit the center of the wave so it has a permanently wonky look. And...... that's why we make mock-ups!

Wednesday, August 22, 2018

Our new dig: front pull tab for spring roller romans


We are diggin' this front pull tab, hidden under the permanent bottom fold.
This is an outgrowth of the back pull tab, which I've been using all year instead of a pull ring.
Spring roller shades do not strictly require, but work much better with, a permanent fold at the bottom, to make it easier to engage the spring mechanism and not over-pull the shade.
We used that permanent fold to hide a pull tab, made of self-fabric with a bit of flat bar inside so there'd be something rigid to grab hold of.
We made the shade our usual way, adding 6" for the permanent bottom fold.  This shade is interlined and has ribs sewn in.
We turn the hem into a machine-sewn weight bar pocket which provides security and stability, and that is where the pull tab is sewn in.  Here, the shade bottom is folded back so you can see where we pinned the tab.
The bottom row of rings are held by tiny twill tape tabs for even more security.
The raw edges of the tab are trimmed after it's attached.
The hem is folded back to encase the tab.
The second stitch line is sewn to complete the weight bar pocket.
The weight bar is slipped into the pocket, and I also added a rib to keep the bottom hem perfectly straight since this fabric is a little loosey-goosey.
When the shade is strung, the bottom two rings will be pulled up close to each other with an orb and then tied.
Ta-da!