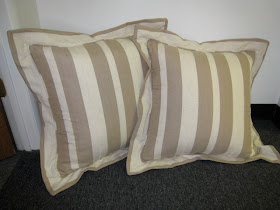
Any idea how hard these are to make??? An inset flange, mitered in the corners, front and back. I could've made three Roman shades in the time it took me to make these two pillows!!!
They turned out well..... eventually!
I have no idea why, but this style just gets me every time. I need an expert to sit down and do a dozen of these in a row with me so I don't have to re-learn the method with each order.

You are right, they are hard but they look amazing !
ReplyDeleteI know how hard they are and you did a brilliant job......
ReplyDeleteAs always exceptional work Debra!
I love the use of the stripes. Clever.
I adore making cushions could do it all day everyday :)
thanks you guys.
ReplyDeleteThis was a weird fabric. It was 54" wide, but the stripes were not evenly balanced across the width, so I couldn't get the stripe on the flange to go up & down because there wasn't enough. That's why it runs the way it does!
I have been enjoying looking at your Blog. Thanks for your effort in taking the time to do it. I used to find it hard and frustrating to make mitered flange pillow and shams. typically I had a hard time getting it all to come together. I knew there had to be a better way. and there is. What I do is carefully make the flange up first. When I sew the mitered corners I stop sewing the miter at the point where it will be inserted between the front and back. I make sure to cut a center notch in the seam allowance on each side of the flange. Next, I sew the piping to the flange. Now, I verify the actual size of the flange to determine how big to cut the fronts and back taking seam allowances into consideration. and I cut the fronts and backs to fit the already meade up flanges. I center notch the fronts and backs in the seam allowances as well. I now machine sew on the fronts and backs stopping just shy of the corners. ( too hard to sew perfectly up in the turn of the corner) I finish the corners after turning the covers right sides out by hand tacking the corners closed. It may take a few minutes to do this, but you will find the rest will go rather smoothly. good luck
ReplyDeleteAlan, thanks so much for detailing your method. Since I wrote this post, I have since made this style using a similar method, sort of winging it, but your instructions are so clear and I'm happy to know I can refer back to them next time I make this style. Thanks for reading the blog and your kind comments.
ReplyDelete