THE BLOG IS HAVING TROUBLE WITH COMMENTS! SOMETIMES THEY DON’T GET PUBLISHED, AND WHEN THEY ARE I AM UNABLE TO REPLY TO THEM. IF THAT HAPPENS, JUST EMAIL ME AT stitchlore@gmail.com.

Looking for something specific? Check out the Topic Index, or the Search bar, just below, on the left.


Sorry about this problem!

SO.........WHAT ARE WE WORKING ON TODAY??

Tuesday, February 28, 2012

Wide Relaxed Romans

For those who wonder about the silhouette of wide relaxed Romans with just one swoop, here are three recent examples. 
All three are about 72" wide.  The first is a sheer:

And this one is an unlined casement fabric with a linen duck 2" bottom banding:

And this is one we featured last week, interlined silk with dog-ears and 3/4" velvet banding on 3 sides:

Sunday, February 26, 2012

Grosgrain Ribbon Banding

We've had a little flurry of banding lately- I've shown a few shades in recent posts with contrast fabric banding; here are two with inset banding made from grosgrain ribbon.
This pink ribbon is applied to a pretty heavy white linen, lined with Centurion napped blackout, for a little girl's bedroom.

Here is a gorgeous grey wool sateen with navy grosgrain ribbon, for a son's room.  Those "ears" on the little valance need to be tacked down with tenter hooks!

Thursday, February 23, 2012

Relaxed Roman with Dog Ears

Here's a beautiful, clean, serene Relaxed Roman variation for a NYC apartment.
There is no fullness: the lift lines are set in about 8.5" to create drooping dog-ears.
Translucent interlined white silk is banded with 3/4" of yellow velvet.
This shade is about 70" wide, in case you're wondering about proportion.

To keep the layers from shifting, first I hand-basted the velvet to the 3 layers before machine sewing.

After sewing with a scant 3/4" seam, I rolled the velvet over and hand-sewed it to the back.

Wednesday, February 22, 2012

In a Purple Haze

I've noticed that purple is a popular decorating color in the winter.  February's birthstone is amethyst, which perhaps reflects an increased attraction to purple when it is cold and dull outside- it sure does pep up a subdued palate.  Still, it was surprising to have SO MUCH purple in-house this winter.
On February 4 I took this picture of purple fabrics that came in for immediate projects. 

These purples were mostly paired with natural, sage or loden, or silver-grey.

The project that kicked off purple month was a simple purple burnout velvet panel, box-pleated onto a board, with purple glass beads shown off when the fabric is draped back to one side.

Next were pillows in silver and purple, balanced with a hint of loden in the outlining:

Then a 165" valance and panels of a gold-dusted natural silk, color-blocked with silver-grey and purple satin.  These did not photograph well, but in the house they are fabulous. 

Four neo-bohemian shades were exuberant with their purple borders trimmed with purple and sage glass beads:


The Sheffield Queen lined what felt like a couple of miles of valances with purple, trimmed with purple fringe: 

Here the sage and purple face fabric stretches across the workroom into infinity, or at least it felt that long:

And for the last purple project of the month: just-the-other-side-of-periwinkle-purple bands and welts the sage and purple toile on this goblet pleat valance:

Saturday, February 18, 2012

Tres-Super-Chic

In a master bedroom inspired by menswear: cornices and draperies, with a variation on a Greek key trim, and nailheads all around the cornices.  The draperies have been tied to train the pleats, so good photos later- like, in a couple of weeks.  Meanwhile:

Thursday, February 16, 2012

More Pillows

Might as well show off some more pillows.  We had a marathon this past week!
This order consisted of 13 pillows- various sizes out of these 5 fabrics.

We combined this order with another dozen or so pillows to cut out and sew by color so we could minimize re-threading the machine.

The most fun part of making a big batch of pillows is rummaging through the zipper bin and picking out the right color zipper for each fabric.  I guess I keep about 35 colors in stock, but sometimes I have to go to a local fabric store for a special color, like the bright orange in the bottom left corner.  Invisible zipper tape didn't come in that orange, so I got regular zippers and did a lapped zipper closure.  I couldn't even remember how to do it!- but after 3 of them it all came back.

Wednesday, February 15, 2012

I love microcord!

These pillow fabrics are delicious- two of the best of the high-end beauties we've had in lately. 

The blue lotus velvet came all the way from New Zealand.

The silver fabric is no ordinary reptile- it's DRAGON.  I want to know, how do they know what dragon skin actually looks like? 

Microcord defines the pillows unobtrusively.  The blue-green welt is faux-silk, the grey welt is satin.  The cord is just 4/32" in diameter. 

Rule of thumb: match zipper tape to welting- subject to exceptions, of course.   And use invisible zipper whenever possible.

Monday, February 13, 2012

That fab fabric, and what we made from it:

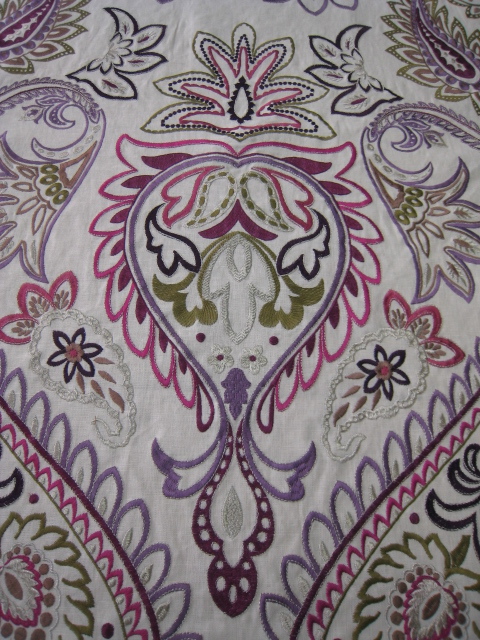
For a young woman's bedroom- 4 gorgeous shades from this embroidered linen/cotton blend, for a sort of high-end, nouveau-hippie look.


The embroidery is set off with purple fabric banding on three sides of the shades, with ribbon and glass bead trim dangling from the bottom to catch the light.

These shades were lined with a modified French blackout layering method.  Next to the face fabric is a layer of lightweight ivory lining; behind that is black Apollo; and plain lightweight white on the back.
To prepare the lining, the edges are pressed in 3/4" and the pockets marked and stitched.
The ivory lining and the Apollo are centered on the shade; then the face fabric is folded over just once and pressed.  The prepared lining is laid over it all, the pockets pressed toward the top and carefully lined up to the table grid, then hand-sewn at the sides. 


The weight bar is sewn into a pocket behind the purple band.  On the front the weight bar pocket is topstitched along the edge of the purple.

On the back, the bottom of the weight bar pocket is sewn, before the topstitching is done, only in the back hem.  The ladder shroud is tucked into the back hem even though the first row of rings is 4" up- so the ladder tape finishes neatly.

Here are my favorite hand-sewing threads: the white is an upholstery thread, but I love hand-sewing with it because it doesn't twist; and the ivory is button & carpet thread which is nearly indestructible.  When I need an exact color match I prefer quilting thread, but in this case had to settle for doubled strands of all-purpose thread.


Of the 4 shades, I chose this one to photograph in order to illustrate the compromises that sometimes must be made even with high-end fabrics, especially when embroidery is involved.  The pattern is not consistent, neither vertically nor laterally, through the roll of fabric.
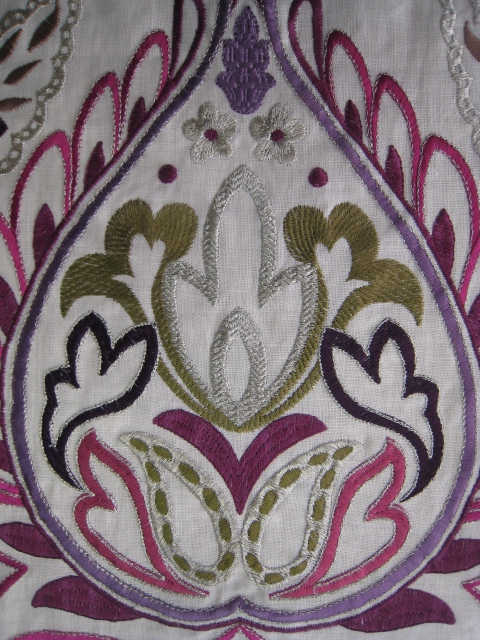
On this shade, the center of the motif is exactly in the center of the shade, but if you look closely, at the top, the pattern is not symmetrical laterally.  If it had been cut with the sides in mind, the center of the motif would not have been in the center of the shade.  
As you look toward the bottom of the shade you can see that the pattern evens out somewhat.
Also, the pattern drops just a smidgen on the right side of the roll.
The most important centering criterion was the center of the motif, and that set the stage for all the variations.  


Thursday, February 9, 2012

Beveled Molding and Inside Mount Shades

The designer hoped to install inside-mounted shades, to keep from covering the beautiful molding on the windows.  The molding was beveled in several increments, both laterally and vertically.
First we cut a notch in the back to accommodate one lateral bevel.  Then we gently tapered the front of the board back 1/2", so the shade would extend out 1/2" yet taper back to the next lateral bevel, so the shade edges would be flush with the molding instead of sticking out 1/2".

The front edge of the board was built up 1/8" with 4 layers of tacking strip, trimmed down to 2 layers for the 2" on each end where the shade side hems would be stapled, to reduce bulk.  The shade will extend 1/8" above the window frame.
Since the fabric was very bulky, we painted the board rather than cover it with fabric.  The curved plane was painted blue to match the fabric, in case it was possible to see in from the sides.

From the front, the taper is barely noticeable, and does not affect the shade operation.

In case a little of the board can be seen from the side, the front edge was painted blue.

The ends you can see in this photo will be completely inside the molding, and the fabric will come right to the window frame.  We kept the board free of fabric except for the bare minimum needed to staple, to ensure an accurate fit.  The serged stapled edge will serve as a shim to accommodate one of the vertical bevels.


Saturday, February 4, 2012

Curved Board for Simple Top Treatment

The curved ends on the boards really adds something to these simple interlined embroidered silk kick-pleated valances.
Although what exactly the curve adds, I can't put my finger on.  Perhaps it doesn't so much add, as subtract- it keeps the treatments from looking hulking by reducing bulk? 

The narrow windows take on more substance with the treatments extending out about 6" on each side, but since they're close together, the curved board keeps them from looking like they're bumping into each other.  I love these curved boards!  Now I'm thinking about other applications for the curve......

Wednesday, February 1, 2012

The Dragon Pillows

I showed this fabric a couple of weeks ago, and now the pillows are done.

The orange side borders were cut off and pieced onto the top and bottom of each 20x26" pillow.  The blue & brown section was cut into welting strips- which are not on the bias so the piping is a little awkward.

The dragons look great against the tangerine ultrasuede backdrop!