THE BLOG IS HAVING TROUBLE WITH COMMENTS! SOMETIMES THEY DON’T GET PUBLISHED, AND WHEN THEY ARE I AM UNABLE TO REPLY TO THEM. IF THAT HAPPENS, JUST EMAIL ME AT stitchlore@gmail.com.

Looking for something specific? Check out the Topic Index, or the Search bar, just below, on the left.


Sorry about this problem!

SO.........WHAT ARE WE WORKING ON TODAY??

Thursday, January 30, 2014

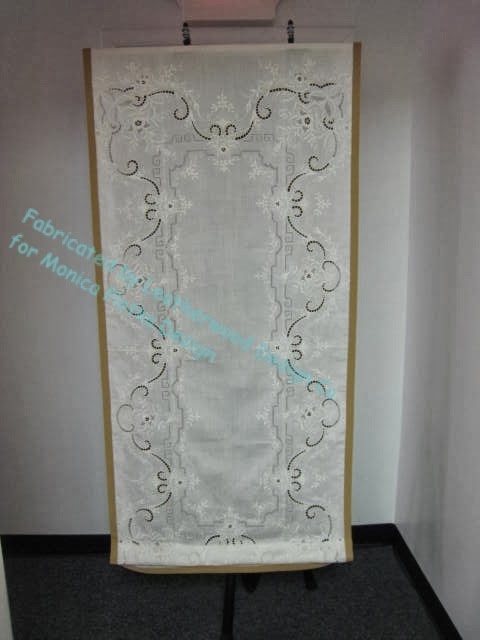
Vintage tablecloth re-purposed

Monica Plotka called me for this project, knowing that I would thoroughly enjoy it, and I sure did- this is one of the coolest shades I've ever made.  Her client dipped into her stash of vintage textiles and brought out this embroidered linen cutwork tablecloth to remake into a shade.
This very fine white linen pressed beautifully.  After the whole tablecloth was ironed, I marked out the exact finished size plus 1.5" for the board, then cut it out carefully, leaving the perimeter intact because..... well, just because I couldn't bear to cut into it.
Because of the openwork areas, it was easy to see the grid of the table behind the fabric.  That made the layout easier.
2" French cotton grosgrain ribbon was adhered to the back with Sealah tape, then pressed around to the front, mitering the corners along the way.
From the front, the ribbon was topstitched all around.

A length of Rowley's weight bar tubing was machine-sewn 3" above the top of the ribbon, the stitching ending right before the ribbon, with an extra couple of inches left at each end.
The first ring started 6" above the fabric tube, with ladder tape.  After all the rings were sewn on, the weight bar tube was folded up to meet the bottom rings, and tacked to that bottom ring.  The weight bar was inserted into the tube, and the ends finished. 
The fold created one permanent pleat at the bottom, even when the shade is fully lowered; the extra fold hides the weight bar pocket stitching, and any other clutter that might show through the open areas.
This project was right up my alley!  Thanks Monica, I'll do this again any time!

Tuesday, January 28, 2014

Shower curtain fever

This is a funny business.  I haven't made a shower curtain in at least 3 years, and this week I made 3.
Even weirder, they are all in the same palette: soft gray-brown with orchid.  Hey, wait, isn't orchid the color of the year?  Guess what, these aren't the only orchid fabrics I've got in the workroom right now.  More later....
Anyhow-
Shower curtains are a great place to have fun with interesting details.
Monica Plotka's shower curtains were two full widths each, with small inverted pleats on a 2" band.  The floral had a 3" ruffle inserted in between; for the stripe, we ran the pattern horizontally.
These were extra-long- 95"- the old 72" x 72" standard side seems to be a thing of the past. 


I was glad to have a reason to pull out my Johnson ruffler.  I really enjoy making ruffles.  They seem to come in clusters, too.  Maybe more ruffles are on the way.


The grommet press had a chance to see some action, too.  I searched high and low to find an antique brass grommet to work with the beautiful shower curtain rings.   They were available from GoldStar Sewing.  The grommet press is the special domain of John.  I'm not really allowed to use it.


Fullness was controlled in both curtains with small inverted pleats.  2" translucent buckram in the bands prevent drooping.     


Remember these incredible mock hobbled cornices we made for Katherine Stern's client?


A shower curtain and valance were needed for the adjacent powder room, and  Katherine wanted to carry through not only the fabric but also the style of the cornices.  We created a rod pocket valance that mimicked the folds.
It definitely took longer to figure this out than it did to make it: a simple tube, lined and interlined, with a single line of stitching to create a pocket for the spring pressure continental rod.
The curtain and valance were a huge hit and looked great.  Sorry about the glare from the flash.......


Monday, January 20, 2014

Sheer Roman shades

Sheer roman shades were practically unheard of 15 years ago, but now, we make them all the time.  Most of the time we line them with a plain sheer, for extra support and body.
This set of four gave the opportunity to show some of the techniques we've developed to make them.
Three of the shades were just 29" wide, so they fit sideways on the table, side by side.  I like that I can be sure the spacing will be identical on all three.  Since the grid can be seen through the fabric, there's no need to mark the fabric for rings.  Fabric and sheer batiste lining were cut and tabled.  All the side hems were pressed and hand-sewn; bottom hems pressed and pinned; ladder tapes run and clear rings sewn.  We wanted one extra permanent fold, so the ladder tape ends at the first ring up after the hem. 
It's a good idea to check sheer fabrics to be sure there's no lint or thread caught in between the layers.  My inspection revealed a little fleck of red lint, so I covered the end of a yardstick with masking tape, slid it in between the layers......
Got it!
When it was time to sew the bottom weight bar pockets, I was dismayed to find that the presser foot would pick up and pull the loose threads that created the pattern.  This is the kind of thing that happens more often than we'd like.
I laid a flat metal hem gauge next to the presser foot and held it down tight to keep the loose threads in place so they wouldn't get pulled.
One great thing about bottom trims is that it can provide a clean bottom line when the fabric is a little wobbly.  I decided to glue this trim on so the shade could be tabled and the trim aligned to the grid.
The permanent fold is a great device for sheer shades, to hide all the stitching and other clutter that is necessary to make the shade work.  Instead of tying two rings together, I just folded the fabric up and stitched the weight bar hem to the first ring.
I covered the weight bar with natural color fabric tubing before inserting it into the pocket.
The weight bar is slip-stitched closed, and the ends of the trim tucked in and the bottom of the hem sewn shut.


Friday, January 10, 2014

Happy New Year!

The holidays are always busy for soft furnishings workrooms.  Naturally, people want to spruce up their homes when they know friends and family will be visiting.  So we were very busy here, and now have had time to get some rest to re-charge for a new year.

Not everything we make can be shown on the blog, and in December we had an unusual number of that type of project.  One of those, a very large job, was one of the most difficult treatments I've ever sewn, and I'm thrilled to say that it turned out spectacularly.   I only wish I could show it off here!

However, I'm so excited to report that starting next week I'll be able to begin featuring a whole house project that we've been working on since last spring for a very special client.  Tomorrow's installation will mark approximately the half-way point.  This client has chosen incredibly beautiful fabrics and satisfyingly detailed treatments that have been a joy and a challenge to create.  I can't wait to start posting about it!

See you soon!

Monday, December 23, 2013

Tall grommeted panels

In late October we received this shipment of fabrics, and on Friday we installed the completed window treatments for nearly the whole house, for designer Denise Wenacur.
The Greek key fabric has gotten a lot of positive attention from everyone who's seen it.
It made for classy and dramatic grommeted stationary panels in the living room, 126" long, with roman shades mounted inside the windows and the sliding door.
The hardware is the Aria line from Rowley Co.  We liked the fact that we could get simple hardware with clean lines, unobtrusive brackets, and matching grommets.  It arrived in two days!
The three-year-old daughter loved the splash of pink under the bright floral valance.
In the playroom, the leafy embroidery lends a serene note, especially on this winter's day.
A simple chenille dot on a neutral ground cuts the sun glare on the office computer monitor.
There were a few other treatments: a back door stretch panel; interior drapery to mask the laundry appliances; and a cute little shade for the powder room out of this pin-tucked fabric.
The next phase will be the master bedroom.  But first, Christmas and New Year's!  have a happy..............

Friday, December 13, 2013

Gulp-

still gasping for air- holiday rush- aaarrrggghhh- help!-
But I'm going to take a moment to show off one recently installed really beautiful drapery job.
Kim Freeman's client had a gorgeous, impeccably fabricated, heavy, interlined top treatment and draperies out of a classic Clarence House fabric, trimmed in burgundy velvet, but wanted to lighten and update her dining room.
The Before treatment

We removed the top treatment, and took the velvet banding off of the draperies.  The panels now needed lengthening, so Kim spent weeks searching for the exact perfect coordinating fabric for a wide bottom band.
The After treatment
The spotted fabric is sophisticated, pairing perfectly with the classic print, and adding just a hint of whimsy.
A skinny burgundy lip cord between the fabrics defines the line, repeated at the top of the heading. 
The new curtains are pleated into a 2.5" long 2-finger pleat to complete the more modern look.

Wednesday, December 4, 2013

Up for air!!!!.......

This time of year is the busiest for most workrooms, with homeowners anxious to have new products in time for the holidays.  Some folks are showing off new homes, others are completing major renovations, and many are freshening up a room or two for entertaining. 
I'm sorry I've had little time to sit down here and post, but that's what it's like around here between Halloween and New Year's, and I'm not complaining!
On my last blog post, I mentioned that I had forgotten to take closeup photos of the beautiful mock hobbled valances we installed for Katherine Stern.  Katherine returned to the job site and was kind enough to take some good shots for me.
Scroll down to the previous post to read about the fabrication and installation of this project, and whole-room pictures.
See you again soon!  (sooner or later, that is.....)
The bay window, from underneath, the solar shades hidden.

Katherine wanted the folds to have a shingled look.
Rolled English bump helped the bottom of the folds kick out.
The ends were the hardest part due to the variation in the thickness of the bump inside the folds.