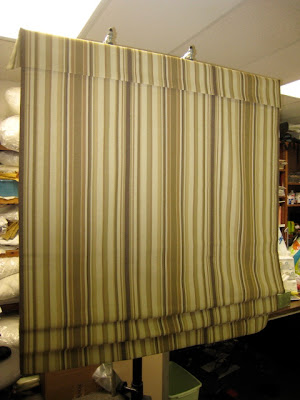
Developed in response to the new shade safety standards, Safe-T-Shades are completely cordless. From the front, they look exactly like any other fabric shade, whether flat roman, relaxed, London, balloon, whatever.
They are actually two shades in one: the front fabric shade, and in the back, a spring roller shade. When the roller shade is raised or lowered, it winds around its roller, and the fabric shade in front comes along for the ride, folding up independently, looking just like any other fabric shade from the front.
Here is a view into the space between the two shades, and you can see the J-hooks and battens that loosely join the two layers.
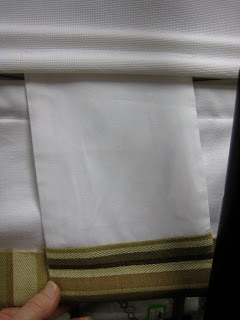
The workroom makes and attaches a pull tab out of the face fabric which is completely hidden behind the shade.
The shade is fabricated similarly to any shade, with a couple of exceptions. Here, the side and bottom hems have been sewn, the pocket fold line is marked for stitching, and the rings are attached. All the sewing was done by hand.
One important difference is that for the outermost rows, J-hooks are sewn on instead of rings. The rows generally are 10" apart, which is somewhat greater spacing than traditionally fabricated roman shades.
It helps to sew the rings on sideways so they don't twist when the battens are inserted. The weight bar pocket is sewn as usual, but instead of a 3/8" steel rod we used a 1" wooden slat.
Our client wanted one permanent fold at the bottom; here you can sort of see that we used that pleat as the place to sew the weight bar pocket, and sewed the ring through the pocket and the face.
Here is the Roman shade, all the sewing completed, and the battens in place.
There was an awkward moment when the pull tab was sewn on to the roller shade fabric. It wasn't easy getting it under the machine. It's important to not let the stitching interfere with the pockets that are already there for the bottom rods, because they're quite snug already. In the future I'll make the pull 1" longer so I can sew it above the top line, rather than along the middle line where there is a chance my stitching might sneak into the pocket area.
Because of the extra permanent fold, the roller shade started 8" up from the bottom instead of the 5" or so that would be more usual. So our pull tab was 8". We didn't have enough scraps to make it entirely of the face fabric, so we made it out of lining and added the face fabric to the bottom. The kit comes with a little weight bar to tuck into the pull tab.
Once the shade is stapled to the board, the roller shade is pulled down to the lowest batten, and probably will need re-tensioning at that point. Once it is taut enough, the bottom is secured with the acrylic bars, the sides of the roller shade fabric are tucked in to the J-hooks, and the whole thing is done.
Safe-T-Shade offers kits for the workroom to cut to size and assemble, or a made-to-order headrail already assembled to the workroom specifications. We ordered them pre-assembled. It comes mounted on a covered board; included are the battens, J-hooks, and pull tab weight insert.
I love the fact that this option is entirely cordless. It is easy to operate. They were not terribly complicated to make, and the cost is in the ballpark with other lift systems.
I think it's a great solution for small and easily accessible windows in homes with young kids. And guess what, I have a new order for two!
THE BLOG IS HAVING TROUBLE WITH COMMENTS! SOMETIMES THEY DON’T GET PUBLISHED, AND WHEN THEY ARE I AM UNABLE TO REPLY TO THEM. IF THAT HAPPENS, JUST EMAIL ME AT stitchlore@gmail.com.
Looking for something specific? Check out the Topic Index, or the Search bar, just below, on the left.
Sorry about this problem!
SO.........WHAT ARE WE WORKING ON TODAY??
Monday, May 23, 2011
Subscribe to:
Post Comments (Atom)


Deb, do you have to do this with a valance or can you do without?
ReplyDeleteNo the valance isn't necessary- the decorator requested it.
DeleteWhere did you get the J-hooks?
ReplyDeleteOh, these J-hooks- they're part of the kit from Safe-T-Shade.
Delete