THE BLOG IS HAVING TROUBLE WITH COMMENTS! SOMETIMES THEY DON’T GET PUBLISHED, AND WHEN THEY ARE I AM UNABLE TO REPLY TO THEM. IF THAT HAPPENS, JUST EMAIL ME AT stitchlore@gmail.com.

Looking for something specific? Check out the Topic Index, or the Search bar, just below, on the left.


Sorry about this problem!

SO.........WHAT ARE WE WORKING ON TODAY??

Tuesday, April 29, 2014

London shades, pattern, and arithmetic

We had a wonderful opportunity to fabricate some valances for a blog reader in California!  She fell in love with some London shades she saw here; chose her fabric and trim; shipped it to NY; and we made them.
After the main body of the shade was assembled, with the microcorded contrast pleats and the bottom brush fringe, the header was created.   After the pleats were basted in place, the first row of welt was attached and the seam trimmed.
 The header was first glue-basted to ensure a perfect pattern match.
 Fusible buckram helped the header keep its shape.
The top row of welt was attached after the valance was stapled to the board.
The header was lined separately, more like a facing I suppose.  The back is nice and neat.
The big deal with these valances was mathematical.  It was important to match the pattern horizontally, across the swoop and tails; vertically, from the valance to the header; and most difficult, from one valance to the other.  The tails needed to center the same section, which at first seemed absolutely impossible.   However, in the end, after a lot of head-scratching and experimentation, I got those numbers crunched to my satisfaction.  Though there's a slight difference in the pattern on the small valance tails and the large valance tails, the eye is pretty much tricked into seeing it all the same.
I'm pretty happy with these valances! 

Thursday, April 24, 2014

Mitered striped banding

Right away I have to acknowledge Scot Robbins for his brilliant painter's tape tip which I adapted for this project.  He uses the blue tape to mark drapery lead edges with wrapped banding- so you can wrap your side hems to the back and know that the banding on the front is all even.
Here I did much the same thing for Roman shade banding using a transparent quilter's rule as my guide.  First the band was glue-basted to the body of the shade.  The tape went on what will become the back of the band. 
Once it was all marked, I stitched on the fold line.
After everything is pressed into place, it's easy to wrap the band back, following the tape.
Just FYI, I applied fusible buckram to the bottom band to help keep it from curling.  Someday I'm going to do a whole blog post on all the things you can do with fusible buckram!

Tuesday, April 22, 2014

Letting the pattern speak

As the homeowner and I played with this Pierre Frey fabric, testing lining options, we realized that it could be railroaded to good effect.  Because the windows are different lengths, the top of each shade begins at the same place on the pattern, and each shade ends where it will at the bottom.

 In a flash of inspiration, we decided to shape the bottom hem to sort of follow the pattern.  You can't see it very well, but the bottom is welted with black.  Next visit to this house I'll take some close-ups.
By the way, we chose black interlining with white cotton sateen lining.  The back of this fabric is covered with unclipped black warp threads, so the black flannel interlining eliminates the shadow of the black threads when the sun shines through.

Thursday, April 17, 2014

Multiple treatments for versatility

So many windows would benefit from multiple treatments.  You want light control, temperature moderation, sound insulation, and beauty. Throughout the day and the seasons your needs change; as many as three or four treatments on some windows would not be unrealistic, to achieve various combinations of sheer, semi-sheer, lined, or blackout layers. 

Anyhow, my clients needed two layers of treatments on their kitchen windows, and there was no room for a curtain layer, so we did two shades.  Underneath is a sheer linen relaxed roman shade, and on top a split roman, so they have multiple options for privacy and light control.
Both shades are trimmed with the sweetest most delicious grosgrain ribbon- REAL grosgrain, French, in subtle organic greens, from Hyman Hendler in NYC.

For the split romans, the grosgrain serves as binding.  Since it's tiny- just 7/8" to start then folded in half- the whole shade was basted together beforehand, to keep all the parts in place.  Sometimes you see buttons used to cinch the split  together, but here the ring tacks do the job.  This style can be dressed out, too, with a scrunchie effect between the cinches.  Plain white sateen is used in the pleat.  We chose not to add microcord at the pleat, instead letting the shadow of the meticulously trimmed seam allowance define the pleat line.
The ribbon on the undershade is aligned with the split in the roman shade.
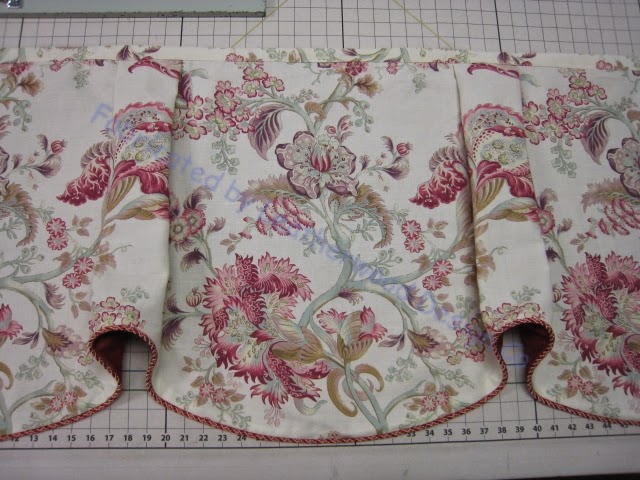
Each shade is on its own board, and there is a linen valance on the window-side of the board to disguise the mechanisms from view from the outside.
There were so many ways to lay out the motifs on this Pierre Frey botannical print.  We wanted to lose as little pattern as possible, and didn't want both shades to be identical.  I took half a dozen photos along the lines of these with different layouts to choose from.  The goal was not so much centering as it was tonal balance.

Friday, April 11, 2014

Special touches.....

Layers of pattern distinguish this nursery: wallpaper, embroidered linen sheer, and embroidered silk.

London shades serve as toppers for operable linen sheer relaxed romans.
(Please note: after these photos were taken, hold-downs for the bead loop chains were installed!!!)
The subdued lighting created by the fabrics makes this room feel like the perfect place to escape the summer heat, with a book, some iced tea, and a few extra minutes for napping.
The next two photos are over-exposed, so the details are easier to see.
The double London shade on this short, wide window needed special attention to proportion.  
Because the windowss are next to the crib, extra steps were taken to ensure that the shades are ultra-safe.  Originally posted last June, you can read here about how we encased the cord in a sheer shroud that was fully sewn shut so there would be no possible way to reach the cords.
On the right, the angled ceiling cut into the board line, so we made an angled dustboard, naturally!

Another special touch was a little leaf applique from the linen sheer on the inside of the silk shade.  Chances are nobody will notice it, but I know it's there!
Since the sheer linen was unlined, the bottom rings were reinforced with a little scrap, to strengthen the fabric under the stitch.

Saturday, April 5, 2014

Pleating to pattern

Pleating to pattern distinguishes the artisanal workroom from the commercial.
Whether pinch pleats or box pleats, draperies or cafe curtains, roman shades or valances, pleating to pattern takes more time and attention but yields a pleasing product.
Here are some favorite examples from our workroom.
Cafe curtain...... Possibly my all-time favorite example!
Goblet pleat drapery: every other pleat matches.
Classic French pleated draperies.
Box pleats!
Pleating to pattern is especially effective here.
Mock hobbled valances.
Hobbled shades.
Inverted pleat valances.
A little serendipity on this Sheffield- the pattern matches across the horn and scallop.
On this roman shade, every other pleat matches. 
A small motif but a big effect when pleated to pattern.
More French pleats.....
More box pleats......
And one more set of hobbled shades.

Tuesday, April 1, 2014

Sheer shades make good window treatments great

These box pleated panels on boards were pretty effective as soon as they were installed........
Living room before sheers
......but when Liz at Paris Interiors added sheer roman shades, the room lost its sharp edges in the muted light.
Living room with sheers


Across the foyer, the dining room was similarly softened with an embroidered linen sheer.
                                      Dining room with shades  
Because the center shade was just wider than the fabric width, extra width was added using French seams that are as beautiful as the shade itself..... too bad they're hidden behind the panels!   The sheer shades, by the way, are all lined with batiste in winter white.


Pleating to pattern is equally important for draperies and shades. 


Living room with shades
Pleated panels with velcroed mounting strips
Velcroed boards shaped to fit bay angles