THE BLOG IS HAVING TROUBLE WITH COMMENTS! SOMETIMES THEY DON’T GET PUBLISHED, AND WHEN THEY ARE I AM UNABLE TO REPLY TO THEM. IF THAT HAPPENS, JUST EMAIL ME AT stitchlore@gmail.com.

Looking for something specific? Check out the Topic Index, or the Search bar, just below, on the left.


Sorry about this problem!

SO.........WHAT ARE WE WORKING ON TODAY??

Thursday, July 27, 2017

Stationary wool shades

Susan Marocco chose beautiful Holland and Sherry wools for two stationary Roman shade valances in the same home as the wool ripplefold draperies I wrote about in June.
Both shades were trimmed around the perimeter with Samuel and Sons tapes.  We mitered the corners, and the blue shade featured two layered tapes.
From past experience with wool shades I knew the layers needed to be interlocked internally to support the wool and keep it from sagging.
First the interlining was interlocked to the wool face.  We used the seam in the face fabric and then interlocked in alignment with where the rings would eventually be sewn.

Ribs were sewn to the interlining to provide additional structure.
Above the board line, the interlining was serge stitched to the face fabric.
The lining was interlocked at the board line.
The ribs were secured to the lining, then the rings sewn in between the ribs.  These little tack stitches are visible on the back, but they lie on the column line with the rings so they're not noticeable.
The side hems were sewn by hand, and the bottom finished as per my usual method, with buckram in the hem.
To miter the trim corners, we first basted by hand to make sure the pattern was well aligned.   The corners were then sewn by machine, cut, clipped, pressed, and the little fiber ends stabilized with some tight little stitches and a dot of glue.
The mitered trim was sewn by hand to the outer edges with a ladder stitch.  How the pattern falls on a pattern like the Greek key is a matter of math and luck; for this shade, we had pretty good luck!
Because in both rooms the underside of the boards are not easily visible, we did not need to make returns, but we did use a bit of trim to cover the ends of the boards.
The time we spent on steps to support and stabilize the wool were well spent.


Wednesday, July 26, 2017

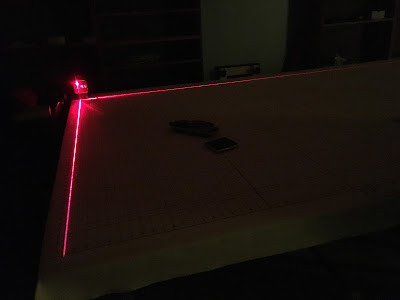
Laser-squaring a new gridded table canvas

Hey people, we are back from vacation, and are deep into the workroom move- as of today about 2/3 of the way done- by the end of today it'll be about 7/8 done.
Yesterday was exciting- the heart of the workroom, the work table, was completed!  Today the sewing machines will make the trip and we'll be ready enough to actually work.
John spent the afternoon preparing, and at 7:15pm I arrived.  Stretching the gridded canvas cover is a two-person job.  It was dark when we finished, which made for a good photo op with the laser.
If you own a workroom and don't have a gridded canvas work table, I encourage you to consider getting one.  Everything about my fabrication changed for the better once I got the first one.  This brand-new spotlessly clean grid came from The Workroom Channel.
We followed the procedure in the instructions and it went smoothly, using a tape measure, an arsenal of straightedges, and our Dewalt laser.  The table is layered with a plywood base, homosote, table padding from Rowley Co, and topped with the grid. 
Someday I'm going to do a blog post about all of the ways I use my grid; it's vastly more useful than I ever imagined it would be, and I could not work efficiently without it.  I can't even think without it.
I'll be catching up as quickly as I can with pre-vacation project stories and new workroom stories.  Stay tuned!

Saturday, July 15, 2017

Vacation!

Hi people!  We have been super busy moving the workroom to our new space, but the move is being interrupted by VACATION!  When we return we'll finish the move, open up the new workroom, and catch up on project posts.  While we're away I might do a few posts on our Facebook page.
Thank you all so much for reading my blog!   I am so inspired by the kind and positive feedback you all send me!  This blog started out 7 1/2 years ago, during the recession, as a way to inspire myself to keep going to work every day during that long, scary quiet spell.  But you guys have become this blog's raison d'etre and it has led to wonderful, un-looked for connections and opportunities that amaze me.    I'm looking forward to getting back to it, in our new digs. 
Thank you all!!!!!!!
Meanwhile-
Happy Summer!


Tuesday, July 4, 2017

Making progress on the new workroom!

We are moving soon to a new workroom space very nearby- with double the space, and an 11' ceiling!
Our first look at the space:
 The walls have all been painted robin's egg blue, except for the front display area, painted shitake mushroom.   It will be divided from the work space with a sheer curtain. 
The molding around the perimeter makes it feel fresh and clean.
 Paul scraped old film off the windows and cleaned them (they were pretty bad!)- a heroic job!
John surprised me with a white rose from the florist next door.
A workroom friend took away a bunch of lining short ends.  You just cannot move EVERYTHING.  She will make good use of them!
This little lady- a relic of some apparel-making dreams I once had- is off to a new home!
More photos later...................