THE BLOG IS HAVING TROUBLE WITH COMMENTS! SOMETIMES THEY DON’T GET PUBLISHED, AND WHEN THEY ARE I AM UNABLE TO REPLY TO THEM. IF THAT HAPPENS, JUST EMAIL ME AT stitchlore@gmail.com.

Looking for something specific? Check out the Topic Index, or the Search bar, just below, on the left.


Sorry about this problem!

SO.........WHAT ARE WE WORKING ON TODAY??

Monday, November 29, 2010

Two Fab Fabrics

One is an amazing soft wool paisley, the other is.... I have no idea what.  It feels like.... plastic macrame?  But it's not plastic, because it ironed beautifully.
The wool became a relaxed Roman shade.

It's trimmed with a loop fringe layered over white grosgrain.

The mesh fabric became long drapery panels, which I wish I had seen on-site, but alas I only saw them here.  But the homeowner and decorator flipped over them!  They called twice to say how happy they were.  All hand-sewn of course, except for the actual pleats.  The picture does not do them any kind of justice.  The top-tacked heading has translucent buckram.


Khaki chain weight in the bottom is thanks to Kelly from Scarlet Poppy Interiors in Texas who saved the day!  I tried to order it from Rowley but it is on backorder.  Kelly responded to my plea on the CHF Forum.

And that wasn't all.  We made Roman shades too out of the mesh.  Here they are not hiding the shelves full of supplies and tools.  They are reverse-mounted, but we didn't have to make a self-fabric valance because they went under cornices.

The best part was, we didn't have to put in grommets- just ran the matching tan string through the mesh!

Wednesday, November 24, 2010

Thanksgiving Window Treatment Emergencies!!!

We made this shade five years ago for the oldest daughter in this house, a middle school student.
Now she coming home from college for Thanksgiving.  A string had broken so we removed the shade, re-strung it, and put it back up so she'll have a working shade for her holiday at home.


How could the holiday be complete without this powder room valance installed on Thanksgiving Eve?  This is a traditional Kingston except that the fullness is gathered rather than pleated.
This homeowner bought the creamy white and minty green silk faille at the Brunschwig sale I went to two weekends ago, and- 10 days later- voila: a valance, interlined and trimmed with banding and tassel fringe.
There is a big fat roll of interlining padding the board between the bulky horns, to even out the top line.
I am so glad I do not install.  Look at the right side- that jabot is embarassing!  I just don't see it until the picture is up and the product is gone.  I can't dress window treatments.


Here is another Window Treatment Emergency:  fabric that had been back-ordered since July arrived last Friday, and today two valances and draperies are being installed.  This is super-simple and plain: just a flat piece of fabric pulled up with an adjustable loop, but something about the silhouette appeals to me.  I am sure I would like to see more- more- more what?  Shape, movement, detail- however, it's giving me ideas.


Happy Thanksgiving!  I hope you're not having any holiday window treatment emergencies.

Saturday, November 20, 2010

Not as simple as it looks

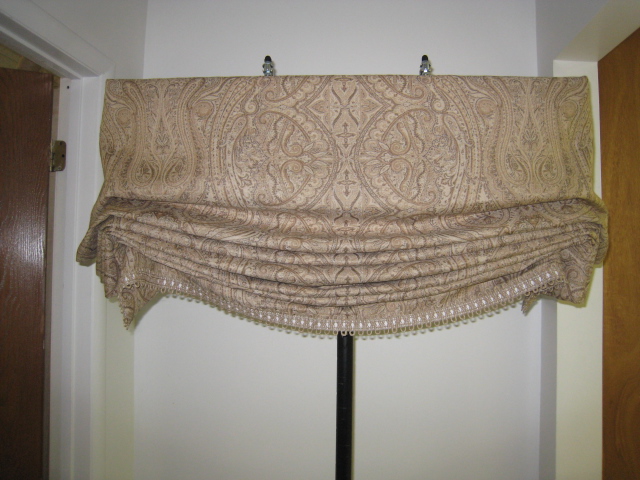
For such a simple-looking valance style, there was not one step in the fabrication that was easy.

We were asked to duplicate this valance, which is made out of a nice sturdy cotton.  Our yellow stripe is a paper-thin fine silk.
Hmmmmm.

The patterns were drafted based on the photo.  There are two valances this size, and one with five sections.
The two small valances have seven individual pieces- 2 scallops, 2 returns, and 3 jabots; and the large valance has 13 individual pieces.

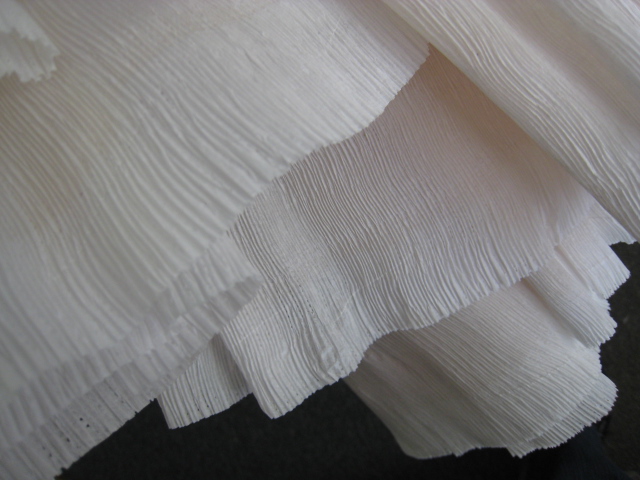
To help make it easier to sew the welt to the stripe without puckering I fused the fabric pieces to Rowley's fabric stabilizer- a knit interfacing that adds stability and substance without stiffness.
Oh, boy, I love this stuff.  I bought it several years ago and never used it til now.
This was as eye-opening as glue basting was earlier in the year!
Interlining might have made it easier, but the order did not call for interlining.

All the little return pieces have a painfully close curve at the bottom, so I took special care with them.  Here you see five of them in different stages of completion:  I traced the piece onto the napped lining and pinned it without cutting the curve in the lining.  Then sewed on the welting and pinned it back to the traced shape and sewed around.  After it was sewn I trimmed off the lining around the curve.  The seams were graded before turning and then the piece was carefully ironed.....

Using this pressing ham to try to keep puckers out of the curve..... with varying degrees of success.  As a 35-year vegetarian, this is the closest I get to ham.


Once all the pieces were cut, sewn, turned, and pressed, time to staple.  The little "jabots" were pleated into place and stapled.  Then to compensate for the bulk of the jabots, I built up the board edge to the same height using rolled fabric, so the top would be even.


At long last, all done!

I'm so glad I'm not installing these.  I dressed these valances a dozen times already, at different stages along the way, and now it's someone else's turn!

Monday, November 15, 2010

A Collaboration

This valance was a joint effort, for another workroom.  They created the wood frame, and we did the sewing & mounting.
The client wanted the illusion of an arched window and provided a template of the silhouette they wanted.

The wrong (gold) side of the fabric was used to create contrast inserts for the pleats, and the welt at top.  This fabric is actually two separate layers that are connected at the pattern only.  That's the second fabric I've had in the past two weeks that is made this way.

Planning the layout took as much time as fabricating.  After cutting and seaming all the sections, the unshaped valance is laid out & pressed.

Blackout lining was sandwiched between the face and the lining, to prevent any variation in color when the light shines through.  Rather than risk putting holes in the blackout that would allow light bleed, the hem was sewn by hand through the lining only.  Really, by the time you figure out how to do it then transfer it all to the sewing machine then turning right side out and ironing, it's faster to just whip up the hem by hand.
And then you have a nice flat piece that lays true and doesn't twist or warp.

Then the pleats were formed, the layers secured, and the frame laid out for cutting the shape of the top.
All that's left is to staple, make and apply welting, and cover the board.
To eliminate bulk and unevenness at the top line, I padded the spaces between the pleats with layers of fabric, lining, and blackout to equal the layers in the pleat sections.

Sunday, November 14, 2010

Shade Glitch

The other night we were stringing three reverse mounted flat Romans, with Rollease clutches.

The first two went fine, then the third one refused to lift more than about 15".

We spent an hour trying everything we could think of. First I meticulously re-strung according to the hallowed Rollease stringing principles I reviewed at the Rollease seminar last month with Geremie Giancola. Everything was perfect and it still stopped after raising only 15".

We wound up changing out virtually everything- clutch, brackets, fiberglass rod, bead lift chain- we unstrung and re-strung about 8 times, we measured to the millimeter making sure the fiberglass was straight, the board not warped or curved, on and on. Finally we changed the last possible thing (or so we thought), and the shade still stopped after 15". I was really and truly at my wits' end. We had nothing else to try, nothing else to change.

This is the wicked little knot
My fried brain had just barely enough juice left to think, "maybe there's a knot in the cord." Ta-da! that's what it was! A little knot in the cord preventing it from passing through the bracket. I was hysterical with relief! dancing around the studio, cackling like a wild witch.

Then we went and got Chinese food for a very late dinner.

Obviously, we had not changed literally everything!..... not the actual string.

I'm still trying to figure out how the knot got there.

It's awfully difficult to hang these reverse mount shades once the valance is on, unless you have another pair of hands, and I was by myself in the studio when I attached the valances.  So this is the best I could do for photographing these shades.

Happily the horizontal stripe was even and true, so it was pretty easy lining up these three shades, which are to be hung side-by-side in a bay window.  I laid out all three crossways down the table and made them all at once to keep them consistent.  
__________________

Friday, November 12, 2010

Yes, two posts today because it's Fab Fabric Friday

I just got back to the studio after visiting the Brunschwig & Fils warehouse sale in White Plains.
Some of the planet's finest fabrics for breath-takingly low clearance prices.  I wish I'd had a LOT of money to spend!
But I restrained myself to something that I'm going to use, for myself.  We need some new shades and here's what they're going to be made from:
The part in the foreground, still on the roll, the mottled pattern, is the wrong side- can you believe that???


When the light shines through, here is what you see:

This is without a doubt The Most Fabulous Fabric in the World!
The second I saw this bolt at the warehouse I knew it was the one.


In case you wondered what's in the plastic bag, here it is.  I'm always a sucker for novelty prints, but when I can say I'm making something for a child out of it, I feel totally justified.  (I have no idea what I'm going to make.  I just had to get this.)


But back to the shade fabric.
 I imagine I'll use the reverse side as banding, or possibly the valance- since these shades will be top-down, or top-down-bottom-up, and will need a valance to cover the mechanism.
 Behind it we think we're going to put another shade, a sheer of some sort.  It's always fun to experiment on oneself.
 If there were enough room, I'd also put a blackout shade in there somehow!  But then we'd have a headrail projection halfway into the room.

This is the second post today, so just scroll down a bit to the next post to see one of the valances we delivered this morning.

Make-over

Here is one of four valances that we just made out of two pairs of draperies that we made about 3 years ago.  The client has moved house, and now has four windows in her daughter's room, so each panel of one and a half widths became one of these balloon valances.  There was just enough to allow for a ruffle for the bottom.
It's barely shirred- after it was hemmed the piece was only 75" wide to cover 54" of board (including the returns)- but the four-cord shirring tape gives the illusion of more fullness than there really is.  And they're interlined, which gives substance to the chintz.  The half-width seam is right in the middle of a pouf but it was well matched and doesn't show.
This style is very messy as an operable shade- it took a lot of dressing, and, I know, it could use a little more!  We used 54" in length of face fabric, plus the ruffle, to make these valances.  We tied up three rings and the valance is adjustable so it can be set where the decorator likes it.   I like it set here at about 30" long.

Saturday, November 6, 2010

off-topic: November, my favorite month

e. e. cummings

who are you,little i 

(five or six years old) 
peering from some high 

window;at the gold 

of November sunset 

(and feeling:that if day 
has to become night 

this is a beautiful way) 

Friday, November 5, 2010

Some Fab Fabric Friday fabrics, made up

I love this motif!  I made this pillow wrong side out by mistake and had to pick it apart and re-sew it.....serging and all.  
For all Greek Key lovers, a variation, in rose.
I don't know what this fabric is, not quite taffeta, not quite satin, a steely grey shimmery stuff that has a wonderful drape, especially interlined.  Modern 2" no buckram 2-finger French pleats.  There was a little scrap left over which is the backdrop for the pillows above.

Wednesday, November 3, 2010

Shawl to Pillows

I was asked to cut up this amazing shawl and make it into pillows.  The 12" fringe was hopelessly tangled, and the client's decorating taste had moved on.
Since the shawl was a family heirloom, she wanted to preserve the memory in a form she could more easily use in her home.
Cutting this hole nearly killed me!
I love the border.  I wish the client had wanted it incorporated into the new pillows; oh well.
I wonder who wore it?
I

Tuesday, November 2, 2010

Those pleats

Something I forgot to show you a few weeks ago, so here it is now.
That chocolate brown pleated fabric came on a roll, sandwiched between two layers of paper which had been pleated with the fabric.  The paper had to be peeled off of both sides of the fabric.  Now I have 18 yards of this pleated paper- I don't know what that paper is made of- and it needs to be used for something fantastic.

Monday, November 1, 2010

Shades

Beautiful embroidered linen
Here's a handful of recent shades:
Brunschwig "On Point" with bullion fringe

Sheer embroidered linen, unlined