THE BLOG IS HAVING TROUBLE WITH COMMENTS! SOMETIMES THEY DON’T GET PUBLISHED, AND WHEN THEY ARE I AM UNABLE TO REPLY TO THEM. IF THAT HAPPENS, JUST EMAIL ME AT stitchlore@gmail.com.

Looking for something specific? Check out the Topic Index, or the Search bar, just below, on the left.


Sorry about this problem!

SO.........WHAT ARE WE WORKING ON TODAY??

Friday, November 22, 2013

Color!- on fab fabric Friday!

This project with Katherine Stern is one of my favorite projects of all time.  First, Katherine's color sense and overall aesthetic jives totally with my own style and preferences.  (Click on the link to check out her website- if you love color and pattern, you'll love her work!)  The room is not quite finished- walls, floors, furniture, and windows are done but accessories, artwork, and the grand piano are still to be installed.
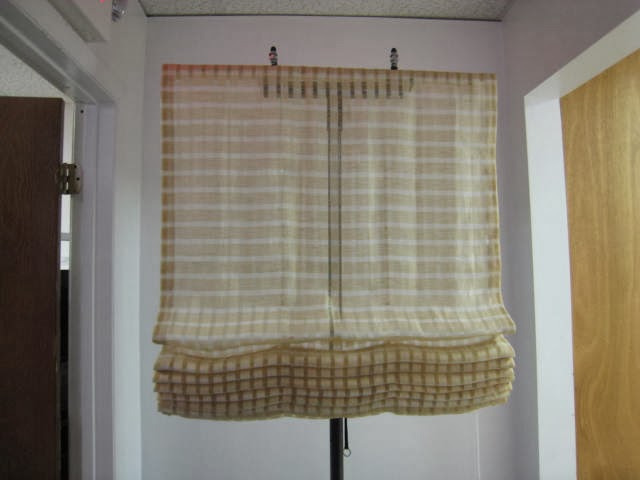
We fabricated mock hobbled valances to provide continuity across a large space, originally two separate rooms, with 7 windows of 5 different sizes.  The bay area at the end will soon have a black grand piano, so there are solar shades under the valances to protect it from the sun.
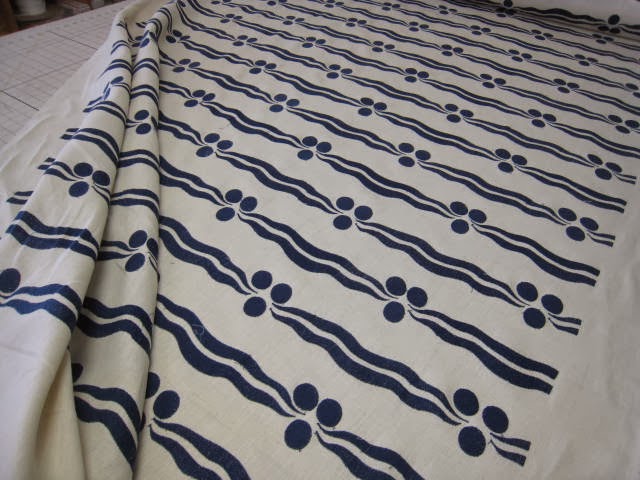
The fabric repeat was perfect for this style, allowing the pattern to flow uninterrupted.  I totally forgot to take a close-up to show how the valance has depth and dimension- next week I hope to have a chance to get some more shots.  This is the closest I got:

Prints are not always on-grain, but it was critical to cut the strips perfectly according to pattern, so I used a transparent ruler to draw a line from point to point across the width.  Although the line was curved, the fabric was stapled on straight, and the slight "smile" didn't affect the outcome of the product.
Katherine wanted the valances to have depth and dimension.  She didn't want the fold sections to be flat and taut, but instead look shingled.  To achieve that, I used bump but didn't line the entire strip the way I learned in Ann Johnson's webinar; rather, I cut 9" strips, and rolled the bottom half so it would make the fold kick out.  It worked perfectly.  (That's what I forgot to take a close-up of!)  To keep it from slipping, I used a tag gun to secure the fold in a few spots before stapling it on. 
I marked my strips "bottom", "A", and "B", and laid them out on the table along with the bump strips, of which I used three different sizes and folds, so I layered them in the order in which they would be used, to keep from getting them mixed up.  Then I worked one at a time, hanging them on my Workroom Valet so I could sit on a chair for finishing the ends. 
You can't tell from the photos, but the center window of the bay was a tough one to treat.  The molding went into and just past the angle in the wall.  I had the valance frame constructed so this could be taken into account on-site and have some flexibility.  The legs did not go all the way back to the back of the dustboard.  I had the dustboard made narrower than the molding, and the face was added on separately and was slightly wider than the molding to molding measurement, so it wouldn't look too small.

 The spaces between the bay windows were different, so we nudged each of the three valances in different directions: you don't notice it, but the valances are not centered on the windows; however, the gaps between them are equal, which was the only way to deal with the imbalances. 
I can't wait to see this space when it's all finished!  As the installer said- "This job was food for my soul!"

Wednesday, November 13, 2013

Change of pace-

Elizabeth Harlow asked me to make a small make-up bag as part of her package for the silent auction benefiting Girls Inc at tomorrow's fund-raising event.
Elizabeth designed a gorgeous handbag for the auction's theme, Power of the Purse, and it will be auctioned,  along with other one-of-a-kind designer handbags.
The organization's motto, "Strong, Smart, Bold" is embroidered on the accompanying make-up bag.
The bag is lined and trimmed with a vintage linen print.
The handbag's strap was repeated on the make-up bag as a trim.
I haven't made something like this in, well, decades, so I really enjoyed having fun with this project.

Monday, November 11, 2013

Left to my own devices.....

....here's the sort of thing I might make for myself or for a friend or relative who shares my off-beat taste: as a matter of fact, I did make this, for our nephew's house.  They needed an inside mounted curtain for a doorway, so I rummaged through my fabric collection and found that this favorite embroidered cotton was perfect.
Happily, another awesome hoarded treasure worked wonderfully as a top band.  Folded in half lengthwise, the embroidered fabric was wide enough only if the selvedges were left on, so I ran rows of machine embroidery in complementary colors to fill in the wide solid area.  The selvedge had a natural fringe, which was very pretty and begged to be seen, so I left it on and did not turn it to the inside.  Lastly,  I raided my super-special trim drawer and found a little multicolored ribbon for small tabs.  This curtain always gets a lot of smiles!

Thursday, November 7, 2013

Re-purposing

Sometimes you have to abandon your standard fabrication practices in order to achieve your goal.  Monica wanted four Roman shades...
to be made from the customer's existing rod pocket curtains.
The first project was to see if it could be done: the curtains are made from a beautiful linen sheer, but there were various pulls, tears, and stains to cut around, like the one below.
We just made it- that stain is 1/2" from the top edge- but to do so, we turned the fabric upside down and made the hem serve as the weight bar pocket, because the rod pocket top was crumpled from being gathered on the pole, and though it ironed beautifully, creases like that just wouldn't come out well enough to serve as the top- and focal point- of the shade.
The gridded canvas table makes projects with sheers go more quickly and more accurately.  You just line up the grainline with the printed lines.
It was impossible to pick out the original pocket stitching, so I just left it in, inserted a covered weight bar, folded the hem, and hand-sewed it all loosey-goosey so it wouldn't pull.  Not the standard practice, but it was the only way to make this job work.
Ladder tape in this soft gold blended perfectly with the fabric.
I keep it in these three colors, plus natural:
There was JUST enough fabric to make one permanent fold at the bottom, to hide all the weight bar and pocket stuff.

Wednesday, November 6, 2013

That slanting fabric.....

I keep meaning to up on a project from the spring, draperies with a fabric that was woven with about a 4" slant.

 The vendor, Vaughn, had it sent off to Griswold in Rhode Island to attempt to stretch the pattern straight.  When I got it back, it had improved to within 1", so the decorator gave the go-ahead.
The decorator and homeowner were very happy with the outcome.  I can see the slant, but to a casual observer, I think it just looks natural.  These are flat panels with little channels for inserting the drapery hooks for the rings.

Monday, November 4, 2013

Pattern placement

Pattern placement on window treatments is often left to the workroom's discretion.  Amongst the factors that need to be considered are the dominant motif vs the alternate motif, and color, shape, and tone.  How the pattern will be "read" when folded, draped, or pleated must be planned.
On a top treatment consisting of multiple sections, the rule of thumb is to make all the sections the same.  These five 60"  tailored valances, however, in a busy monochromatic print with a single center pleat each, will go around a pentagonal bay window area.  The ends will be butted up against each other, so the pattern going around the room  will be interrupted, which is why I thought that continuity of pattern on each individual valance was the most important factor in choosing my layout.   Tonal balance of light and dark was second most important.
By matching the pattern in the center, the same floral motif that is split at the center pleat also repeats at each end, balancing the darks at the ends.  This also allowed the bird and butterfly to be featured in the lighter centers of each section.  The two sections are not identical. 
The pieces were cut offset so the seam joining them would not be in the middle.
Under the center kick pleat, the fabric is smooth and continuous, the seam hidden in the fold.