 |
| Horizontal stripe for bedskirt; the three-layer trim repeated on throw pillow. |
Monday, April 25, 2011
Another showhouse peek
Packing up goodies today. The furniture is in place and tomorrow we'll put the bedding in place.
Friday, April 22, 2011
More on Showhouse Draperies
The showhouse draperies were installed this week- and I continued to have camera woes. I forgot my regular camera, and thanks to some lighting issues, the iPhone pics I took are not too great.
 But here is one shot, at least. The panels are stapled to a curved board, and dressed with luscious, luxurious tassel tiebacks, which, as you can see, are not shown here.
 Once the panels were sewn, I made a sampler of pleats for Susan to choose from.
 We both had the same favorite: a three-finger fanned pleat, henceforth dubbed "the showhouse pleat." The center finger of the pleat is more prominent than the two side fingers, and the back of the pleat is fanned out and tacked- actually once on the board, the fanning is reinforced by the staples inside the pleat that attach it to the board face.
 Also in the running: a regular three-finger pinch pleat, side-tacked:
 Two-finger pleat, too casual for this room, though it's one of my favorite pleats:
 Goblet pleat, nice enough but too predictable:
 Three-finger regular pinch pleat, front-tacked, which I really love, but for this situation Susan preferred the side tack:
 And top tack, which is just wrong in this context and with this fabric:
because of the embroidery, the fabric was not consistently pliant, so the embroidered parts were stiff and bulky while the plain parts were supple, making it impossible to create even fingers.
 The original inspiration was a storefront drapery display Susan saw at Cowtan & Tout in London, with a four-finger flared pleat; but this bulky, interlined, embroidered silk was impossible to shape into four fingers, for the same reasons as the top tack above, as you can see:


because of the embroidery, the fabric was not consistently pliant, so the embroidered parts were stiff and bulky while the plain parts were supple, making it impossible to create even fingers.

Monday, April 18, 2011
Super cool wall drapery

The wall of 10-foot-long draperies was wildly successful. In a pre-war apartment on Riverside Drive with limited storage space, these draperies disguise an area about 18" deep where the homeowners keep everything from books to golf clubs.


To read more about how these curtains were made, scroll down a bit to the post from April 4.
Monday, April 11, 2011
Sweet Little Trim


I suppose I could've glue-basted it but I didn't want to give it the satisfaction.
Saturday, April 9, 2011
The showhouse- a preview
 |
| How about this amazing trim? |
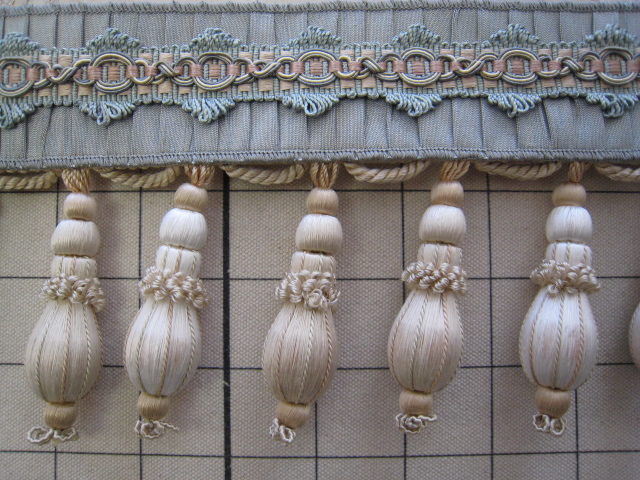 |
| When I saw the sample I wondered who makes it. |

Actually, it turns out there are three separate trims, and we are creating it ourselves. The loop gimp was adhered to the pleated silk band.

I'm afraid this multi-layered trim will have to be hand-sewn to the drapery, because it is really, really heavy. I like to do hand-sewing during Yankees games. Hey, there's a game this afternoon! Guess what I'll be doing?
Friday, April 8, 2011
Seeing is believing


Monday, April 4, 2011
Order from Chaos
One of my favorite parts of any job is the transformation of chaos into order. For most jobs, we start off with a neat roll of fabric which we unroll and cut up into pieces. Then we sew them back together and we have created something new.
This laser-cut fabric is the personification of disorder.


 This has been made up into six panels, each 12' long, Parallel rodding will be ceiling mounted with three panels on each, overlapping, to create a 161" wall of curtain to create a storage area in a pre-war apartment on Riverside Drive.
 We cut several hundred circles off of each panel so it could be hemmed on all four sides.
 The top has clear 2" buckram with parallel lines of stitching to create channels for the drapery pins.
 Tamed and ready to go!

This laser-cut fabric is the personification of disorder.


Sunday, April 3, 2011
Tiny bias band


Also luckily, the stripe remained straight after blocking- it had quite a "smile" to it at first. Trimming off the selvedges helped and then a lot of obstinate pressing.
These shades are blackout lined, ribbed, and strung with encased cord.
The bottom would have had to be faced even if it hadn't been banded. Despite its small size, that narrow bias banding was a lot of work!
Friday, April 1, 2011
Austrian shades

Subscribe to:
Posts (Atom)