THE BLOG IS HAVING TROUBLE WITH COMMENTS! SOMETIMES THEY DON’T GET PUBLISHED, AND WHEN THEY ARE I AM UNABLE TO REPLY TO THEM. IF THAT HAPPENS, JUST EMAIL ME AT stitchlore@gmail.com.

Looking for something specific? Check out the Topic Index, or the Search bar, just below, on the left.


Sorry about this problem!

SO.........WHAT ARE WE WORKING ON TODAY??

Wednesday, August 31, 2011

Hurricane Hiatus

Well, Leatherwood Design Co remained dry during Hurricane Irene.   We had a flash flood during a Hudson River thunderstorm about 5 summers ago; luckily I was in the building at the time, and was able to rescue everything that was on the floor and we lost next to nothing.  Since then, we've been very diligent (/obsessive) about taking precautions against any chance of water damage.  Our landlord did an awesome job after that storm, creating very effective new drainage, but I am still leery of a repeat of that flood.

Everything at floor level is in plastic, or on pallets.  Nevertheless, for Irene we moved virtually everything to table level; this was a hurricane, after all!  I'm happy to report that there was not a drop of water in the building.

We finally got power and telephones and internet back, so things can start to get back to normal.  I hate to waste a cleaning opportunity, though, so while everything is still up on the tables, we're getting under and behind places that haven't been cleaned since that flood......

.............including the windows.
The embarrassingly dusty windows.
When we moved into this space the five big windows had mini-blinds, and now, 11 years later, they are a dusty, crumpled mess.  So today I took them all down and threw them out.
Now the big question is: what to put on the windows?

Oh, what possibilities!- a window treatment workroom choosing window treatments!  Well......

I don't want shades, because I don't want to ever see bare windows when the shades are raised, or a wall of fabric when they're lowered.  I do not want curtains, not even cafe curtains.  I don't want fullness, I don't want silhouette, I don't want clutter.  I don't want color, I don't want pattern, and I don't want different treatments on each window.  I want lots of natural light, and I want to be able to control it.  I want to be able to see out. 
I want new mini-blinds.
I'm always surrounded by ever-changing pattern, color, line, and volume; I don't want distraction on my own windows while I'm working.  Even though many workroom visitors say "but what a great opportunity to make and show off samples!!"............... 
..........I want new mini-blinds.
Cheap, plain, white, mini-blinds.
Tomorrow's project!

I'm hoping to get back to normal working and posting right after Labor Day.
Thanks for reading!


Wednesday, August 24, 2011

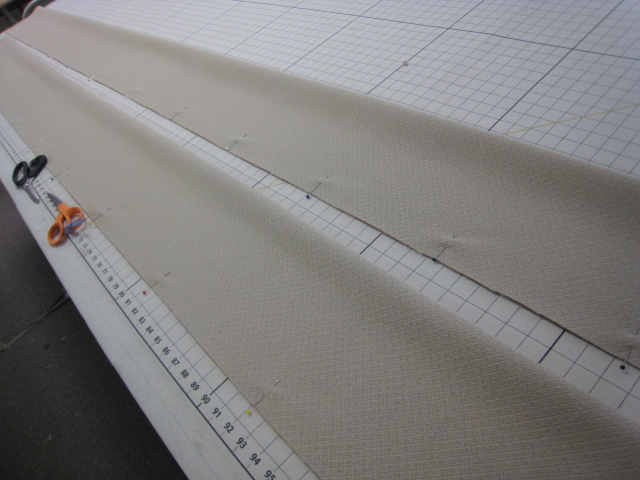
Drafting Scallops: "And all you got to do to join....."


There's been a run on scallops.  That is, I've done my second scallop project in a month.  Normally scallop projects are years between.  In July it was the lavender scalloped drapery lead edge, for August it was a scalloped bottom for a Roman shade.


 If I have to draft a third scallop job in September, I'll start to wonder if I missed the memo from the Organization of Scalloped Edgers.  And if fifty folks come in and order scallops, I'll believe that it's a movement.  And all you got to do to join, is start drafting those scallops- thank you Arlo! 

Drafting scallops: stuff I learned from my momma.
She didn't teach me to draft scallops, per se, but she taught me how to use a grid and points and lines; compasses and squares and straightedges.  I was a very little girl.  I kept her company when she made posters for church or school events, and she explained every step of her process.  My mom could make anything.

For these scallops, I drew parallel lines, thinking I wanted a 2" short point, but once I had the lines I knew I really wanted a 1.5" short point.

I refined the lines til I had something I liked.

I folded the template to get a mirror image, (you can see your lines through the paper if you use a black Sharpie), cut it in half,

then flipped it, made sure the scallop shape was the same upside down as right side up.

The shade was fully made before the scallop was cut and sewn.  Actually I should say, sewn then cut.  I love my purple pens- I draw all over the backs of shades- but the purple kept disappearing from the blackout lining so I had to draw in pencil.  The weight bar pocket was sewn into the facing, then the facing sewn to the uncut scallop.  The seam allowance was trimmed, clipped, and notched, turned to the right side, and one stitching line attaches the facing to the shade, at the point where the bottom rings will be attached.    

Cute green trim applied:


The shade was strung with mesh tube shroud, cord idler pulleys, and a cord lock.  Sorry no picture of it on the stand.   

Friday, August 19, 2011

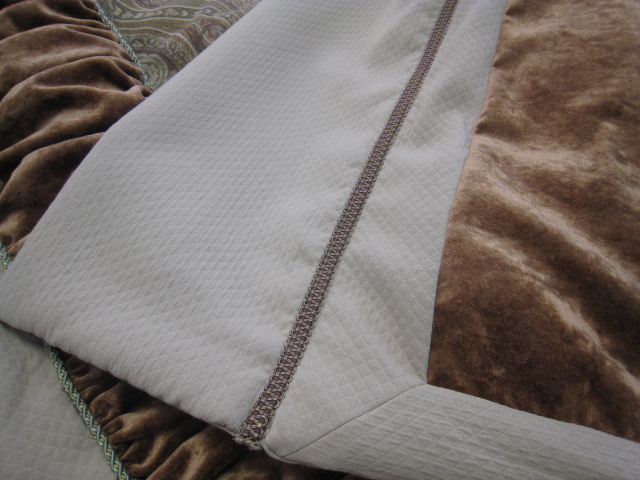
Modifying a duvet cover

Remember this bedding ensemble from a month or so ago?

Unfortunately the duvet was too narrow for the bed.  Both the bed and the duvet were odd sizes, and even though the client had used them together  for years, once the duvet was in a cover, it was obvious that it was too narrow.
 

After a brainstorming session with the designer, we decided to add to the width with a flange.  The client needed to keep the cost down, and I wanted to be sure the flange looked as if it had been there all along.  To keep the labor down, I didn't want to open up the serged seam if we didn't have to, or remove the snap tabs inside.  I wanted to avoid extra bulk, and I didn't want any hand-sewing- it's a heavy bed-covering, and it needed strong machine sewing.
So our post-vacation mission was to create the flange to extend the sides and make it not look added on.  With a sudden flash of inspiration, I realized we could use the braid trim to actually join the flange to the main cover, as well as to hide the join.  That would eliminate excess bulk.  We sewed two long tubes for the flange, open at each end..........

The front flat braid was sewn to the cover, just overlapping it halfway,

then the flange was tucked under the other side of the braid and sewn.

The duvet cover was flipped over and a row of flat braid was sewn onto the back side.  It was fortunate that the braid on the front was nubby and patterned, to hide all the rows of stitching, otherwise this process wouldn't have worked.
The ends were sewn shut by hand.  I had to leave that to the last, because I was sure that if I sewed the flanges to size beforehand, something would stretch, or shrink up, and the pieces wouldn't fit.

To stuff the cover, we turned it inside out, snapped the duvet to the cover, then gingerly turned it right side out, all as one.  Heavy work!-  you practically have to crawl inside it. 


Here's the flange from the front.....

And from the back.

And by the way, those three Milan valances were for this master bedroom.....  Now that the duvet cover is finished, I hope we'll be receiving a nice photo of the completed room.

Wednesday, August 17, 2011

Back From Vacation, Best of Westchester, and Up Next:

Leatherwood Design Co was included in this summer's "Best of" edition of "Westchester Home!"  Click here and scroll down for the on-line article.

Vacation is over, back to work, nothing left but to occasionally check out the webcam of the Cape May beach I love so much, and book our autumn trip.

Plenty of work in-house to get busy with.......

....including this very enticing project- 6 motorized shades out of "What a Hoot," a Harlequin fabric imported from England.


Saturday, August 6, 2011
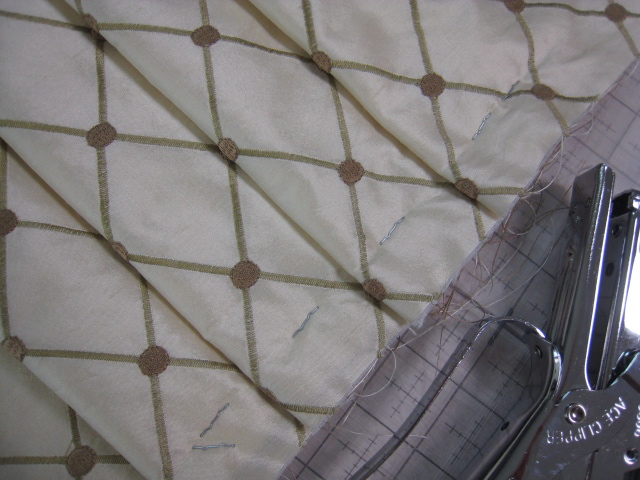
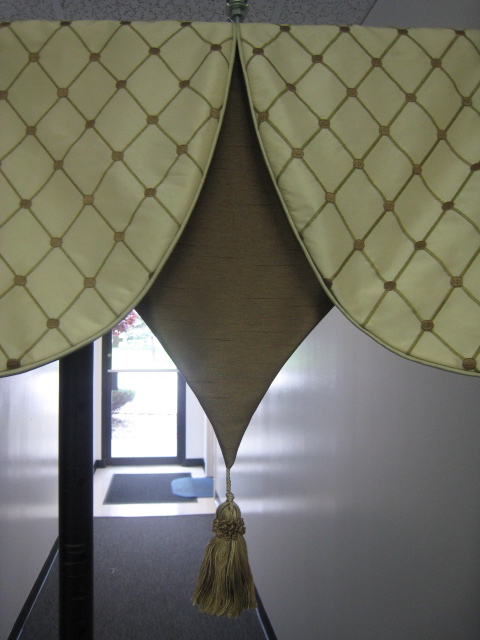
Milan valance

I was happy to have an order for 3 Milan valances- the second time recently that someone finally ordered something I'd been dying to make!  (The other time was the panels with the scalloped lavender lead edge.)

I assumed I'd use the M'Fay pattern, but unfortunately my valances were only 34" wide, too small for the pattern and too drastically different to modify it.  I'd have to re-create it from scratch.   Hurray, who doesn't love an opportunity to practice their pattern-drafting skills?

I used the designer's sketch which was drawn to scale.  It took a couple of muslin copies: first to get the proportions right, and then to re-proportion it to allow the diamonds to match on the pleats.

The way that I decided to layer the fabrics required a three-step cutting process.  First the face, then the face with the lining, nestling the curves to save on fabric; 

then the face down against the interlining.  When the valance was turned to the right side, I wanted the interlining layer to be seam allowance layer that sat next to the face fabric, because I didn't want the bumpy embroidery to show through.

Grading the seams, clipping the concave curves, notching the convex curves, turning, and pressing takes as much time as the actual sewing.

A boo-boo
On four of the six pieces I needed to re-sew the curve because I didn't get close enough to the microcord the first time, like this:

I staple-basted because I had a funny feeling that I'd have to do some adjusting of the pleats on the board, and I was right.  It took some fiddling to get everything just right.

But look: beautiful, I think!

And now...... 

We are going on vacation!

cya later!

Thursday, August 4, 2011

Cord idler pulleys

These white matelasse shades are trimmed at the bottom with purple grosgrain ribbon and lavender gimp, although in the photo the trims read royal blue... 

We used a cord lock along with cord idler pulleys from Rowley to help the shades raise easily, for two reasons:  
The shade in the photograph is small, but the other was quite wide; so, first, since the context dictated a 1" headrail, there was no room for a clutch; and secondly, both the matelasse face fabric and bonded interlined blackout lining were heavy.

The pulleys were a great help- the cords glide smoothly over the little wheels instead of scraping across metal screw eyes.  The only screw eye is at the end with the cord lock.

Mesh tube cinched with cable ties was used to shroud the lift cord.   At the top ring the cord is fished out from the mesh tube and runs up to the headrail.....

...while the empty mesh shroud continues up to the headrail and is stapled to the top of the board, for a neat finish.  This part needs to be done before the headrails are covered with finishing fabric.  

The lining is the new Bella Notte Centurion: blackout with cotton flannel interlining fused to the wrong side.  It's soft and drapey, and the interlining adds bulk- none of that unpleasant "rubber pants" blackout feel.

Tuesday, August 2, 2011

Lovely Lavender

How pretty are these panels??  I've always wanted to make a drapery exactly like this-

and finally someone ordered it.  A contrast scalloped lead edge-

with microcord- on the straight side of the band, that is; what looks like microcord on the scallop (at the bottom of the photo) is actually the back side of the band, with the fabric rolled around from the front to give a clean front edge.

My favorite two-finger pinch pleats.

The scallop was drafted onto pattern paper then drawn with purple pen onto the fabric.  Both the front and the facing were reinforced with Rowley's fabric stabilizer, which made this soft linen easy to work with. 

Using a tight machine stitch, the scallop was sewn along the drawn line, then trimmed to a little under 1/4".  The concave parts of the curve are clipped, to let the seam allowance stretch out when the fabric is turned to the right side.  The convex parts of the curve are notched, to reduce the bulk in the seam allowance when the fabric is turned.

We sewed the microcord to the scallop lead edge, then to the drapery.   I guess that was the most tense part of the day, and picture-taking was forgotten about!
The fabric stabilizer made all the difference- the band pressed out perfectly to shape, and without a pucker.
With a finished length of 100", I made the band 100.5" long to allow for the possibility of a little shrinkage when it was sewn to the main drapery fabric- a good thing I made that allowance because it came out to 100" exactly.
 

The facing was hand-sewn to the panel, and encased the raw edges at the top and bottom.  Here's the back of the top.

I have to say, I love these panels!  They were installed yesterday, and I hope I eventually get a photo of them.  (hint!)