THE BLOG IS HAVING TROUBLE WITH COMMENTS! SOMETIMES THEY DON’T GET PUBLISHED, AND WHEN THEY ARE I AM UNABLE TO REPLY TO THEM. IF THAT HAPPENS, JUST EMAIL ME AT stitchlore@gmail.com.

Looking for something specific? Check out the Topic Index, or the Search bar, just below, on the left.


Sorry about this problem!

SO.........WHAT ARE WE WORKING ON TODAY??

Thursday, December 29, 2016

Coming up in 2017- all about education!

Well, will you look at that?  2016 is nearly over, and I haven't told all my stories yet!  I confess that for the past week and a half, I have been focusing on life, family, and rest.

I found this photo.  I guess you can tell which of these ladies is me:
I come from a lineage of makers on both sides of my family; here I am at 6 months with the maternal side:  my mother, her mother, and HER mother, in Fort Worth, Texas.
Cronin-Dalton-Foster-Leatherwood-Lowe.

When I look at this photo, I realize why I have this blog, and why I have become involved in education in this Soft Furnishings industry.  These women who went before me were all self-taught at everything at which they excelled, and they all passed down their hard-won knowledge. 

Now that I've finished resting up, taking down our Christmas tree this afternoon, I'll catch up on the blog stories that didn't make it in this year.
I'll also be focusing on upcoming educational ventures.

I'm on the  D & D Pro Network calendar for February with a webinar on Sheer shades.
 I'll finish up my presentation on Streamlining Top Treatments for the Custom Workroom Conference 2017 in May.

 For CWC17 I'm also updating my class on Relaxed Roman shades.

I'll be recording a podcast with Ceil Weiss DiGugliemo.
Check out her podcasts at Sew Much More Custom Sewing- they are wonderful and inspiring!

I'll be adapting my Efficient Shade Making presentation to become a hands-on class for WCAA chapters- or anyone else too!
Rosemarie Garner and I are collaborating to create an interactive presentation on challenges and solutions in shade design and fabrication.
Future classes are coalescing- for instance, techniques for working with blackout lining for shades and drapery to achieve no pinholes of light..

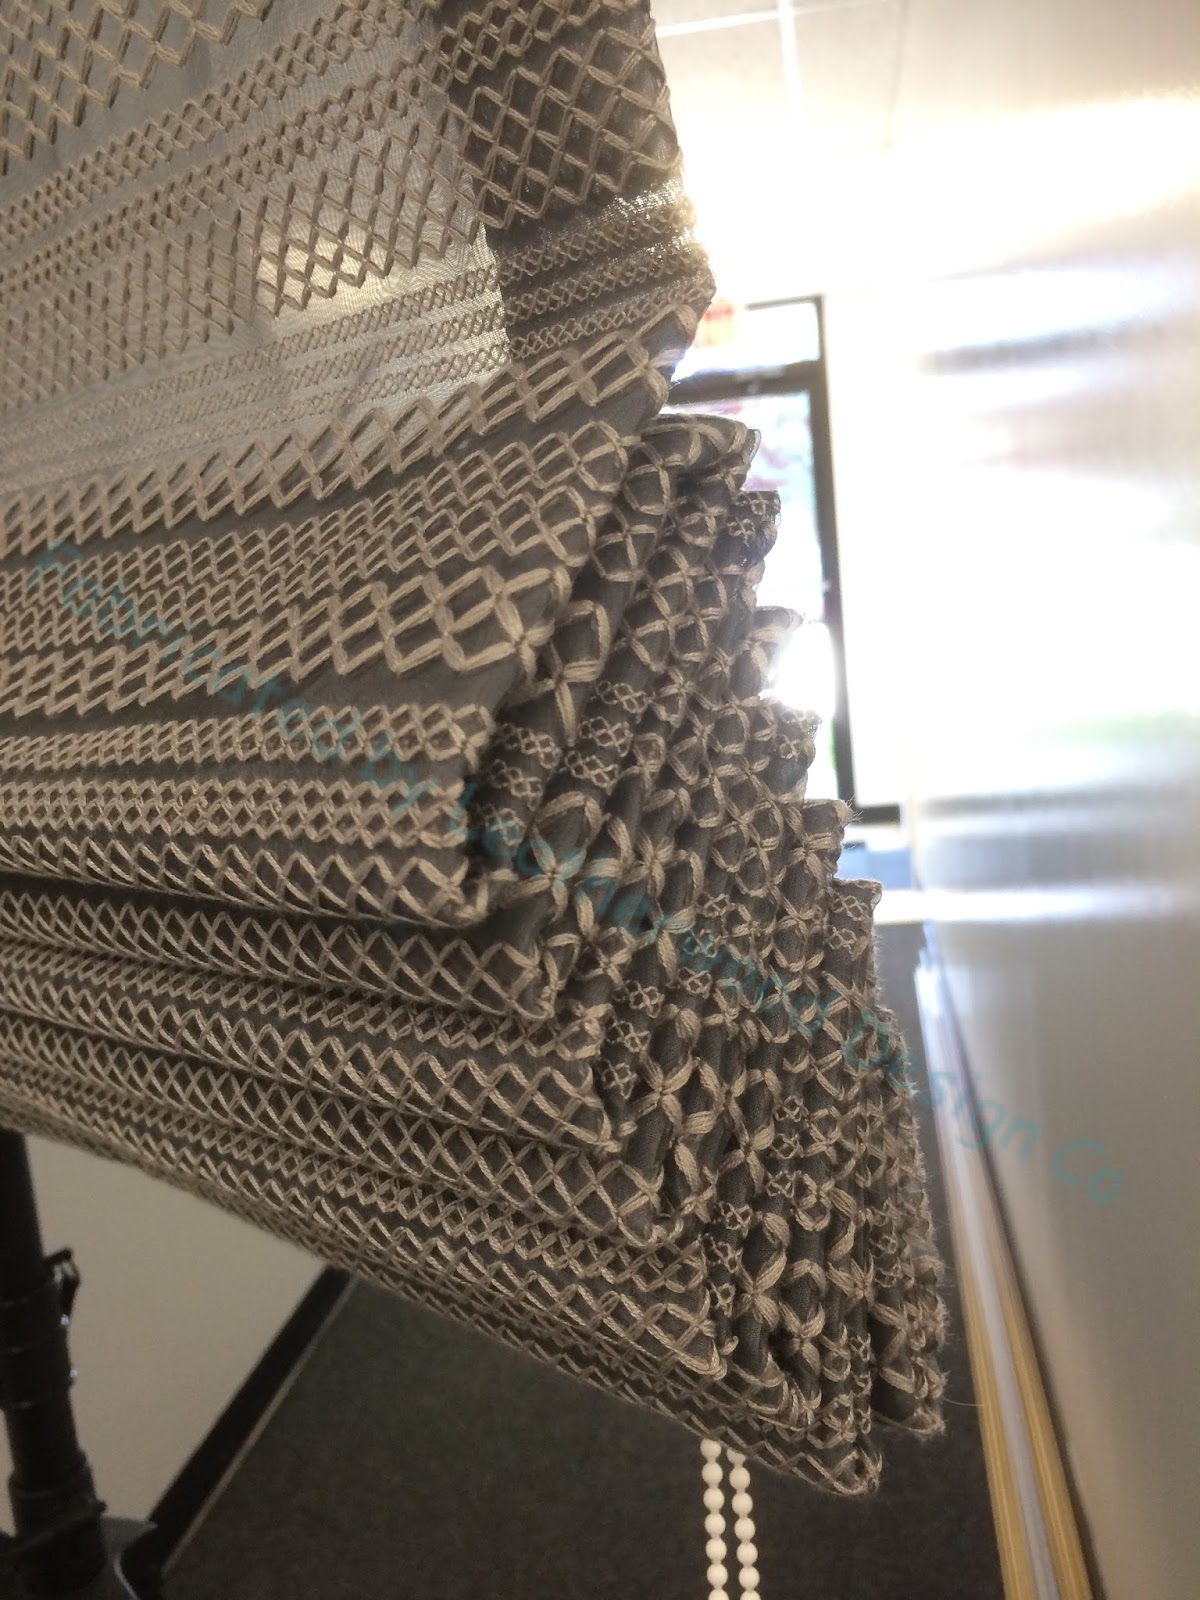
Last but not least, I'm playing with brand new ideas for crossing techniques from creative textile arts with professional soft furnishings fabrication standards, inspired by this applique-on-sheer shade we made a few years ago.
Stay tuned!  It's going to be a great year!


Tuesday, December 20, 2016

Pinch pleat valances

Last week I delivered 3 separate orders for simple pinch pleated valances.  The fanciest they got was matching covered buttons.  This fabric was railroaded, so the striated weave runs vertically.
For this valance, I didn't need to cut the sections and pleats separately; the width of the sections and the horizontal repeat worked out so I could simply join the widths.  The pleat had slightly more fabric in it than usual, about 10",  so I made a four-finger pleat.
One simple step turns a utilitarian pleat into a decorative pleat: instead of tacking through the pleat by machine, I like to hand-tack over the pleat, so the thread is visible.  I use fusible 4" buckram from Rowley Company for valances like this: it folds well and holds its shape without crumpling, and keeps the top line straight.
I also like a four-finger pleat when covered buttons are being added; the center fold is a good nestling spot for the button shank.  There is about 9" in these pleats.
There were three or four of these little shorties, for a kitchen, all different widths.  The buckram was split to create a dainty 2" pleat on these 10" long valances.  The sections and pleats were cut separately and joined, so the pattern matches from one to the next- standard operating procedure for me and my fellow workroom colleagues.  This step might be unavailable, or upcharged, from a factory workroom.
I thought a 4-finger pleat would look out of proportions on these short pleats.  There's about 7.5" in each pleat section- still generous for a three-finger pleat.
Some workrooms line all valances with blackout; some also interline everything.  Since I work to the trade, I lined these with plain lining as per the designer's specifications.
For those of you who have read this far, I will add an explanation of why I have not posted every day as I had hoped: an event occurred in our family and my attention was necessarily focused there.  But I'm back!

Friday, December 16, 2016

Heavy-weight French blackout shades

Upholstery fabrics make stunning shades, and I have a few techniques for working with the extra bulk.
These shades are extra bulky because they are lined with French blackout.
Double side hems, the default standard, would've been really thick, so I improvised to create a single hem.
 For French blackout, interlining and dense black cotton sateen are layered between the face fabric and white sateen lining.
I fold the layered lining, then cut while still folded, to grade the layers and avoid a blunt, thick edge.
To reduce bulk, instead of a double side hem, I sewed twill tape to the edges, then hand-hemmed.  (I always hand-sew side hems when I use interlining.)  One of the two shades was just 3" less than the width of the fabric, so I didn't have enough to make a good hem anyhow, without piecing it, which would've been even bulkier.  I kept the selvedge and sewed the tape over it.  For the other shade, I trimmed down the side hem and added twill tape to create a single hem.

  In this picture you can also see how severely I graded the bottom hem to keep the white lining from bubbling up from the bottom fold.
It looks pretty cool, I think!
I baste the layers before stapling bulky fabrics to a board.  This helps them grade themselves as they fold over the board edge.  Since a shade is flat all the way across, I don't cut out the inner layers of interlining as I would with a treatment that is pleated onto a board, where thick layers build up and look lumpy.
I'm loving the new grey lining.  It's available from both Angel's and Hanes.

Tuesday, December 13, 2016

Catching up-

Oh I had the best intentions of posting every single day until Christmas, but really, the last two days got the best of me.  We made 19 shades and 7 valances, between Friday-Monday.  So I guess that's why I didn't have time to do a blog post!  Here is a sampling.
One of 15 relaxed romans, this one with dog-ears, 1" returns, and 1/2" top welt:
Antique satin makes a nice, drapey shade, and sleek top welting:
 Ten of the relaxed romans were machine-sewn, pillowcased with a 1" side hem.
We made all 10 at once, which speeded up the process.  Here are the other 9, waiting to be board-mounted and strung.  And guess what that cream-colored fabric is- yes, more antique satin......
This dog-ear valance was made a couple of weeks ago, same style, different proportions: about 45" wide, with 3 1/2" returns, rings set in 6" like the blue one above.
How about this embroidered beauty?
This is my way of making non-functioning flat roman shades to be used as valances.  Thank you Scot Robbins!   If you leave a bit of lift cord, the treatment is slightly adjustable with the orbs.
 This shade is part of a bigger story, to come later, but, this shot is useful for illustrating the kick-back of flat romans when they are hanging freely without a window to hold them forward.

Saturday, December 10, 2016

Afternoon light, scones, four-finger pleats

Who else is working today?  It would be such a lovely day off, but, so far, I've encountered plenty of working people today: a drapery maker (other than me), a psychotherapist, a postal union official, a landscaper, a coffee roaster, a potter, a gas station attendant, my personal farmers Pam and Melissa- and I'm grateful to be two weeks away from Christmas and having steady, satisfying work.
The late afternoon light in my studio is superb.  How could I want to be anywhere else?
Right now I'm working on shades, with this lavender and cream casement stripe.  "Lavender and cream" yum to me it sounds like a scone.  Or a bar of soap.
While I've got your attention, I'd like to ask: who says pinch pleats must have three "fingers?"  We all routinely do two-finger pleats nowadays, but what about four?
Especially with a button.  Four fingers gives me a nice snug spot to nestle in and secure the button shank.

Friday, December 9, 2016

The elves are at work.....

To give you an idea of what we're up to: I've cut all the lumber, weight bars, and ribs, and prepared some of the clutches for every job that needs to be finished by Dec. 16.  We have ripped all the lumber that needs ripping so the lumber is stacked on the bandsaw and tool chest.  The weigt bars and ribs are labeled and bundled.  More clutches need to be assembled and a few RBS systems still to be ordered.
I take my skill saw to Home Depot with me to cut down oversize pieces in the parking lot, so they'll fit in the car:
Finished shades are starting to accumulate.
And these 9 relaxed romans are ready to be mounted and strung, to go out tomorrow afternoon:
Ho Ho Ho everyone!

Thursday, December 8, 2016

Party day

Late post tonight!  I spent the afternoon in New Jersey at the NJ WCAA Chapter's holiday party. 
All the way home I thought about the network of resources and support within our industry.  I'm so happy that I found my way into this community!
The NJ chapter is composed of both designers and workrooms.  Whatever path led each of us to the Window Coverings industry, we all share a love of making things beautiful or making beautiful things, with fabric. 
When I got back, I found some treats awaiting me.
A package arrived with a batch of 3 supple, sophisticated drapery wool from Holland and Sherry.  These will become window treatments for a wonderful mid-century home filled with a glass collection of a lifetime- I'm looking forward to this project for a number of reasons!
To trim the pale blue strié, this Zimmer and Rhodes embroidered linen trim, which will be hand-sewn to the lead edges of ripplefold panels.
This trim is so beautifully made that even the back is impressive.  And the end is sewn to prevent raveling!
What excites me most is the rod we'll be ordering from J L Anthony via Ona Hardware: can it get any cooler?  This 124" silver finish square pole will be ceiling mounted.
The other package I received was pretty exciting too: a box full of Jewel Tape- double-sided adhesive tape from Dondar Designs. 
And now-
goodnight!

Wednesday, December 7, 2016

Hobbled shade with ladder tape

I have a little more to say about the hobbled shades I showed the other day.
HEY, by the way, it's one whole week and I've posted every day!  I said I would- so far so good!
Anyhow.
These shades are hobbled with ladder tape which also serves as the cord shroud.  However, I also sewed rings.  You might wonder if the rings are redundant, but there is a reason I chose this way.
Because the folds are 4", there are 50% more folds than usual, which means the shade can't stack up as compactly as it would if it had 6" folds.
Using traditional tape with rings would necessitate ring locks, which would add significantly to the stack in addition to the extra stack due to the short folds.
Therefore, I used ladder tape plus rings, to get the least stack I could.

After preparing the shade, I marked the ladder tape in 4" increments with purple disappearing pen.
The rows for the rib pockets are marked and pinned, and the ladder tape pinned to the bottom.
After sewing the bottom row and securing the ladder tape, I began working my way up the shade, sewing across the ladder tape as I sewed the pockets.
This hobbled the shade as I moved up the rows.
The rings were sewn on by hand, the ribs and weight bar inserted and secured, and the shade was strung with a stringing needle.
There are other ways I could have made these shades (there were 5) but after weighing all the options, this seemed the best to me.