I'm happy to say that the grey velvet swags were successfully installed today! Thanks to Danny at Fabric Factory Outlet for sending me his photo.
I've made a variety of arched treatments before, but once I began making this, I realized that I had never actually made arched SWAGS. Thanks to the excellent instructions in Ann Johnson's books on swag fabrication, I was able to draft these swags perfectly on the first try.
The side swags were pretty tricky. I read the instructions a dozen times before starting. I've made asymmetrical swags, but never with an arched top. It was fun!
The face of the board was covered in grey lining....
.....and the outward-facing part covered in white. The horizontal board is there to help the frame stay put; it was removed after the arch was installed.
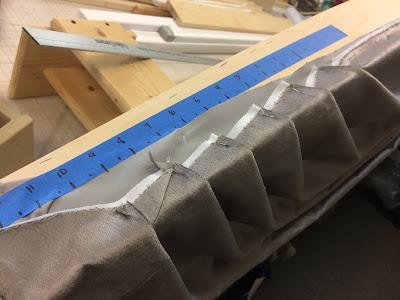
I marked the arch with masking tape in 1/2" increments so I'd have symmetrical reference points for each side.
The reference points allowed me to go back and forth and make small adjustments evenly on each side.
The side swags were attached first, starting with the flat section. When stapling mirror image swags, I do both together, one pleat at a time, so they can be pleated the same way.
It was pretty thrilling to see the pleats to fall into shape almost immediately!
I used cardboard tack strip to even out the center where the pleats stack up. After the center swag was stapled, I flipped it back and filled in the gaps with little pieces of cardboard, then secured it all with hot glue.
Actually the hot glue made a good filler too. I wanted the top curve to be sleek. Once the glue cooled, I trimmed it smooth with scissors.
To shape the jabots to the frame, I made a little paper mock-up of the jabot silhouette and cut the shape of the frame.
After the jabots were pleated (using my Parkhill jig), I cut them to shape, leaving a board allowance for the returns and first pleat.
Since the jabots followed the frame precisely, they were easy to attach to the face. Only the return and part of the outermost pleats were stapled up onto the dustboard; the rest was attached to the front to reduce bulk.
It didn't seem likely that anyone would climb up and see the raw edges, but I covered them will twill tape just to be safe.
The dustboard cover was stapled just behind all the tack strip build-up which shaped the top. It's fun to staple it on then flip it over right side up!
It's a wrap!
THE BLOG IS HAVING TROUBLE WITH COMMENTS! SOMETIMES THEY DON’T GET PUBLISHED, AND WHEN THEY ARE I AM UNABLE TO REPLY TO THEM. IF THAT HAPPENS, JUST EMAIL ME AT stitchlore@gmail.com.
Looking for something specific? Check out the Topic Index, or the Search bar, just below, on the left.
Sorry about this problem!
SO.........WHAT ARE WE WORKING ON TODAY??


Incredible! I love it!
ReplyDeleteThank you, Laurel!
Delete