 |
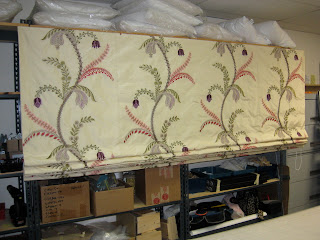
| A workroom shot of one of the two shades, mounted for testing, partly raised. How do you like the pattern layout? |

All this silk/viscose blend fabric had to be ironed first from the right side then turned over and ironed to size from the wrong side and then ironed again with the interlining, and then again with the lining- about an hour of ironing per shade before the sewing even starts!
 | |
| Can you believe this is the nursery scale that John's mom used when he was a baby? John weighed a lot less than this shade! We weighed everything to be sure we could use a slim clutch since there was little space for mounting these very wide shades so we couldn't use a regular 30# Rollease clutch. The scale says 10 pounds, including the weight rod, face fabric, lining, and interlining, and the clutch components- whew! the slim clutch can handle 15 pounds. |

 There was not enough fabric to use three cuts per shade, and we had only 1/4" over on each side for the side hems, so we used an alternative construction technique, adapting a method from English interlined panel fabrication: the interlining was layered over the face fabric and both were folded over together, then the lining laid on top and ironed down just 1/8" or less from the edge- just wide enough to get a skinny needle into the space- and the sides were blind-hemmed by hand with itty bitty stitches. It was tempting to just whip stitch the sides but in the end it was only a couple of extra minutes to do a blind hem, and I don't have to feel guilty! That narrow bit of face fabric looks so nice, like a microcording. I can think of a few situations where I might use this technique again.
The decorator just called to report that the shades look fabulous in her client's home and that they are very happy with them- yay! I'm SO thrilled. I don't know if folks realize how personal these projects are to us workrooms- a little piece of us goes into every job and we agonize over the decisions we have to make during fabrication. I love hearing when one of my products has made someone happy!
The shades are gorgeous!
ReplyDeletehey Ellen we can do long-distance decorating ya know, UPS!
ReplyDelete