.................a scary place, but welcome!
When I plan a project I resort to my own system of primitive sketches. There are all kinds of worksheets available for figuring out stuff like this, but in the end I go back to my own sketches. After the job is done I keep the notes and drawings with the order.
Here are a worksheets for a few recent orders.
This is how I planned out the pink center pleat relaxed roman. If I don't draw it like this, in "chunks" representing the sections and returns, I get my mirror images confused. One thing that has to be taken into account is the center of the "swoop" on the end sections, because the ends also have returns and deep side hems. On a solid it doesn't matter, but for patterned fabrics it does. So the cut pieces for the left and right sides are not identical, but the centers match.
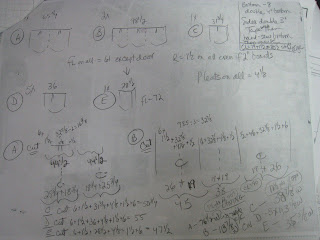
For the ten center pleat shades out of the green print, the layout was more complicated because there were seven single, a double, and two triple:
And my worksheet looked like this- shades A, B, C, D, and E, with the centers marked for each section.
I need to have every bit of information all on one sheet, in my own shorthand which I can instantly understand, even if it's gibberish to anybody else. I get worried when it's gibberish to ME!
I know there are wonderful computer rendering programs to eliminate the need to sketch out designs to scale; I own one of them; nevertheless, I love and prefer to work with graph paper and a pencil so I can whip up ideas on the spur of the moment.
For these treatments, I sketched, to scale, a number of variations of proportion and consolidated them on two pages for evaluation. We went with the versions on the second sheet which were much more appealing. Everyone agreed that the half-sections peeking out from under the shirred panels looked more intriguing than full sections would have.
Once the design was chosen I used the same page to begin planning my cutting layout. In the end the final section sizes were determined by the horizontal pattern repeat: therefore the diamonds match at the folds.
Here is a worksheet for a kick pleat valance with contrast inserts. The seams needed to be offset so they didn't fall in the middle of the insert, or at the fold of the pleat. I've drawn rectangles to represent the cutting sizes of the solid sections and the patterned sections.
Here's my worksheet for a swag and jabot treatment. The decorator specified the width and depth of the components. Once I had all my numbers on one sheet, I could begin drafting my full-scale patterns.
THE BLOG IS HAVING TROUBLE WITH COMMENTS! SOMETIMES THEY DON’T GET PUBLISHED, AND WHEN THEY ARE I AM UNABLE TO REPLY TO THEM. IF THAT HAPPENS, JUST EMAIL ME AT stitchlore@gmail.com.
Looking for something specific? Check out the Topic Index, or the Search bar, just below, on the left.
Sorry about this problem!
SO.........WHAT ARE WE WORKING ON TODAY??


No comments:
Post a Comment