THE BLOG IS HAVING TROUBLE WITH COMMENTS! SOMETIMES THEY DON’T GET PUBLISHED, AND WHEN THEY ARE I AM UNABLE TO REPLY TO THEM. IF THAT HAPPENS, JUST EMAIL ME AT stitchlore@gmail.com.

Looking for something specific? Check out the Topic Index, or the Search bar, just below, on the left.


Sorry about this problem!

SO.........WHAT ARE WE WORKING ON TODAY??
Showing posts with label AL1 headrail. Show all posts

Monday, May 22, 2017

Evolution of Stationary Romans for Doors

I love my latest method for stationary Roman valances for doors!  Well, I should say, my "continuously evolving method" because I haven't made them the same way twice.  Every time I make one, I think of a new modification that improves the product and/or the method.
There is one thing they have in common: the cool Dofix AL1 compact velcro headrail.
Here are a few I've made this year:
 I make the shade mostly the same way as I usually do.  At the top, all extra bulk at the side hems is cut out:
At the top, 1.5" is pressed at the finished length:
The lining is cut out evenly with the top:
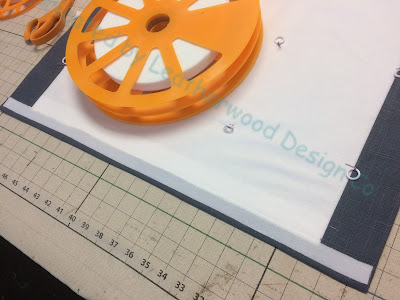
2" fusible buckram is secured to the face fabric to keep the top edge crisp:
The top is secured with Dofix, and the raw edges covered with fusible velcro:
The top hem is secured with Dofix Bortenfix with lift cords fused in as well:
Ring locks are used as spacers, and the cords are run through the rings, drawn up, and secured with orbs:
 For this arched stationary shade (obviously on a frame, not the AL1 headrail!) there was no appropriate place to secure the cords at the top, so instead the cords are run through the rings with ring locks and secured at top and bottom with orbs:
After making the arched shade without lift cords going to the top, I tried it with a door shade.  By planning ahead, the rings and locks can be hidden behind a mullion.
A neater alternative to orbs is the level locks from Safe-T-Shade:
 A dot of glue gives peace of mind that the level locks won't slip:
The headrail is attached to the door with tiny brackets:
The velcro allows some flexibility at installation:
 I like the way the fabric draws up naturally, as if it were strung to be operable.  Simply cinching the rings creates a pinched look that I never liked.
The little valance looks great alongside the larger stationary roman valances on the windows:
The arched shade is flanked by 4 inside mount stationary roman valances, made the same way but stapled to boards:

Thursday, May 11, 2017

Shades and panels

I've decided to write about these treatments today, because designer Denise Wenacur has featured them in her blog post today for Greenhouse Fabrics.   Please click on the link and check it out!
We made 8 shades in all for this dining area, kitchen, hallway, and foyer.  In the dining area, the shades are flanked by narrow sheer box-pleated panels, mounted on the molding, which soften the room and draw the eye up.
The door is treated with a stationary roman shade valance.
This wide bank of windows needed three shades, each about 65" wide. 
Around the corner in the hallway is a 98" window tucked behind a staircase.  This shade is full-length, but tied off to be stationary.
Here's the other end of that 98" hallway shade, adjacent to the foyer shade.
Over the sink another stationary shade is tucked under the soffet.
I have a new super-cool method for stationary shades for doors, like this one. I'll be doing a post about this method soon.
Meanwhile, a sneak preview: it's on the tiniest headrail imaginable, that is completely unseen.  This is the AL1 from Dofix, and I've been finding interesting ways to use it.
In fact, the AL1 was used to hang the narrow sheer panels.
 I made a set of pleat mockups for Denise so she could choose the number of pleats and panel widths.
To keep the panel widths consistent, we extended the headrail at the ends, stabilizing it on the outside with a tiny L-bracket to which we added velcro for the panel return.
One side required a cutout to fit around the ceiling.
This little headrail made installation go so smoothly!  The panel tops are finished with hand-sewn facings and fusible velcro.
More on this project next time!