THE BLOG IS HAVING TROUBLE WITH COMMENTS! SOMETIMES THEY DON’T GET PUBLISHED, AND WHEN THEY ARE I AM UNABLE TO REPLY TO THEM. IF THAT HAPPENS, JUST EMAIL ME AT stitchlore@gmail.com.

Looking for something specific? Check out the Topic Index, or the Search bar, just below, on the left.


Sorry about this problem!

SO.........WHAT ARE WE WORKING ON TODAY??
Showing posts with label rope trim. Show all posts

Monday, May 6, 2019

Fortuny panels, installed!

If there had been a DJ in the house, we'd have cued up Etta James and sung along to "At Last."  These stunning draperies were a long time in the making!
Designer Chrissy Glenn envisioned the Fortuny pattern with banding of the same fabric in a contrasting colorway, on the lead edges, and bottom.  Of course that meant accomplishing a perfect pattern match- in both directions.
Gold rope cording from Samuel and Sons defined the edges.
The project began with a day of assessment, layout, marking, rolling, re-rolling, more marking, and re-assessment.  The bittersweet colorway was discontinued, so what we had in-house was all there was on the planet- and we had just- and I mean JUST- enough.
It was truly exciting to see the plan develop.
Finalization of the plan called for celebration!
Cutting required a full day of calm, quiet, complete isolation, and a generous dose of chutzpah.  It was scary.  Quilters will recognize the term "fussy cutting" and this was fussy cutting to the extreme.
I knew that I could not manage perfect pattern matching with any ad-lib effort, so I used a double-sided adhesive tape to align the pattern.  I like to use Rowley's tape for this purpose, because it can be removed easily.  After pressing the edge to create a sharp, visible sewing line, I applied the tape in order to secure the layers perfectly.
The sharp crease provided a clear(-ish) stitching line.
The tape was removed right after the sewing was done, before trimming away the excess.
It is a testament to the high quality of Fortuny prints that the pattern aligned so easily.  In both directions there were few adjustments to be made.  This fabric isn't expensive for no reason!
The turquoise was intended to have a high translucence, so the panels were interlined with a light but dense cotton flannel, and lined with a tightly woven lightweight doublewide (seamless) cotton.
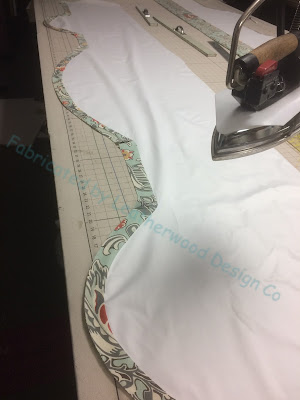
But first, we wanted to add a light-filtering layer to the bittersweet band, pressing the seams toward that side, to eliminate any shadow of the seam allowance. 
Grey cotton sateen was used to reduce but not eliminate light bleed. 
This grey was interlocked by hand with a herringbone stitch on all sides of both lead edge and bottom bands.
Once all twelve panels had been prepared, we began the process of assembling the layers.  Here is where I have no photos- I guess at the time I thought pictures of plain white linings were too boring!  We interlocked the interlining to the seams as usual, but also to the lead edges, since no lining layers were going to be rolled into the hem.  They were interlocked right over the grey lining, if you can imagine that from this photo.
After assembly, the last step was to pleat and tack.  Chrissy chose a two-finger top tack, tacked around the fronts of the pleats with coordinating thread.
I'll be going back to the house in the near future, and hope to take great photos then.  On installation day we didn't have time to steam, dress, and stage the photos since the family was leaving for the weekend.  However, even though they couldn't sleep in the room that night, they were pretty thrilled at having these to come home to!
Lots of love and gratitude to my support posse, Camille, Jen, and Rosemarie.  Their work, encouragement, and advice made this project happen!  And a huge shout-out to Penny from whom I learned techniques I'd never dreamed of that are now part of my daily work life.


Friday, February 3, 2017

Hybrid Soft Cornice, part 3

Whew, this blog post is taking forever!
But this treatment was so much fun to make, I want to finish documenting it, for anyone who has the fortitude to keep reading about it.  This is going to be a long post.
Here it is, one more time:

And here's where I left off at the end of the last two posts.  The sections have been planned, marked, joined, cut, and pressed, laid out and aligned with the table grid.
Against the face fabric, interlining is laid in place, pressed, and cut to shape.
The buckram pieces are laid in place in the sections but not the pleats.  The bottom "seam" allowance is folded up and lightly glued against the buckram and interlining.  Blackout lining is then laid across it all and cut to shape like the interlining.  I also ran a little glue line around the perimeter of the blackout, to keep it in place.  But keep reading- it's not the glue that holds this together- it's all hand-sewn later.
 For the final layer, backing is cut to shape from regular lining, and a 2" continuous bias strip sewn on to create a facing.
 It's like magic when the facing is turned and pressed!  This makes me happy.
The faced lining is layered over the valance, and the bottom is sewn to the welting by hand.  With all the hand-basting I had already done, I figured in for a penny, in for a pound, right?  No glue is holding this treatment together!  I love how the hand-sewing makes a perfect welted bottom line.
At the corners the excess is folded to shape and ladder-stitched.
Since this treatment is not waterfalling off the top of the board, but instead stapled to the face of the board with a standing open box pleat header, I needed to be certain the layers would not droop inside the top.  First I joined the interlining and blackout with a running stitch, enclosing the buckram so it can't budge.
Then I lock-stitched the face fabric to the interlining.  Now I know that all the layers will stay put.
I folded the face fabric to the back, fold the lining under just below the top, and ladderstitched the lining across the valance.
Then I had the pleasure of turning the treatment over, folding and pressing in the pleats, and making sure the face measurement was correct!  I also drew a purple-pen line 4" down from the top using a quilter's rule, and secured the pleat areas with a tag gun so I could easily ant-trail staple the valance to the covered board.
Yay!  Nearly done.
I knotted the rope and hot-glued it to the staple line, and tied the cut ends tightly with matching thread.
Opening up the rope strands, I saturated the trim fiber with Rowley's fringe adhesive and let it dry.
The rope was snipped through the clear-drying glue, leaving a neat, smooth end.
Everybody was happy!  Even the back is beautiful.

Friday, January 27, 2017

Another Hybrid Soft Cornice: part 1

Here's the latest in my collection of completed soft cornice projects!  Designed by Elizabeth Harlow, this started out as a simple shaped kick pleated valance, and morphed into a soft cornice with an open pleat header and knotted rope trim.  I tried some new (new to me, that is) methods and am thrilled with the outcome.
There are 5 layers of materials.  The face fabric is paddeded with heavy flannel interlining.  The scalloped sections and returns are stiffened with buckram (Skirtex), but not the pleats.  The entire valance is layered with blackout lining; and the back is plain lining with a self-fabric facing.  In between the face and lining is self-fabric 1/16" microcording. 
The rope trim was knotted and attached with hot glue.
It has so much more substance than a soft valance, yet is sleek compared to an upholstered wood cornice.
I took lots of photos during fabrication, so I think I'll split this project into several posts.  Today will focus on preparation.   The treatment began with the excellent template made by Elizabeth out of foam board.
The template was created to determine proportion, not the exact shape, so all I had to do was refine the curves and make my patterns.
Together we marked the central pattern motif.  I made my 4 identical cuts- 1 for each section and 1 for the returns, and cut them to shape before sewing together- a departure from my usual method for sectioned valances.
The sides of each scallop were extended to create the pleats, and the top and bottom of the pleat section marked with tape.
A white chalk line marked the edge of the pleat.  This was very faint and had brushed itself away by the end of the fabrication.
 The excess fabric is cut away with a 2" allowance. 
The bottom line was marked with white chalk or purple pen.  I especially want to mark the point where the pleat ends and the curve begins- the pen is pointing to one of those spots.  This mark comes in handy later, as you'll see in the next photos, so it needs to be dark.  You can see here that the sections have been sewn together.  That seam hides on the inside of a pleat so it's never visible.
Here the valance has been stapled onto the board.  I used the purple marks to be certain that the curves are meeting each other at the right point.  You can see them on each side of the pleat.
The other end of the pen has the magic eraser- and ALWAYS test that purple pen on each fabric before using it, to make sure the eraser will remove the mark!
In the next blog post, I will show how I applied the trim, added and secured the various layers, and finished the back.  Right now I'm going back to work!  See you Monday......