THE BLOG IS HAVING TROUBLE WITH COMMENTS! SOMETIMES THEY DON’T GET PUBLISHED, AND WHEN THEY ARE I AM UNABLE TO REPLY TO THEM. IF THAT HAPPENS, JUST EMAIL ME AT stitchlore@gmail.com.

Looking for something specific? Check out the Topic Index, or the Search bar, just below, on the left.


Sorry about this problem!

SO.........WHAT ARE WE WORKING ON TODAY??
Showing posts with label mitered corner. Show all posts

Tuesday, March 19, 2019

A motif that made its own border

Sometimes a pattern motif makes itself into a beautiful border.
For these shades, the designer left it up to me to decide on the ribbon placement.  It was total serendipity that the diamond shapes came right to the edge of the shades, so I could center them between the ribbon and the edge.  The shades are pleated to pattern, too!
After mitering the corners, I applied Dofix Bortenfix tape to the trim....
then fused it to the shade, starting at the bottom.
I use a separate square of Bortenfix tape in the corner so I have more control over its application.
After the trim is fused, I take small hand stitches in the outer corners to keep the fibers from straying.
For extra assurance, I apply a tiny dot of glue to hold down any loose fibers.
I hated to see these shades leave!

Monday, January 8, 2018

Black and White Greek Key

Our first shade of 2018 featured a graphic white-on-black Greek Key:
The miters started with a paper template.  A test corner was folded, pinned to shape, sewn, and tested.
The corners were trimmed and angled in closely at the tip, like a dart in clothing.
They were pressed carefully....
and a dab of glue was applied at the points to hold down any stray fibers.
A little more pressing manipulates the miter into square.
We chose to apply this trim using Dofix Bortenfix tape.  The tape was trimmed to size with a rotary cutter.....
then applied to the back of the Greek key tape.
Blue painter's tape marked the finished size and provided a guide for applying the trim.
The sides and bottom were folded and pressed along the blue tape, and then the shade fabrication continued as usual.
The first row of rings started 9" up to allow the Greek Key shape to show when the shade is raised.


Wednesday, December 6, 2017

Mastering the Miter, one corner at a time

A miter queen I definitely am not- I know a miter queen or two, but I'm not one of them!  I have to carefully think my way through it every time.  As with many fabrication tasks, such as installing zippers in pillows, the only way to become proficient is to practice, practice, practice.
For these pillows, precision was key.  The Samuel and Sons 2" woven braid had to be turned into a 1/2" mitered flange.
When I made a trial flange, I immediately discovered that the soft braid would not hold its shape.
This was not the precise, tailored look I needed to achieve.
I made another experiment using fusible fabric stabilizer from Rowley Co. 
When I trimmed and turned the corner, there was the look I was going for!  The stabilizer gave me control over the shifty tape.
So I got out my rotary cutters and cleared my mother-of-all-cutting-mats tabletop.  I needed a sharp blade for the stabilizer, so I put a fresh one in my cutter.
I cut the strips just shy of the trim width.
I learned the hard was that the tape should be ironed on OVER the stabilizer, not the other way around.  A few miles of ironing later.....
Nothing for it but to plunge in and get started.  Once you get the hang of it, this is actually fun.
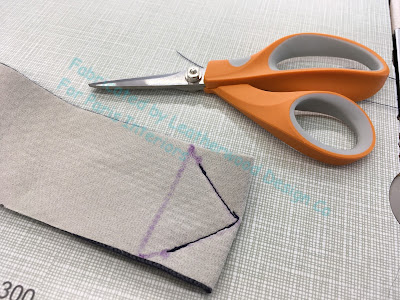
Maybe the Miter Queens can do the rest of this job with math, but I can't!  I pinned the flange to the table to mark the exact spot for executing the next corner- another use for my can't-live-without gridded table canvas from The Workroom Channel.
The pressed fold helped make it easier to be precise.
 I completed the corners one at a time, going back and forth from table to machine (it's only 3 feet away, LOL) for each step.
When they were done I laid the trim out to cut and pin the join, in the center at the bottom.
 The last step before applying to the pillow face was to stay-stitch the entire perimeter just inside the final stitching line, to keep the layers from shifting.
The completed trim was sewn to the pillow face as if it were a lip cord.
I just barely tapered the corners, to help avoid pointy pillow ears.
The pillow was finished the ususal way- right sides together and a color-matched zipper.  The rule for color-matching with a contrast zipper: match the trim, not the fabric.  This holds true 99% of the time in my experience.  Now they're ready for their new owner!

Thursday, July 27, 2017

Stationary wool shades

Susan Marocco chose beautiful Holland and Sherry wools for two stationary Roman shade valances in the same home as the wool ripplefold draperies I wrote about in June.
Both shades were trimmed around the perimeter with Samuel and Sons tapes.  We mitered the corners, and the blue shade featured two layered tapes.
From past experience with wool shades I knew the layers needed to be interlocked internally to support the wool and keep it from sagging.
First the interlining was interlocked to the wool face.  We used the seam in the face fabric and then interlocked in alignment with where the rings would eventually be sewn.

Ribs were sewn to the interlining to provide additional structure.
Above the board line, the interlining was serge stitched to the face fabric.
The lining was interlocked at the board line.
The ribs were secured to the lining, then the rings sewn in between the ribs.  These little tack stitches are visible on the back, but they lie on the column line with the rings so they're not noticeable.
The side hems were sewn by hand, and the bottom finished as per my usual method, with buckram in the hem.
To miter the trim corners, we first basted by hand to make sure the pattern was well aligned.   The corners were then sewn by machine, cut, clipped, pressed, and the little fiber ends stabilized with some tight little stitches and a dot of glue.
The mitered trim was sewn by hand to the outer edges with a ladder stitch.  How the pattern falls on a pattern like the Greek key is a matter of math and luck; for this shade, we had pretty good luck!
Because in both rooms the underside of the boards are not easily visible, we did not need to make returns, but we did use a bit of trim to cover the ends of the boards.
The time we spent on steps to support and stabilize the wool were well spent.