THE BLOG IS HAVING TROUBLE WITH COMMENTS! SOMETIMES THEY DON’T GET PUBLISHED, AND WHEN THEY ARE I AM UNABLE TO REPLY TO THEM. IF THAT HAPPENS, JUST EMAIL ME AT stitchlore@gmail.com.

Looking for something specific? Check out the Topic Index, or the Search bar, just below, on the left.


Sorry about this problem!

SO.........WHAT ARE WE WORKING ON TODAY??
Showing posts with label Sheffield. Show all posts

Friday, November 15, 2019

Layering sequence to feature the "Important" side

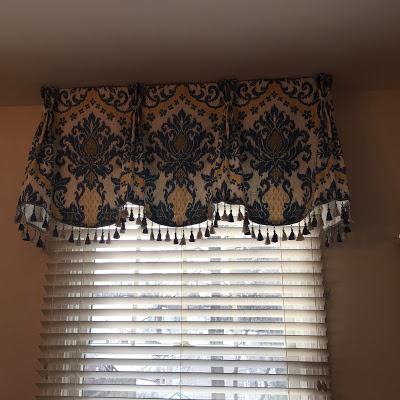
In this Master Bath renovation, different wall finishes required a fabric that would complement both.  Susan Marocco chose a traditional motif, Martinique by Cowtan and Tout, in a fresh colorway that worked with both the painted and tiled areas.  Variegated lip cord from Samuel and Sons defines the lower edges.
We were able to raise the valance over the tub without drilling into the tile by mounting on wood extenders for the L-brackets.
A toned-down, straight kick-pleat valance out of Schumacher's "Woodberry" was an understated treatment for the Guest Bath window.  Rather than divide the width into three equal sections, we instead left the motifs whole by slightly rearranging them and making a barely wider center section.
Sewing patterns are available for shaped box pleated valances- this is the "Sheffield Valance" from M'Fay- but after planning, cutting, and joining the individual sections, I usually just draft the shape directly onto the fabric, free-hand, with erasable pen.  This allows me to customize the long and short points of the treatment.  (In the years before drafting onto the fabric, I probably fabricated 5000' of Sheffield valances, so I had a feel for how to draw those curves!)
After the first return, horn, and scallop are cut, I flip the fabric to repeat the silhouette across the pieced fabric.  To do this, it's essential to cut the sections accurately and straight at the top, because the top line is the reference point.
I layer the interlining and interlining, and cut around the valance.
Very importantly, I notch all three layers before moving the layers, so there are reference points in case the layers start to drift during sewing.
Now I rearrange the layers so the right sides of the face and lining are together, and the interlining on top of the face.  The notches help me re-align the curves.  When turned right side out, the order of the layers will be face, interlining, lip cord or welt, then lining.  This sequence helps eliminate any bulge from the lip cord trim on the right side- the "important" side. 
The layers are all pinned together; the lining is held back so the lip cord can be basted.  (Yes, I'm using a zipper foot.  Many people use a cording foot, with the welt to the bottom during sewing.  Sometimes I do, too.)
The lining is folded back into place and all layers are sewn together.  The seams are graded, the corners and curves are clipped, and the valance turned right side out, pressed, and mounted. 
The interlining smooths out the front of the valance so no seam allowance is detectable.  I learned, years ago, from reading M'Fay patterns, to determine the "important side" of the treatment, and layer accordingly. 


Friday, June 24, 2016

The Lazy-S Valance

For a variety of reasons, our workroom is most often associated with shades.  What many people don't know, however, is that we also do a brisk production of valances which are rarely seen here on the blog. 
Sheffield, Queen Anne, scalloped kick pleat- they are all the same basic shape.


I call these the "Lazy-S" valances, because they mostly begin with a serpentine bottom shape like this.
These valances are reduced to five steps: draft, cut, mark, make, and mount.  Whether it's a one-off or multiples of the same valance, my procedure and tools are the same.
Meticulous preparation allows us to feed valances like these through the workroom quickly, efficiently, and accurately.
First, the valances are broken down into numbers.  Sometimes I'll make a sketch to scale, like these I did recently to help a client narrow down shape, size, and proportion.
On a large roll of graph paper I draft the pattern; in the case of 10 identical valances I made a full pattern, flipping the first scallop and horn to repeat.  More often, I choose from scallop and horn patterns which I have made in every size and join them together.
 The notcher is my most indispensable tool for efficient marking:
The pattern is weighted down and since these valances were railroaded I could layer the face and lining and cut them both at once.  I got two out of the width, and I cut and sewed the first two to test the fabrics and trim, before cutting the remaining 8.  These valances are white fabric with white lining, sorry it's not more visually appealing in the photos!
Then I rolled out 8 layers of fabric and lining to stack-cut the remaining valances with my electric rotary cutter.
The notches are transferred to the fabric at the bottom.  This allows me to sew efficiently, with a minimum of pinning.  These valances had lip cord at the bottom; I applied it first to the face then used the notches to align the layers as I sewed the lining.
Most importantly, before moving the valances off the table, I carefully mark the tops with black Sharpie pen.   I've standardized a system of marking for myself which allow me to staple the valances to the boards quickly and accurately after they're sewn and pressed. The permanent ink ensures that the marks will still be there when I'm ready to mount, sometimes days or a week later. 
A length of fabric is cut and sliced with a rotary cutter for the dustboard covers.  I always cut the dustboard covers when I'm cutting valances and shades!
And there you have it!  With careful preparation, the sewing is the least of the effort. 

Saturday, June 9, 2012

Super-size me!

Wow, I'm exhausted!  I just sent out two really big jobs, both with beautiful but challenging fabrics, and now I'm sitting with a cup of coffee to decompress.   

This is a beautiful, soft, lush printed velvet, with a gold contrast fabric welt, for 23' of Sheffield valance in a huge bay window.  The sides of the bay are nearly 6' each, and the center is 10 1/2', so the installer wanted to staple the valance on-site, which I totally understand.  But, tacking strips are so not my thing!  To me they're a million times harder than just stapling the whole thing in the studio myself, the normal way, so I can fuss over it.  I would have hinged the boards so it would fit into a van.... oh well.  I will be worrying about the fit until I hear back that it turned out well. 

The other project was 3 button-back kick pleat valances totaling 22'.  The face fabric is a beautiful cotton print, but the contrast fabric was a blackout Apollo lining in gold.  wow.  That stuff made a simple project into a really frustrating ordeal!  But, it's all over now, so I'm just going to relax about it.   See the pretty mauve button in the corner?  The buttons made the job.

Sorry no finished product photos for this work, which took up a giant bite of my week.

Wednesday, February 22, 2012

In a Purple Haze

I've noticed that purple is a popular decorating color in the winter.  February's birthstone is amethyst, which perhaps reflects an increased attraction to purple when it is cold and dull outside- it sure does pep up a subdued palate.  Still, it was surprising to have SO MUCH purple in-house this winter.
On February 4 I took this picture of purple fabrics that came in for immediate projects. 

These purples were mostly paired with natural, sage or loden, or silver-grey.

The project that kicked off purple month was a simple purple burnout velvet panel, box-pleated onto a board, with purple glass beads shown off when the fabric is draped back to one side.

Next were pillows in silver and purple, balanced with a hint of loden in the outlining:

Then a 165" valance and panels of a gold-dusted natural silk, color-blocked with silver-grey and purple satin.  These did not photograph well, but in the house they are fabulous. 

Four neo-bohemian shades were exuberant with their purple borders trimmed with purple and sage glass beads:


The Sheffield Queen lined what felt like a couple of miles of valances with purple, trimmed with purple fringe: 

Here the sage and purple face fabric stretches across the workroom into infinity, or at least it felt that long:

And for the last purple project of the month: just-the-other-side-of-periwinkle-purple bands and welts the sage and purple toile on this goblet pleat valance:

Saturday, July 23, 2011

Serendipity

If you want a job you can report to every morning, work a specified number of hours at a pre-determined activity that you are capable of doing but will not have to think much about, you will not be creating window treatments for a living.

Every minute of every working day, window treatment fabricators are thinking their way through one-of-a-kind projects.  Even when we make a style over and over again, the materials and math for a particular project makes that job unique.

If you love the unexpected twist, the happy coincidence, the lucky break; if the occasional surprising perfect marriage of the specific numbers with the specific fabric quickens your pulse; if your heart goes pitter-patter every time a raw material is transformed before your eye; if the mathematics of your project are as beautiful to you as the end product is to everyone else- then you will be rewarded every day in this line of work.

Which leads me to this valance that has been meandering through this post.
The cut length of the sections is 23", and the pattern repeat is 23.25"- right there you know you're on to something!  The horizontal repeat is offset so that when the scallops are cut to size, what is left is the perfect part of the pattern to allow the repeat to flow continuously across the scallop and the horn on its right.

This kind of fortuitous coincidence is to window treatment fabrication what a lunar eclipse is to astronomy.
Usually it is the alternate motif that is used for the horn.  

Some numbers, some fabric, a few snips and a few stitches, and- another Sheffield valance is born.  The fabric is a beautiful English print on a cotton-linen blend.

I'd like to see this one mounted on its board, but, we were asked to put it on a tacking strip instead.   It will be installed on-site. 

Saturday, June 4, 2011

A well-behaved fabric

It's such a treat when a client chooses a fabric and treatment style that are compatible. 

When I first started working in this industry, 25 years ago, drapery fabrics were cotton prints.  The big boom in silk was yet to come, no one thought of using upholstery fabrics on windows, and nobody asked for their sheers to be blackout lined.
This cotton print behaves perfectly as a Sheffield valance. 

Friday, June 3, 2011

Sadly, this is one window treatment I'll never see in its new home, not even a photograph.  It's a Sheffield valance for a bay window, which has cabinets that intrude into the mounting area.  The three mitered dustboards are flat across the whole valance, but beyond the cutout area, boards extend upwards, sort of like an upside down cornice board, and the valance is attached to the 3/4" part of the board.

A self-microcord was secured with double-sided adhesive tape, to make it easy to control and adjust; then the dustboard cover was stapled over it and down over the back.

Monday, February 28, 2011

Curved Box Pleated Valance

aka Sheffield-
Made to the M'Fay pattern specifications with a dramatic contrast between short point and long point.