THE BLOG IS HAVING TROUBLE WITH COMMENTS! SOMETIMES THEY DON’T GET PUBLISHED, AND WHEN THEY ARE I AM UNABLE TO REPLY TO THEM. IF THAT HAPPENS, JUST EMAIL ME AT stitchlore@gmail.com.

Looking for something specific? Check out the Topic Index, or the Search bar, just below, on the left.


Sorry about this problem!

SO.........WHAT ARE WE WORKING ON TODAY??
Showing posts with label duvet cover. Show all posts

Thursday, October 25, 2012

Three strikes

Some projects seem jinxed.  Here is one of them: a bedding package consisting of two duvet covers and three 26x26 boxed pillows.  Fate contrived to thwart the project, but we prevailed!

First, the blue duvet cover went seriously awry when I cut into the center width with the serger........ which, in a workroom, qualifies as "The Unthinkable."  I cut off the offending section and pieced in two rows of contrast fabric, bordered by microcord.  (I didn't think to take a picture until it was packaged and about to walk out the door. )


Turns out that the pillow fabric was also discontinued, and the vendor sent the last bit they had, but at just over a yard it was not enough to make the three fronts of the 26" pillows.  They rummaged through the showroom and found the memo sample which was just 25" square, so I added a border all around to get to the right size.  There were just enough scraps to make the boxing.

With all the raw edges from all that piecing and boxing, every seam was serged to eliminate the raveling threads.

Finally, the second duvet cover was too narrow because the supposedly 54" fabric had only 52" of useable print.  I added a 2" band of the backing fabric.  The delicious Vervain silk is lined with napped sateen, making the cover soft and supple. 

Between the seams the tiniest microcord is inserted.   A scrap of fine ivory taffeta from a previous project matched the background perfectly. 


The duvet from Rowley came with snap tabs to keep it in place.  You sew the mate into the cover's seams, then lay the duvet cover wrong side out, place the duvet on it and snap the tabs together, then turn it all to the right side.  So much easier than trying to climb inside to fasten the snaps!

Tuesday, September 25, 2012

More than the sum of its parts

One of the hardest things for me to do is stand in an empty room and visualize the changes that the designer can so easily see in her own mind.
Katherine Stern has a great imagination.   She also is in love with pattern and color. When she presented me with half a dozen fabrics that seemed to bear no relation to each other, I could but have faith in her vision of the master bedroom she was designing.
I'm hesitant to show these now because the room is unfinished, but here we go anyhow.

When the room is complete we will have installed window treatments as well.  But so far our share on this side of the room is the bedskirt, duvet cover, and flanged shams;

on the other side, this round tableskirt, and a topper which I pieced from a too-small remnant that Katherine loved and scraps of the sham fabric to make it big enough.

The most fun part of the project was creating the topper from scraps from the shams.  The look and the process are right up my alley.  How about those mitered corners?  I hated to give this topper to its owner!

Not shown in the picture at top are the feather/down wedge bolsters out of the headboard fabric.  Albany Foam custom-made the feather/down inserts from the template we made. 
I called them the "purple monsters" because stuffing those inserts into the covers was like wrestling an insanely strong, clunky, irrational being.

Friday, August 19, 2011

Modifying a duvet cover

Remember this bedding ensemble from a month or so ago?

Unfortunately the duvet was too narrow for the bed.  Both the bed and the duvet were odd sizes, and even though the client had used them together  for years, once the duvet was in a cover, it was obvious that it was too narrow.
 

After a brainstorming session with the designer, we decided to add to the width with a flange.  The client needed to keep the cost down, and I wanted to be sure the flange looked as if it had been there all along.  To keep the labor down, I didn't want to open up the serged seam if we didn't have to, or remove the snap tabs inside.  I wanted to avoid extra bulk, and I didn't want any hand-sewing- it's a heavy bed-covering, and it needed strong machine sewing.
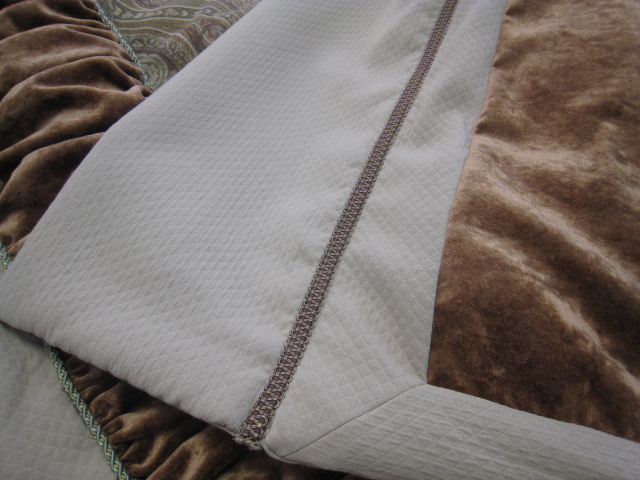
So our post-vacation mission was to create the flange to extend the sides and make it not look added on.  With a sudden flash of inspiration, I realized we could use the braid trim to actually join the flange to the main cover, as well as to hide the join.  That would eliminate excess bulk.  We sewed two long tubes for the flange, open at each end..........

The front flat braid was sewn to the cover, just overlapping it halfway,

then the flange was tucked under the other side of the braid and sewn.

The duvet cover was flipped over and a row of flat braid was sewn onto the back side.  It was fortunate that the braid on the front was nubby and patterned, to hide all the rows of stitching, otherwise this process wouldn't have worked.
The ends were sewn shut by hand.  I had to leave that to the last, because I was sure that if I sewed the flanges to size beforehand, something would stretch, or shrink up, and the pieces wouldn't fit.

To stuff the cover, we turned it inside out, snapped the duvet to the cover, then gingerly turned it right side out, all as one.  Heavy work!-  you practically have to crawl inside it. 


Here's the flange from the front.....

And from the back.

And by the way, those three Milan valances were for this master bedroom.....  Now that the duvet cover is finished, I hope we'll be receiving a nice photo of the completed room.

Friday, July 8, 2011

This week it's all ruffles

My awesome Johnson Ruffler got a total workout this week.  This little machine is one of the best workroom investments I've ever made.

This bedding package has three ruffled products: a bedskirt, inset rouched velvet panels on the duvet cover, and a top-sewn silk ruffle on the pillows.
We did not fabricate the headboard.  Or the dog.

Quite a pile of ruffles!

The velvet was first overlocked, then ruffled on each side.

The rouched strip was applied over the full width of tapestry.  First the lip cord was basted to the tapestry, then the rouching sewn right sides together then flipped to the edge.  The edges were basted together and then the second row of lip cord applied, then the outer band.  This method worked surprisingly easily, especially considering all three fabrics are upholstery weight.

To fill a duvet cover, I lay it wrong side out on the work table, snap the comforter to its corresponding snap tabs in the cover, then work it through the opening, duvet and cover all as one, and zip it up.  It takes awhile but it's easier than stuffing the comforter into the cover right side out and trying to reach inside to fasten the snaps. 

Bedskirt- what can I say?   The ruffler handled the velvet squares with professional calm at 3x fullness.

The silk was sewn into a tube, turned right side out, and pressed with the seam 1" from the edge.  Then it was fed through the ruffler right over that seam line (which is on the wrong side), and again, the ruffler performed like a pro.

The finished ruffle was first basted to the face of the pillow with a narrow strip of double-sided adhesive tape, then topstitched over the ruffling stitch. 

Three of those!

And some sleek throw pillows (no ruffles!) to top it all off.