THE BLOG IS HAVING TROUBLE WITH COMMENTS! SOMETIMES THEY DON’T GET PUBLISHED, AND WHEN THEY ARE I AM UNABLE TO REPLY TO THEM. IF THAT HAPPENS, JUST EMAIL ME AT stitchlore@gmail.com.

Looking for something specific? Check out the Topic Index, or the Search bar, just below, on the left.


Sorry about this problem!

SO.........WHAT ARE WE WORKING ON TODAY??
Showing posts with label adhesive tape. Show all posts

Friday, March 22, 2019

All the Best, part 1

I've been waiting a long time to do this blog post about one of my favorite projects of 2018, for designer Susan Marocco.
Last summer we created these valances that are a whole lot more than the sum of their parts.  They are the result of the finest materials, intense hand-sewing, internal structure, and special handling.
It's going to take several posts to tell the whole story, and today is the day to begin. 
Susan Marocco's clients live in a sprawling home overlooking a lake.
Accustomed to having no window treatments, but wanting the room to look finished, they chose top treatments in a sky-and-lake palette to create continuity between the indoors and outdoors.
After considering a dozen or more possible fabrics, a striĆ© Rogers & Goffigon wool was selected.  I knew immediately that I had to plan to make these treatments entirely by hand.  A geometric border from Samuel & Sons was chosen to define the bottom and add to the layers of color.
There were 7 separate kick-pleated valances, each a different size.  Each section size was determined accordingly.  The trim's geometric pattern was centered on each.  That in turn influenced the size of the kick pleat because the motif needed to be centered in the pleat as well. 
AND there were two right-angle corners- the left corner, in the photo above, and the right corner, which ran into the bookcase and needed a little fiddling.
The only machine sewing on the entire project was joining the sections.
We decided to sew the trim to the fabric before making the valances.  Running stitches in a matching blue thread completely disappeared into the trim.
When working with fine materials, I love to use what I call the best of both worlds- a combination of fine handwork that is facilitated by the use of modern tools and materials.  In this case, we used a removable double face adhesive tape from Rowley to secure the trim so it could be sewn with more control.  After the bottom stitch line was finished, we peeled off the "basting tape" before sewing the top stitch line.  This is actually a tape that is sticky on both sides, as opposed to an adhesive film on tape.  Removing it left no sticky stuff behind. 
Here you can see why the trim had to be sewn on by hand.  Whenever sewing happens, there is a bit of take-up, because as little as a single line of thread adds bulk and slightly distorts the fabric.  Even with the most attentive hand-sewing, in this photo you can see the slightest bit of rippling behind and below the trim.  Hand-sewing allows the most control over thread tension, which minimizes the take-up.  If this had been sewn on by machine, even a walking foot machine, the take-up would've been noticeable.  This is true of any fabric, but wool especially. 
Once all the trim was sewn, it was time to layer in the linings.  The goal was to have the wool fold up enough to create the tiniest lip of trim showing on the back, as you can see here if you peer closely at the bottom edge of the back of the valance.
And that's where I will pick up on the next post- layering in the linings and adding internal structure.  Now, it's time to get back to sewing my current project. 

Monday, January 30, 2017

Hybrid Soft Cornice part 2- applying the microcord

On Friday I started posting about this hybrid soft cornice.  I thought it would be a three-part post, but I think I'll need to divide it into four parts!
One of my favorite features on these soft cornices is self-fabric microcording.  I thought it turned out beautifully on this valance.  You can see the purple marks made during the planning and preparation- and upon completion, we hit those marks perfectly.  They were erased after I took this picture.  So today I'll go through the process of applying the microcord on the front.
We left off here on Friday: the valance pieces had been marked, cut, joined, and pressed.
My first plan was to "baste" the welting onto the face with 3/16" adhesive Jewel tape.  I ran the tape around the bottom edge, splitting up the curves into a bunch of straight pieces.
I began sticking the microcord to the face along the lines I had drawn.  I used 1/16" microcord which is REALLY tiny.  The welting was made ahead of time, something I rarely do; I usually make it and apply it all in one step, but I did not trust that the curves would not stretch out of shape.
At the sharp turns, I clipped the welt and cut out a little wedge so the lip would lay flat.
On the curves I carefully followed the white chalk line I made during the preparation stage.  In this photo you can see the sticky tape by the glare from the lights.
However, once I began sticking the welting on, I didn't like how the tape was creating a bit of distortion, so I decided to baste the welt on by hand.  In the corners I added a couple of back-stitches so the turn would stay put.
Hand-sewing really allowed me to be precise at those sharp turns.  I could never have sewn it this precisely by machine.
 As I sewed I peeled off the sticky tape, and as I visibly saw the fabric relax, I was glad I had made the decision to  hand-baste.  It was easy to see that that it was vastly better.  I basted right on the machine stitching line.
And that's how I did stage one of the welting!  Now the valance is turned over, straightened onto the table, and lightly pressed.  From here on it will not leave this spot on the table.  The various materials will be layered in and secured- and that's a story for tomorrow!


Thursday, January 30, 2014

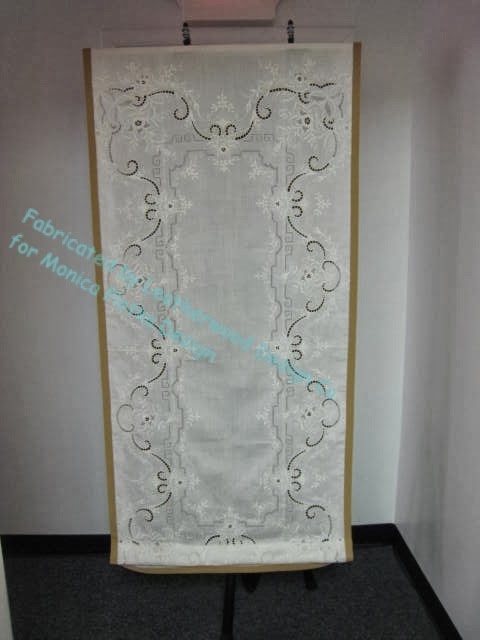
Vintage tablecloth re-purposed

Monica Plotka called me for this project, knowing that I would thoroughly enjoy it, and I sure did- this is one of the coolest shades I've ever made.  Her client dipped into her stash of vintage textiles and brought out this embroidered linen cutwork tablecloth to remake into a shade.
This very fine white linen pressed beautifully.  After the whole tablecloth was ironed, I marked out the exact finished size plus 1.5" for the board, then cut it out carefully, leaving the perimeter intact because..... well, just because I couldn't bear to cut into it.
Because of the openwork areas, it was easy to see the grid of the table behind the fabric.  That made the layout easier.
2" French cotton grosgrain ribbon was adhered to the back with Sealah tape, then pressed around to the front, mitering the corners along the way.
From the front, the ribbon was topstitched all around.

A length of Rowley's weight bar tubing was machine-sewn 3" above the top of the ribbon, the stitching ending right before the ribbon, with an extra couple of inches left at each end.
The first ring started 6" above the fabric tube, with ladder tape.  After all the rings were sewn on, the weight bar tube was folded up to meet the bottom rings, and tacked to that bottom ring.  The weight bar was inserted into the tube, and the ends finished. 
The fold created one permanent pleat at the bottom, even when the shade is fully lowered; the extra fold hides the weight bar pocket stitching, and any other clutter that might show through the open areas.
This project was right up my alley!  Thanks Monica, I'll do this again any time!

Wednesday, April 11, 2012

Kingston variation

The client showed us a picture of a Kingston-style variation that was shirred instead of pleated, so this is what we made for her- five of them, actually:

I used to struggle with top welt.  While sewing and stapling it I'd fight to keep it from twisting.  Then I read a tip from Merlyn on the CHF Forum and my life was changed forever: I don't sew or staple anymore- I use double-sided adhesive tape, and now my top welts are smooth and unwarped.

Adhesive tape is run along the front of the board.

The welt strip is laid over the tape, then another row of tape goes on top of the welt strip.

The welt cord is positioned at the edge of the board, letting just a little of it touch the sticky tape to hold it in place.

Then the welt strip is carefully rolled over the cord and secured to the adhesive.

Now it's ready to be stapled, all in one step with the cardboard tacking strip and the dustboard cover.

Now I enjoy applying top welt!

Tuesday, August 3, 2010

Yet another ribbed shade method

When this order came in for blackout shades with ribs, I knew I needed to develop a new method.
My standard method has been to make skinny pockets in the back for the ribs, but with blackout lining the stitching would leave horizontal light-bleed lines.
Though I don't love using adhesives- I like to think I sew, not glue, for a living- I know that blackout is all about NOT sewing, because every time the lining is pierced with needle or pin, light is allowed through.
So I worked out a non-sewn ribbed shade method that I like.
The weight bar pocket tape sold by Rowley was used for the rib pockets.  There is probably a cheaper alternative, but this is what I had on hand and it worked beautifully. 
After pressing the sides of the lining to 1" less than the finished width, I adhered the pockets to the wrong side of the lining, using adhesive tape from Atlanta Thread.
The lining was turned right side up onto the wrong side of the face fabric, which had been pressed to size.  I ran rows of adhesive tape up each side but kept the paper on until after the rings were hand-sewn and the ribs inserted, then I reached under and released the paper, pressing the lining into place.
These shades had bottom trim, so I turned up a 2" hem and glued it in the back and glued on the trim.
I used tiny stitches to reinforce all the stress points of the shade so the glue and adhesive didn't have to bear all the burden of keeping the shade together.  Also, of course, the tacking used to put the rings on goes through all layers, including the top of the pockets, so the pockets are secure as well.
There were three shades on one headrail, and they turned out perfectly, I think!  They're on their way to being installed, and if I have time I'll run over and get a photo today.  If not, I'll get pictures in a week or two when we install the swags in the dining room.
I totally forgot to take pictures while I worked!  So the one above is the only one I have, but it does show a lot of what I just wrote about.
I think I'll use this method for two more shades I'm about to make, even though they aren't blackout.  I like the hidden ribs and pockets.

Friday, June 25, 2010

Tools my grandmother didn't have!


Does this fabric look familiar?  Back in the winter I posted pictures of a small shade out of this fabric.  It was fun using twill tape to band the edges and the shade turned out great.

The decorator wanted to use it again for this shade which is wider than the width of the fabric.  We needed to find a way to join the widths.

The face fabric is a very sheer silk, with a 1/4" hemp rope woven in horizontally.  The rope is very bulky, making it impossible to sew the widths, so we thought of using the twill tape to hold the widths together and at the same time hiding the join line.  The twill tape is topstitched down each side, through all the layers.

This is where some modern workroom tools really made it possible to fabricate this shade with confidence.

The shade was made almost entirely on the table.  Since you can see through the sheer silk and the sheer linen lining, I used the gridded canvas table to press and lay out the fabric and keep the rope lines and the lining grain line straight.

Adhesive tape was used as a basting tool.  Once the half widths were positioned next to the full center width, I ran adhesive tape down the join line and pressed the twill tape into place.  I also used the tape to position the twill tape used for the banding.  The tapes were also pinned to keep the layers together.

Fabric staples across the top kept the fabrics from shifting while the shade went off to the machine for topstitching.


Back to the table, wrong side up, the grid again assisted in marking for the rings.  As a matter of fact, I didn't even mark- I just followed the rope lines and the vertical grid lines and sewed the rings on by hand right on the table.  The clear plastic rings and tan lift cord are nearly unnoticeable from the front.


The twill tape in folded in half and made a pocket for the weight bar which I sewed right behind the bottom band, following the topstitching line.

I've had my gridded canvas table for 4 or 5 years now and can't imagine going back to fabricating anything without it.  


Tuesday, April 13, 2010

More on Efficiency

I have been working on some hobbled shades.  Since these have a lot of steps, I thought I'd showcase one shot that illustrated as many steps as possible.
For shades, as for drapery panels, I have found that you get not only the best product but also the most efficient use of time if you leave the product on the table for as many steps as possible.

For hobbled shades,  the fabric is laid face down and the lining over it, squared up, then the side hems are pressed in, but not secured yet.

The bottom will be made in various ways, depending on the style, trim if any, and the customer's preference.  For these shades I folded up a double 4" hem and hand-sewed it.

Next the fold lines for the rib pockets are marked.
Here, we use disappearing purple pens.  I don't know what we'd do without those!
And then the fold lines are pinned, pins all in the same direction. 
As long as the straightedge is right there, the marks are made for the rings.  If three lines are marked, the straightedge can be laid down to mark the remaining rows.

Now the side hems are secured.  Depending on the fabric, they might be hand-sewn, adhered with adhesive tape, or blindhemmed.  Machine blindhemming is a rarely used method here.  We've blindhemmed side shade hems maybe twice, ever.  
For these shades, adhesive tape is applied.  Look at the right side of the picture where a straightedge is holding back the opened-up side hem to reveal the tape.  I want to apply segments of tape leaving 1" on each side of the fold line without tape, because this tape is not nice to machine needles and I want to avoid having to sew over it.
The adhesive is a secure method but it is used only when some amount of machine stitching will be securing the layers somewhere- in this case, the rib pockets.

The twill tapes that will be "hobbling" the folds are laid out on the far right and marked, in this case in 6" increments, and brought to the sewing machine with the shades.


There are three steps the sewing machine will be used for. 
At the sewing machine first the folded pocket lines will be sewn 3/4" from the fold, making a right turn at the end of the row to close the pocket on one end.  I use thread that matches the face fabric, not the lining, because I want the thread to blend in at the side hems, unless it's a really dark fabric.  And then, I use white for the lining sections and color matched thread for the side hem bits.  A pain in the neck, but.  For these shades I used a pale yellow which blended in with both lining and face fabric.
The tapes, all ready and marked, are sewn behind the bottom row on the row's stitching line.

Now the rings can be sewn and ribs inserted into the pockets, and then it goes back to the straight stitch machine which hopefully is still threaded with the matching thread to sew up the open ends of the pockets. 
Ready for stapling & stringing!  The shade was on the table once, and not moved til all was marked and secured.
The indispensible tools for maximum efficiency on this project: purple disappearing pen, and the gridded canvas table cover.

Tuesday, January 12, 2010

Bay Window Hinge


When I started making window treatments and heard about "hinges" for bay window treatments, I took that literally, not realizing that the hinges were not actual hardware.................
Now I know that the hinges are made of fabric; however, I still use actual hardware hinges for bay windows. I like to be able to fold the treatment compactly and securely. I like seeing them. I like that the installer can lift the treatment easily and unfold it on the ladder if necessary. I like that if the homeowner climbs up on a ladder and looks at the top of her treatment she'll see real brass hardware up there, unlikely though that may be.
Some people have told me it's a waste to bother with actual hinges that cost money instead of a little strip of fabric that's free, but really, how much do they cost- I don't mind spending two dollars on them, and I like them.