THE BLOG IS HAVING TROUBLE WITH COMMENTS! SOMETIMES THEY DON’T GET PUBLISHED, AND WHEN THEY ARE I AM UNABLE TO REPLY TO THEM. IF THAT HAPPENS, JUST EMAIL ME AT stitchlore@gmail.com.

Looking for something specific? Check out the Topic Index, or the Search bar, just below, on the left.


Sorry about this problem!

SO.........WHAT ARE WE WORKING ON TODAY??
Showing posts with label sheer shades. Show all posts

Monday, October 3, 2016

Pied-a-terre shades and pillows

Where to start after not posting for 3 weeks?  Shall I bore you with stories about the dead car battery in NYC; the equipment failures: band saw, Dofix boiler?  The unexpected modifications, re-stringings, repairs; and 5 installations in 2 days?............ nah. 
Instead, I'll show you my favorite project from these challenging few weeks.

Arielle of Paris Interiors designed this oasis in Greenwich Village.  The black and white scheme is unbroken except for the brick wall, and is restful in the most modern way.
I enjoyed every aspect of fabrication of the Missoni sheer shades and the 11 pillows using 12 different fabrics. 

The sheer was a special challenge.  The pattern match was about 5" in from the selvedge, and I didn't think I could accurately join the widths by machine.  Instead, I basted then hand-sewed the seams using a ladder stitch.
I flat-felled the seam by pressing it, but did not sew it. 
After tabling the face fabric and laying out the double-wide semi-sheer lining, I lock-stitched the sheer to the edges before folding and pressing the hem into place.  This is a technique I learned from Penny Bruce of Denton Drapes (albeit in reference to interlined English curtains!) adapted to my own fabrication process.
I intentionally made the side hem wide enough to reach the face seam.  As I ladder-stitched the hem, the thread caught the felled seam to secure the fabric.
The rest of the shade fabrication followed my standard procedure for sheer shades, stabilizing the bottom with translucent buckram, and enclosing the weight bar pocket into the hem.  You can see one of the three horizontal basting lines I ran before beginning to sew the rings. 
This is one of my top three favorite projects of the year so far!  


Friday, August 26, 2016

Silk and jute sheer shade

I've worked with this silk and jute fabric before and it is always a pleasure. 
Designer Monica Plotka shares my love of twill tape binding and we've used it to bind this fabric which really cannot be hemmed.  This shade is lined with voile.
When working with sheer fabric, my first step is to pull a thread so I can cut along the grainline.
I basted the voile around the perimeter of the silk, both cut to the exact finished size.
Before finishing the edges, I sewed the clear rings to the shade.  This stabilized the layers further.
To apply the twill tape, I started with the bottom edge, on the back.  I nestled it up next to a row of jute and basted it in place.
Then I flipped the bottom up and hand-sewed the right side, making sure that the twill tape was caught on the back as well.
I turned the corners and started working the miters into place.
After securing securing the corners on the back, I folded the twill tape to the front and pinned it.
I finished hand-sewing the tape from the front side, catching both sides with one row of stitching, and ladder-stitched those pesky mitered corners.
For the weight bar pocket, I used a piece of translucent buckram, folded in half and stitched, and inserted a piece of 1/2" acrylic rodding, which was nearly invisible from the front.
Done!

Wednesday, July 6, 2016

Two successful remakes

OK let's get this clear, no workroom loves to work on or remake stuff another workroom has made.  But I always will honestly consider it, and will accept these projects if they make sense to me.
Here are two we re-installed last week for Paris Interiors, and both were hugely successful.
Today's post features the living room, where the ivory linen sheer relaxed shades were beautifully made, but too plain, and the clutch system showed through.  Liz wanted to add short valances with trim detail (from Samuel and Sons)  to add definition to the windows and also hide the clutches.
Before:
After: the self-lined voile valances that we created achieved everything Liz hoped for:
The 7/8" grosgrain ribbon hid the board and defined the top line, and the swirly banding hid the clutch components.
Having the right tools for the project made it easy to accomplish quickly and accurately.
The first step was to pull a thread on the voile to get the straight of grain and prepare the cuts.
Dofix Bortentape was the right product for applying the trim.
Using the gridded table canvas and a clear quilter's rule, the grosgrain was aligned and steamed into place.
Skinny strips of Bortenfix were applied to the fretwork trim.
And again, the gridded canvas tabletop markings were visible through the sheer which made it simple to position and apply the trim.
The voile was folded right sides together, and the finished width marked for sewing.
Turned, pressed, and double-checked, the valances were perfect.
All that remained was to serge the raw edges together.......
.....and staple them to the existing shades.


Tuesday, January 26, 2016

Adding lining to existing shades

Do you remember these sheer shades from last autumn? http://leatherwooddesignco.blogspot.com/2015/09/the-other-sheer-shades.html
These are some of the most beautiful shades I've ever made, so you can imagine my dismay when the designer informed me that the homeowner needed them re-lined, with an opaque lining rather than the gorgeous grey voile.

I dreaded doing this, but it turned out to be a satisfying project.  It was less difficult yet more time consuming than I had projected; and the opaque shades with grey sateen lining are just as beautiful as they were when they were sheer.
The goal was to not have to take apart the shade and sheer lining. 
I did consider adding lining in the manner of a double-sided shade, but I thought that would be an untidy solution, and ultimately inefficient because I'd have to fiddle with it a lot, not to mention I'd be unhappy with it in the end. 
Therefore I decided to remove the rings and lay the new lining over the sheer. 
I unstrung the shade, removing the orbs and cord clips, leaving the lift cord in their clips.
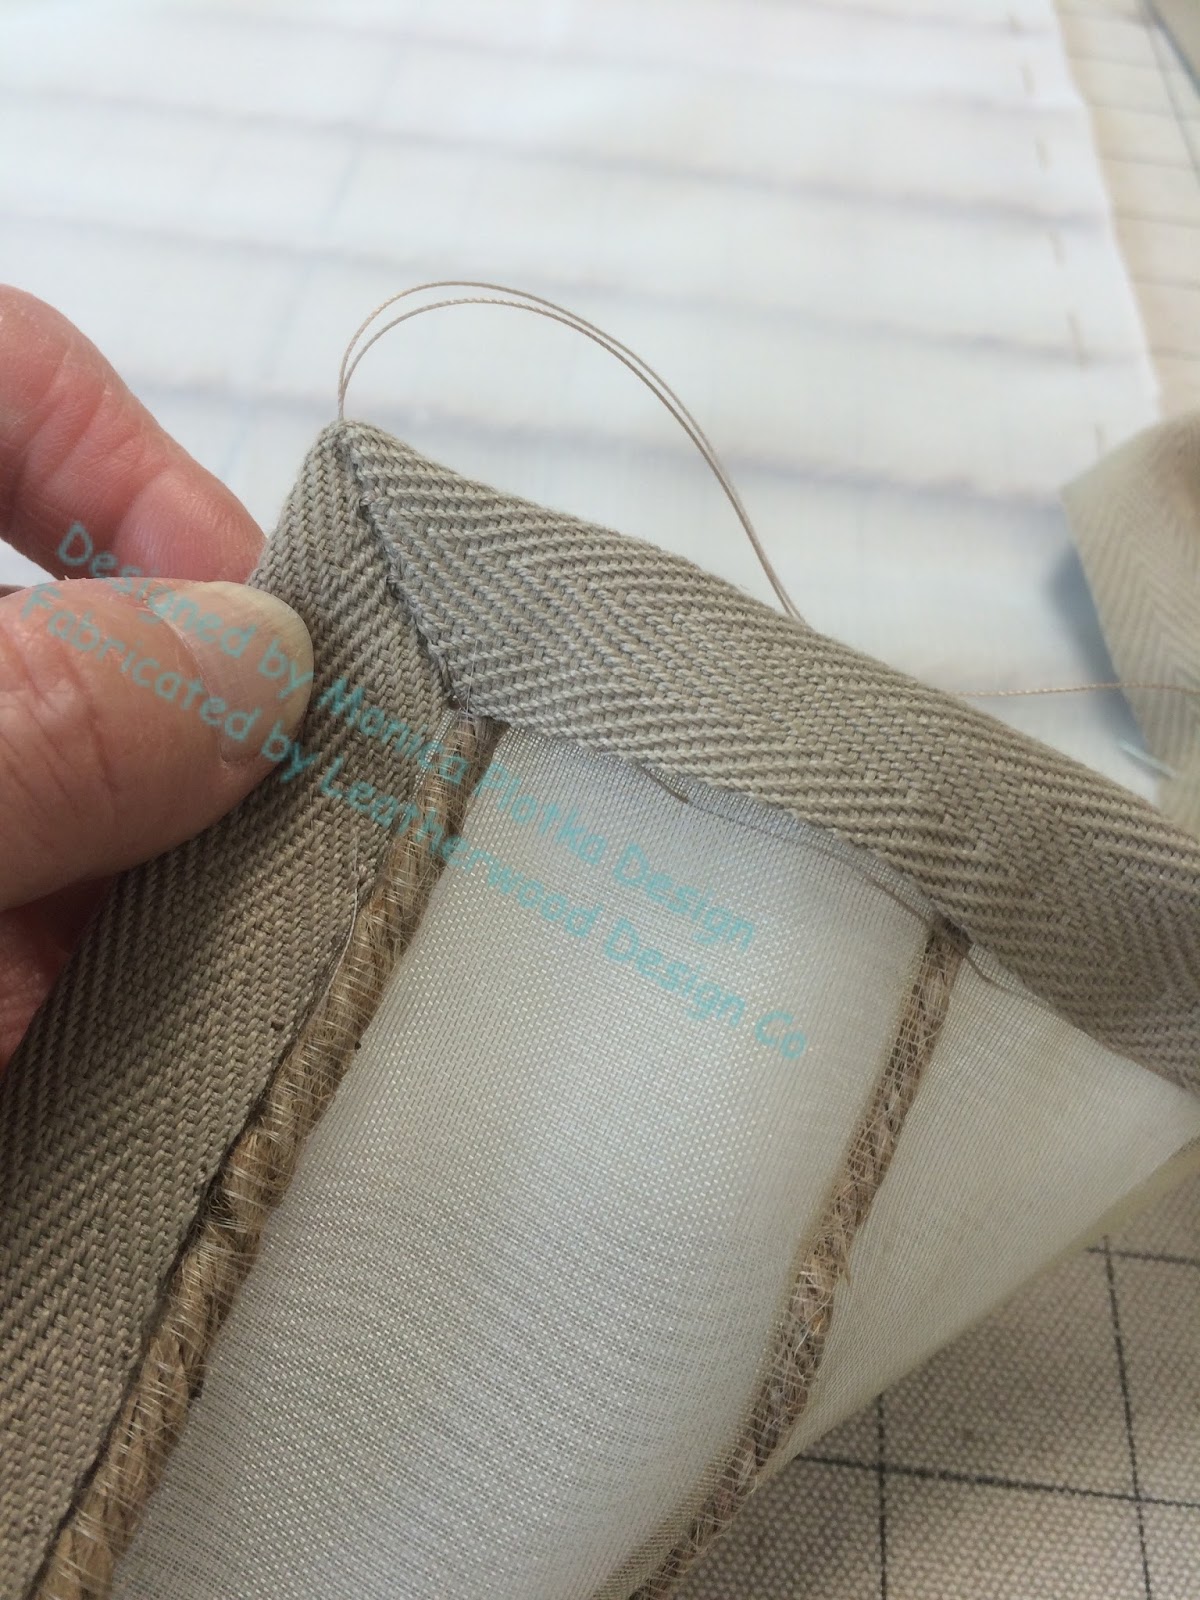
First making sure all the rings pointed up, I laid out the lining, rough cut to about 3" over the finished size on each side, wieghted it in place, and used the iron to make an impression in the lining of the existing rings- sort of like making a gravestone rubbing!
I could see where the rings were sewn, and used purple pen to mark the stitches.
Keeping half the lining weighted down, I folded back one half at a time, and snipped off the ring stitches, except for the bottom rings which I clipped off because I wanted the stitching to remain.
I kept the lint roller handy so the little snipped threads wouldn't wind up inside the shade!
At the top, I trimmed the lining even, leaving enough to tuck under the board.
When I staple, I use tacking strip set back about 1/2", which leaves wiggle room at the front of the board.  That wiggle room is what allowed me to tuck in the lining.
I stapled to secure the lining.
Sewing the rings went quickly.
At the bottom I was careful to avoid a pucker at the pocket when I sewed the bottommost rings.
Because the weight bar lay underneath, creating bulk, I knew I should let the shade hang before sewing the bottom.
 I trimmed the bottom and folded it in place.
I pinned it for hanging, then removed and re-positioned the pins after I knew the shade was true.
The lining and sheer are ladder-stitched together by hand.  Re-stringing with ring locks was quick and simple.
After leveling and completing the rigging, all that was left was to sew the lining to the face at the bottom.
Ta-da!