We've spent considerable time in the house with the huge hobbled shades for Denise Wenacur, and last week it was time to go upstairs to the master bedroom, where we re-purposed the homeowners' existing window treatments.
Crown molding was added, so for two windows, the draperies needed shortening.
And the turret had a full set of draperies until the seating area was built, so they were re-made into Roman shades, the band and rope lead edge detail transformed into bottom shade detail.
Ribs ensure that the folds do not need dressing, a helpful feature in shades that are mounted high and are not so easy to reach. We sew, rather than glue, ribs onto interlining in between the rings so the folds will have some rigidity.
Dofix 6" fusible buckram provided support for the bottom banding.
Re-purposing generally involves some improvisation, to make the existing materials work for the new application. In this instance, we had to fiddle a bit to make the banding work. Although we usually make a double bottom hem, the banding was just wide enough to create a single hem, so Dofix Bortenfix was used to secure the hem below the weight bar pocket......
then Dofix fusible gimp covered the raw edge. The rings were sewn through all materials so the stitching would provide extra security for the band and the gimp.
After the weight bar was inserted into the pocket, the gimp end was tucked in and secured....
Then the bottom pocket ladderstitched closed.
Dofix 8" fusible buckram gave body to the topper, which I wanted to be somewhat supported but not quite as rigid as a soft cornice. We mitered the top and fused Dofix velcro to the back edge so the topper could be mounted easily on installation day.
Fabric staples secured the fabric layers at the top......
and because these shades are reverse mounted, Dofix fusible velcro was added to the front.
The shade snaps off of the headrail for easy installation, then just as easily snapped back on. The lift system is the Rollease SS38 from Designers Resource, chosen for its awesome gear ratio that allows this shade to be nearly fully raised with just one pull of the continuous bead loop chain.
The little toppers behaved just as I wanted them to.
Ta-da! (and yes, we fabricated those cushions, too.)
THE BLOG IS HAVING TROUBLE WITH COMMENTS! SOMETIMES THEY DON’T GET PUBLISHED, AND WHEN THEY ARE I AM UNABLE TO REPLY TO THEM. IF THAT HAPPENS, JUST EMAIL ME AT stitchlore@gmail.com.
Looking for something specific? Check out the Topic Index, or the Search bar, just below, on the left.
Sorry about this problem!
SO.........WHAT ARE WE WORKING ON TODAY??
Showing posts with label Rollease. Show all posts
Monday, July 23, 2018
Wednesday, December 14, 2011
Multiples
Workrooms have some ambivalence about fabricating multiples of a product. While multiples do afford the opportunity to streamline production, the boredom factor sometimes outweighs the convenience. Folks, it's not all thrills in the workroom, every day. Here we had 4 identical shades to make, and now they're ready to string. These had been stack cut then fabricated one at a time. The little striped guy we snuck in with the 4 toile shades and it was like a magic trick, done with no apparent extra effort.
Once all the shades were on the boards, the strings were all run, stacking the next shade on top of the previous one. With all the boards face up, first all the screw eyes were installed, then the Rollease clutches, and the cords were clipped on at the top and secured with orbs at the bottom.
Then it was just a matter of hanging each one on the Workroom Valet for leveling.
Ready to be packed up!
I think 4 of something is the perfect number to make at one time, with a bonus one-off snuck in. It's one of the ways we workroom folk trick our minds to battle the tedium.
This fabric behaves perfectly for shades. One time up, down, and back up, and the folds were trained. Nothing makes a shade look good more than an appropriate fabric choice.
Once all the shades were on the boards, the strings were all run, stacking the next shade on top of the previous one. With all the boards face up, first all the screw eyes were installed, then the Rollease clutches, and the cords were clipped on at the top and secured with orbs at the bottom.
Then it was just a matter of hanging each one on the Workroom Valet for leveling.
Ready to be packed up!
I think 4 of something is the perfect number to make at one time, with a bonus one-off snuck in. It's one of the ways we workroom folk trick our minds to battle the tedium.
This fabric behaves perfectly for shades. One time up, down, and back up, and the folds were trained. Nothing makes a shade look good more than an appropriate fabric choice.
Saturday, March 5, 2011
Living on the Edge of the Learning Curve
It's something new every day, lately.
This past week, we assembled our first "VersaRail" headrails from Rollease. This miniaturized traversing clutch system fits into a 1" headrail, ideal for inside mounts with limited space, or doors. The three shades in this order are inside mounted.
Accessed from the top, the space is pretty small and we needed to use tweezers and needle-nose pliers when our fingers were just too big!
The shade is attached with velcro sewn to the back. The short valance hides the stitching line. I really really really don't like using velcro for shades, so in the future we will adapt these to board installations.
I do love how all the pieces are enclosed and hidden by the headrail. From underneath, it is very neat.
I would now like to spend a week doing small, ordinary, easy projects. Enough of the learning curve! It really eats up a lot of time. Earlier in the week we made 12 shades that were strung with Rowley's EZRig system. Although we had used it before, it's not our everyday system, so there was a lot of learning and second-guessing.
Accessed from the top, the space is pretty small and we needed to use tweezers and needle-nose pliers when our fingers were just too big!
The shade is attached with velcro sewn to the back. The short valance hides the stitching line. I really really really don't like using velcro for shades, so in the future we will adapt these to board installations.
I do love how all the pieces are enclosed and hidden by the headrail. From underneath, it is very neat.
I would now like to spend a week doing small, ordinary, easy projects. Enough of the learning curve! It really eats up a lot of time. Earlier in the week we made 12 shades that were strung with Rowley's EZRig system. Although we had used it before, it's not our everyday system, so there was a lot of learning and second-guessing.
Friday, February 18, 2011
Update on the Top-Down Shades
The shades shown in the previous post, just below this one, were completed and installed a week ago. Pictures? No, sorry, no pictures!
These were top-down only hobbled shades with a Rollease clutch and a self-fabric valance. There were three layers of fabric: the face fabric was a semi-sheer with a woven pattern, a middle layer of a nearly-upholstery weight woven mini-diamond, and the outer back was blackout- the new Bella Notte "Silky" from Angel's Distributing.
There were five shades, all with 2" banding in the mini-diamond on 3 sides with mitered bottom corners.
Shall I mention now that three of the five were side-by-side in a bay window?
Rowley's new encased cord served as both the hobbling tape and the lift cord. Luckily, for hobbled shades the encased cord can be machine-sewn, saving a bit of time.
This was by far the most complicated job I have ever done, both physically and mentally.
Where shall I begin???
Right off the bat, the first challenge was banding the sheer. Glue-basting helped keep the layers from shifting, but none of my sewing experience could mitigate the take-up that naturally occurs whenever two fabrics are sewn together. The pattern was nice and straight at the bottom, but had a big downward smile at the top. Usually you try to compromise and put the skewed end wherever it would be least noticeable, but with a top-down shade, both top and bottom are prominent!
Once the three fabrics were layered and the side hems pressed in, the lines for the rib pockets were drawn with that miraculous disappearing purple pen. Some blackouts won't hold that purple mark for long, but fortunately the new "Silky" did.
The new "hazardous loop" standards prevent us from making a combined fabric-plus-tape that exceeds 16.9", which means that with 6" "ring" spacing, the rows for pockets can't be more than 9.9" apart. I was able to stagger the repeats at about 9.5", and the "ring" spacing was 5.75", so the pattern on the folds were consistent on every other fold, AND it met with the hazardous loop guidelines.
The pockets for the ribs were relatively easy to sew, with plenty of pinning, but unfortunately the textured sheer was the inside of the pocket and made inserting the ribs a difficult task. Many of the pockets had to be strategically opened to get the ribs through. Rowley's clear plastic ribs made it through okay, but that was plan B- originally I wanted to use the 1/8" fiberglass ribs. But they caught on the fabric and would not slide through, and would have caused runs in the fabric if we'd tried to force them.
But back to the pockets. There were 10 rib pockets, and I sewed every other one in the opposite direction, to keep the layers from shifting. My arms are all torn and scabby from the pins gouging them while I wrangled with the very heavy shades at the sewing machine. The next step, sewing on the encased cord by machine, was probably the easiest part of the whole job. I kept the top unfinished until all five shades were done, so I could lay them out and make sure the pattern was consistent on all.
Did I mention yet that three of these shades were side-by-side in a bay window? Oh, yeah. I did. So it was essential that the folds line up perfectly with each other on each shade.
That part was so totally not fun. I made good use of the printed grid canvas and the purple pen, and drew all over the table and made notes right on the canvas about where each fold needed to fall and what part of the pattern had to be at the very top.
Remember the part about how the pattern turned from straight lines into a downward smile towards the top of the shade? Well, I have no idea how, but by the time it was all done, that line seemed less smiley, and also the busy-ness of the folds and little flowers made the skew less noticeable.
After the pocket for the top was pressed in, John put in the little brass grommets that allow the lift cords out of the pocket. Then the pocket was sewn- and at that moment I realized the top of the tape needed to be sewn accurately into the seam- yet another step I hadn't been able to think through until I was actually doing it.
These shades had a regular 3/8" round bottom weight bar, but they also needed a top bar that is very rigid which keeps the top of the shade straight, with no sway. Shopping with John one day in the electrical department at Home Depot, we found something called "wire molding" which is extremely strong metal housing for running wires. We bought that for the top weight bar because it had virtually no flex in either direction. It turned out to be perfect. Brilliant John used the reciprocating saw with the compressor (a non-manual hacksaw) to cut grooves in the metal and we wound the cord around the bar making sure it was settled into the groove so it couldn't slip. After the two middle cords were tied on this way (there were 4 lift lines) we borrowed again from the electricians and use a wire snaking technique to get the strings through the pocket, followed by the bar. I know I'm not describing this well. (I should make a YouTube video. Yeah, in my spare time!) Anyhow, it worked, and let the record show that I would never have been able to make these shades without John's imaginative engineering!
I also must mention that I couldn't have made them by the deadline without a dear friend's patient and good-natured stubborn persistence- she put in a whole back-breaking day of what I had promised as "fun" and "interesting" tedium, did not walk out on me, AND never complained!
Leveling a top-down shade is a major ordeal, and having to level five of them identically is just cruel and unusual. We were not going to be present at the installation, so we had to come up with a way to make all the lines adjustable. The orbs used for shades were the answer. These shades have two sets of lines: the guide cords which set the length, and the operating cords. We used orbs at each end of each line, and tied them off leaving a long tail. This allowed the installer to make slight adjustments.
We were thrilled when we finally heard back from the decorator on installation day that everything had gone well and the next day we heard that the man of the house had called the decorator with his compliments on the job!!!
I feel that I am babbling now- I am sure that no one reading this has the slightest idea what I'm talking about, and I'd be astonished if anyone's made it to the end of this post. I'm sorry I don't have photos. The fabrication was just so intense, I had no time to stop and take pictures. And this was one of those jobs I will never see installed. But if anything you've read piques your curiosity and you have any questions about any of the process, please let me know and I'll try to be more thorough.
These were top-down only hobbled shades with a Rollease clutch and a self-fabric valance. There were three layers of fabric: the face fabric was a semi-sheer with a woven pattern, a middle layer of a nearly-upholstery weight woven mini-diamond, and the outer back was blackout- the new Bella Notte "Silky" from Angel's Distributing.
There were five shades, all with 2" banding in the mini-diamond on 3 sides with mitered bottom corners.
Shall I mention now that three of the five were side-by-side in a bay window?
Rowley's new encased cord served as both the hobbling tape and the lift cord. Luckily, for hobbled shades the encased cord can be machine-sewn, saving a bit of time.
This was by far the most complicated job I have ever done, both physically and mentally.
Where shall I begin???
Right off the bat, the first challenge was banding the sheer. Glue-basting helped keep the layers from shifting, but none of my sewing experience could mitigate the take-up that naturally occurs whenever two fabrics are sewn together. The pattern was nice and straight at the bottom, but had a big downward smile at the top. Usually you try to compromise and put the skewed end wherever it would be least noticeable, but with a top-down shade, both top and bottom are prominent!
Once the three fabrics were layered and the side hems pressed in, the lines for the rib pockets were drawn with that miraculous disappearing purple pen. Some blackouts won't hold that purple mark for long, but fortunately the new "Silky" did.
The new "hazardous loop" standards prevent us from making a combined fabric-plus-tape that exceeds 16.9", which means that with 6" "ring" spacing, the rows for pockets can't be more than 9.9" apart. I was able to stagger the repeats at about 9.5", and the "ring" spacing was 5.75", so the pattern on the folds were consistent on every other fold, AND it met with the hazardous loop guidelines.
The pockets for the ribs were relatively easy to sew, with plenty of pinning, but unfortunately the textured sheer was the inside of the pocket and made inserting the ribs a difficult task. Many of the pockets had to be strategically opened to get the ribs through. Rowley's clear plastic ribs made it through okay, but that was plan B- originally I wanted to use the 1/8" fiberglass ribs. But they caught on the fabric and would not slide through, and would have caused runs in the fabric if we'd tried to force them.
But back to the pockets. There were 10 rib pockets, and I sewed every other one in the opposite direction, to keep the layers from shifting. My arms are all torn and scabby from the pins gouging them while I wrangled with the very heavy shades at the sewing machine. The next step, sewing on the encased cord by machine, was probably the easiest part of the whole job. I kept the top unfinished until all five shades were done, so I could lay them out and make sure the pattern was consistent on all.
Did I mention yet that three of these shades were side-by-side in a bay window? Oh, yeah. I did. So it was essential that the folds line up perfectly with each other on each shade.
That part was so totally not fun. I made good use of the printed grid canvas and the purple pen, and drew all over the table and made notes right on the canvas about where each fold needed to fall and what part of the pattern had to be at the very top.
Remember the part about how the pattern turned from straight lines into a downward smile towards the top of the shade? Well, I have no idea how, but by the time it was all done, that line seemed less smiley, and also the busy-ness of the folds and little flowers made the skew less noticeable.
After the pocket for the top was pressed in, John put in the little brass grommets that allow the lift cords out of the pocket. Then the pocket was sewn- and at that moment I realized the top of the tape needed to be sewn accurately into the seam- yet another step I hadn't been able to think through until I was actually doing it.
These shades had a regular 3/8" round bottom weight bar, but they also needed a top bar that is very rigid which keeps the top of the shade straight, with no sway. Shopping with John one day in the electrical department at Home Depot, we found something called "wire molding" which is extremely strong metal housing for running wires. We bought that for the top weight bar because it had virtually no flex in either direction. It turned out to be perfect. Brilliant John used the reciprocating saw with the compressor (a non-manual hacksaw) to cut grooves in the metal and we wound the cord around the bar making sure it was settled into the groove so it couldn't slip. After the two middle cords were tied on this way (there were 4 lift lines) we borrowed again from the electricians and use a wire snaking technique to get the strings through the pocket, followed by the bar. I know I'm not describing this well. (I should make a YouTube video. Yeah, in my spare time!) Anyhow, it worked, and let the record show that I would never have been able to make these shades without John's imaginative engineering!
I also must mention that I couldn't have made them by the deadline without a dear friend's patient and good-natured stubborn persistence- she put in a whole back-breaking day of what I had promised as "fun" and "interesting" tedium, did not walk out on me, AND never complained!
Leveling a top-down shade is a major ordeal, and having to level five of them identically is just cruel and unusual. We were not going to be present at the installation, so we had to come up with a way to make all the lines adjustable. The orbs used for shades were the answer. These shades have two sets of lines: the guide cords which set the length, and the operating cords. We used orbs at each end of each line, and tied them off leaving a long tail. This allowed the installer to make slight adjustments.
We were thrilled when we finally heard back from the decorator on installation day that everything had gone well and the next day we heard that the man of the house had called the decorator with his compliments on the job!!!
I feel that I am babbling now- I am sure that no one reading this has the slightest idea what I'm talking about, and I'd be astonished if anyone's made it to the end of this post. I'm sorry I don't have photos. The fabrication was just so intense, I had no time to stop and take pictures. And this was one of those jobs I will never see installed. But if anything you've read piques your curiosity and you have any questions about any of the process, please let me know and I'll try to be more thorough.
Sunday, December 12, 2010
Finally- First Encased Cord Shade
It took awhile but here, finally, are a few pictures from last week's installation.
This is the first shade we've installed that has used the new encased lift cord from Rowley, which brings the shade into compliance with the new standards for corded window treatment safety. It was easy to use, and I think it looks just fine from the back.
Instead of sewing rings, the tape is tacked by hand where the rings would have been. It takes no more time than sewing rings would take. The tape is strong but soft and shirrs up to practically nothing.
Here is the new tension device from Rollease which brings the bead chain loop into compliance. The shade will not operate fully until the device is in place. And it looks nice, too. Like most of our shades, this one is operated with a standard Rollease clutch lift system.
The panels have my favorite pinch pleat style- fat two-finger pleats, hand-tacked with coordinating thread wrapping around the front of the pleat, rather than stabbed through the sides.
This is definitely not a low-bulk panel! The heading is double-topped, meaning two layers of print, and one each of lining and interlining, in the back, along with the buckram. I love the full, happy, bulky pleat all that fabric creates.
Wandering back to the dining room, I took a fresh shot of the draperies we made last year with the amazing orange faux panel. Click here to read more about them. Those pictures were taken before the room was finished; now it's ready for entertaining.
This is the first shade we've installed that has used the new encased lift cord from Rowley, which brings the shade into compliance with the new standards for corded window treatment safety. It was easy to use, and I think it looks just fine from the back.
Instead of sewing rings, the tape is tacked by hand where the rings would have been. It takes no more time than sewing rings would take. The tape is strong but soft and shirrs up to practically nothing.
Here is the new tension device from Rollease which brings the bead chain loop into compliance. The shade will not operate fully until the device is in place. And it looks nice, too. Like most of our shades, this one is operated with a standard Rollease clutch lift system.
The panels have my favorite pinch pleat style- fat two-finger pleats, hand-tacked with coordinating thread wrapping around the front of the pleat, rather than stabbed through the sides.
This is definitely not a low-bulk panel! The heading is double-topped, meaning two layers of print, and one each of lining and interlining, in the back, along with the buckram. I love the full, happy, bulky pleat all that fabric creates.
Wandering back to the dining room, I took a fresh shot of the draperies we made last year with the amazing orange faux panel. Click here to read more about them. Those pictures were taken before the room was finished; now it's ready for entertaining.
Monday, November 29, 2010
Two Fab Fabrics
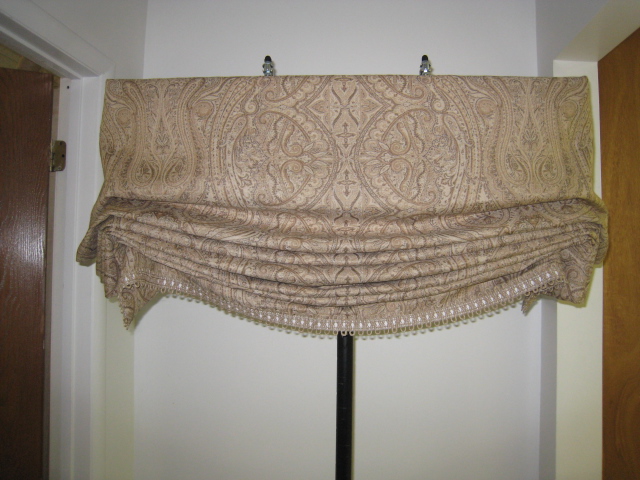
One is an amazing soft wool paisley, the other is.... I have no idea what. It feels like.... plastic macrame? But it's not plastic, because it ironed beautifully.
The wool became a relaxed Roman shade.
It's trimmed with a loop fringe layered over white grosgrain.
The mesh fabric became long drapery panels, which I wish I had seen on-site, but alas I only saw them here. But the homeowner and decorator flipped over them! They called twice to say how happy they were. All hand-sewn of course, except for the actual pleats. The picture does not do them any kind of justice. The top-tacked heading has translucent buckram.
Khaki chain weight in the bottom is thanks to Kelly from Scarlet Poppy Interiors in Texas who saved the day! I tried to order it from Rowley but it is on backorder. Kelly responded to my plea on the CHF Forum.
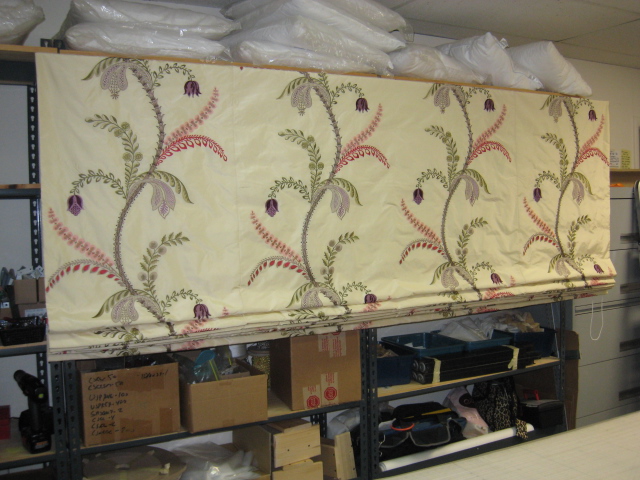
And that wasn't all. We made Roman shades too out of the mesh. Here they are not hiding the shelves full of supplies and tools. They are reverse-mounted, but we didn't have to make a self-fabric valance because they went under cornices.
The best part was, we didn't have to put in grommets- just ran the matching tan string through the mesh!
The wool became a relaxed Roman shade.
It's trimmed with a loop fringe layered over white grosgrain.
The mesh fabric became long drapery panels, which I wish I had seen on-site, but alas I only saw them here. But the homeowner and decorator flipped over them! They called twice to say how happy they were. All hand-sewn of course, except for the actual pleats. The picture does not do them any kind of justice. The top-tacked heading has translucent buckram.
Khaki chain weight in the bottom is thanks to Kelly from Scarlet Poppy Interiors in Texas who saved the day! I tried to order it from Rowley but it is on backorder. Kelly responded to my plea on the CHF Forum.
And that wasn't all. We made Roman shades too out of the mesh. Here they are not hiding the shelves full of supplies and tools. They are reverse-mounted, but we didn't have to make a self-fabric valance because they went under cornices.
The best part was, we didn't have to put in grommets- just ran the matching tan string through the mesh!
Saturday, October 9, 2010
Gorgeous shades!
| A workroom shot of one of the two shades, mounted for testing, partly raised. How do you like the pattern layout? |
All this silk/viscose blend fabric had to be ironed first from the right side then turned over and ironed to size from the wrong side and then ironed again with the interlining, and then again with the lining- about an hour of ironing per shade before the sewing even starts!
| Can you believe this is the nursery scale that John's mom used when he was a baby? John weighed a lot less than this shade! We weighed everything to be sure we could use a slim clutch since there was little space for mounting these very wide shades so we couldn't use a regular 30# Rollease clutch. The scale says 10 pounds, including the weight rod, face fabric, lining, and interlining, and the clutch components- whew! the slim clutch can handle 15 pounds. |
The decorator just called to report that the shades look fabulous in her client's home and that they are very happy with them- yay! I'm SO thrilled. I don't know if folks realize how personal these projects are to us workrooms- a little piece of us goes into every job and we agonize over the decisions we have to make during fabrication. I love hearing when one of my products has made someone happy!
Tuesday, September 7, 2010
You've been thinking, Deb's been awfully lazy lately. Au contraire- I've been forgetting to photograph work before it leaves the studio! And I haven't had the chance to attend installations in order to photograph work on-site. Nevertheless, I do have a few tidbits.
| Great colors! |
| And there were two of these. |
| More great color, in dupioni silk for top-tack interlined draperies. |
| Color on the menu still on a lumbar pillow. |
Wednesday, January 6, 2010
Reverse Mount Rollease Flat Romans


Whew! finally done.
We tried to find a way to photograph the shades with their valances attached but the only way I could find was for wonderful friend CG to hold them up. That's her new shoes at the bottom of the shade.
She was in the studio today to work on 5 shades of her own, interlined and thermal lined, with mitered banding on 3 sides out of a check. Crazy, mind-blowing stuff.
I did photograph the front and back of one Reverse Mount shade before the valance was on, while it could still be on the stand. Grommets guide the lift cord to the front of the shade. Putting in grommets is fun because it means you can bang with a hammer.
The shades are in the hallway, packed, looking a little forlorn and not quite as fab as they really are. That big girl is the 110" shade- nothing to sneeze at! The Rollease had to be spliced and that was fun by myself- usually DH comes to lend his expertise with that technical/mechanical stuff.
And will you look at that yummy red stripe!
Now thanks to aforementioned wonderful friend, I have a borrowed David Sedaris CD to listen to- 75 minutes- long enough to get me and the 7 shades over the Tappan Zee bridge to my client and back laughing my ass off the whole way. A stop at Starbucks first and I'm gonna have a nice ride this afternoon.
No attempt has been made to arrange these pics- I can't wait to see the post and see how they arrange themselves. I haven't figured that part out yet and it's driving me nuts so I'm going to let them find their own way onto the page.
Subscribe to:
Posts (Atom)