THE BLOG IS HAVING TROUBLE WITH COMMENTS! SOMETIMES THEY DON’T GET PUBLISHED, AND WHEN THEY ARE I AM UNABLE TO REPLY TO THEM. IF THAT HAPPENS, JUST EMAIL ME AT stitchlore@gmail.com.

Looking for something specific? Check out the Topic Index, or the Search bar, just below, on the left.


Sorry about this problem!

SO.........WHAT ARE WE WORKING ON TODAY??
Showing posts with label hand-sewing. Show all posts

Thursday, October 17, 2019

Tale of a Bunny Tail Trim

What a perfect combo- this Sanderson bunny print "Dune Hares," and soft grey "Strata Marabou" trim from Samuel and Sons.
This fuzzy brush fringe has tape on both sides, and I had no idea how to apply it.  I tried a few different ways, including attempting to baste it on by hand, all with dismal outcomes.
However, thanks to our marvelous workroom network, after posting an inquiry I got enough suggestions to cobble together a process I felt comfortable with, and started out with some confidence.  If I had to use this again, I might try another method, but for my first time, this is how I did it.
Before I began to sew, I had to satisfy my curiosity about the name "marabou."  First, a "marabout" is a west African Muslim ascetic and teacher.  A "marabou" is a sub-Saharan stork whose hermit-like habits I presume gave inspiration for the term for the reclusive saint.  The feathers of the avian marabou were used in fashion- think Mae West in a boa, or that fluffy, feathery trimming on high-style garments.  Nowadays you can buy fake marabou feathers or marabou trimming made from turkey feathers from places like Walmart.  And in home dec trimmings, the term seems to have expanded beyond feathers to include fluffy, bushy trim from any material- such as wool or silk, or in this case, poly/viscose.
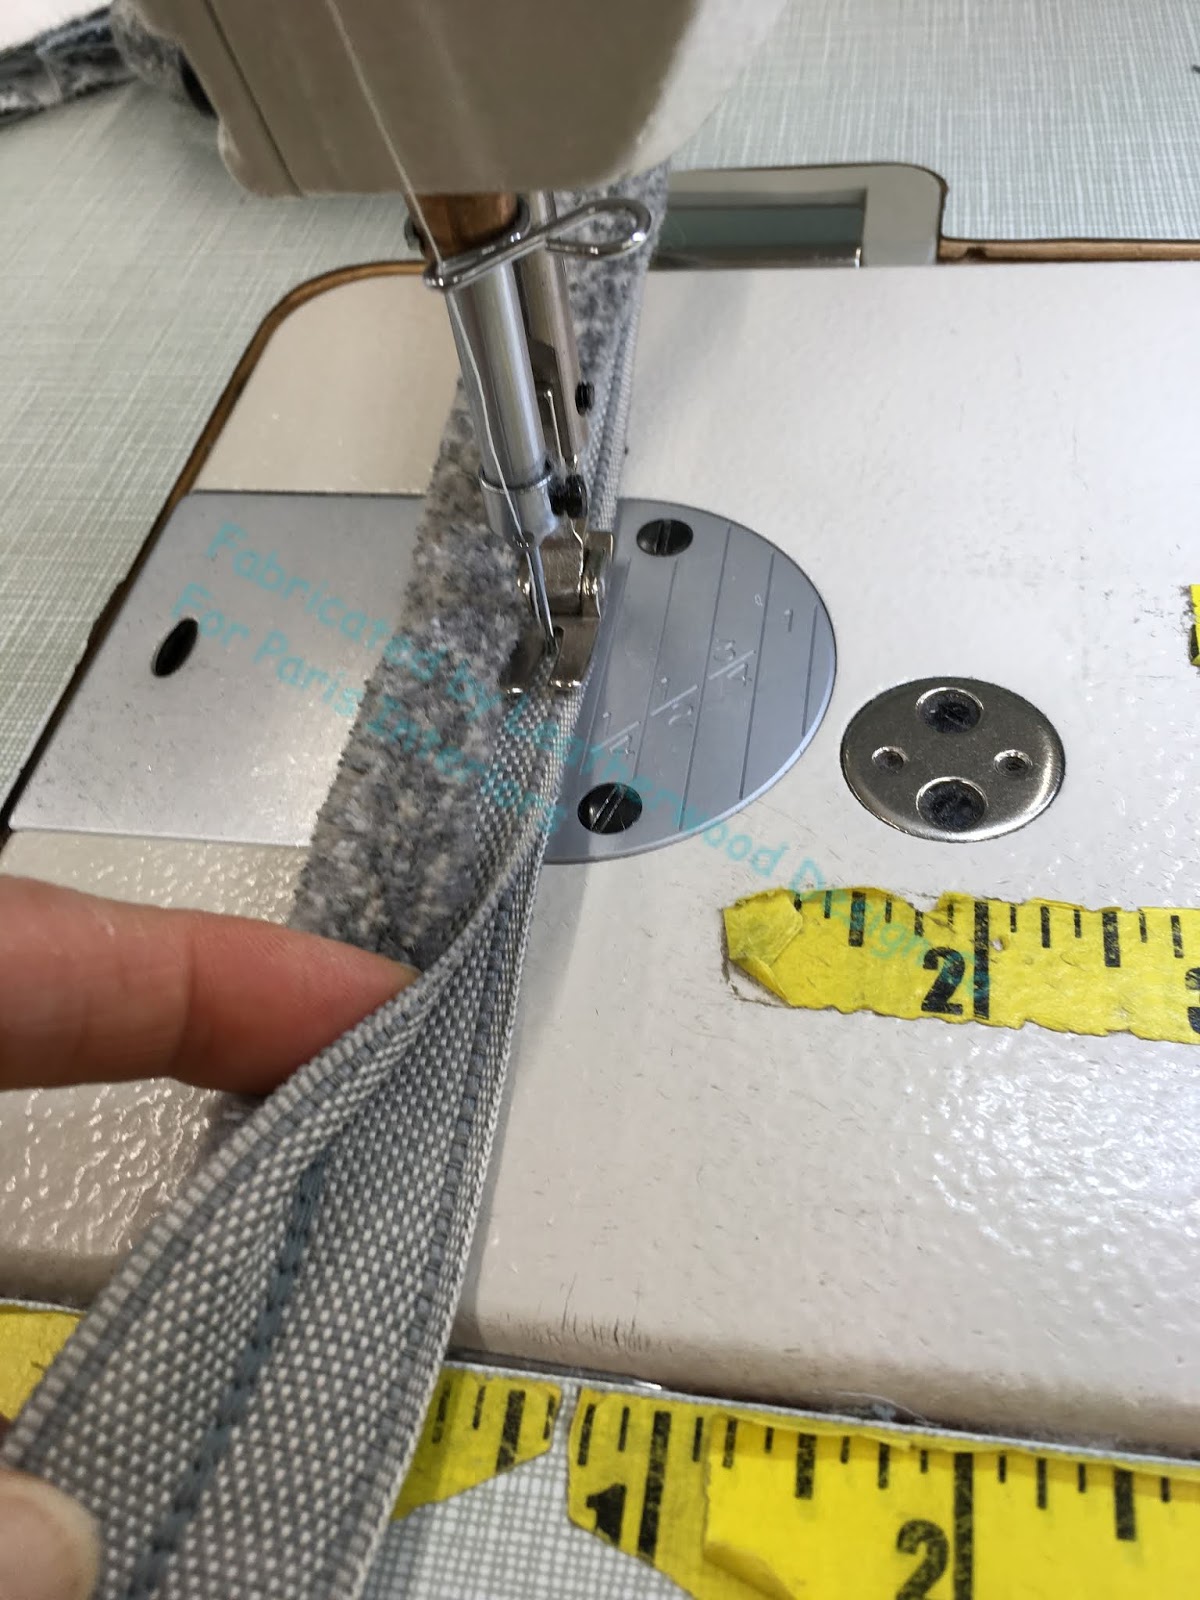
Back to the bunny pillow.  I sewed the two layers of tape together- and I still am not sure if this is how it's intended to be applied!- but this is how I started.
I sewed it to the pillow edges with a skinny foot.  I know, I know, I know about using a cording foot with the cord down and the fabric on top- but this is how I did this.
I put right sides together and sewed around the perimeter- not too close.
I turned to the right side and used the edge of a scissor to pull out fringe fibers that had gotten stuck in the seam, and then I could see how much further in I needed to sew.
I sewed again from the other side of the pillow, still with the skinny foot.
THEN I switched to a cording foot, turned the pillow over one more time, and sewed from the other side.  This last go-around did the trick.   I'm sure you wonder why I didn't begin with the cording foot.  Well, I feel that I could not have sewn the trim effectively if I had just started from this point- I feel that I would've gotten too much fiber caught into the seam.  I could be wrong, but this is the method I used and I'm sticking to it.
There was no way to sew a zipper to this, so I sewed the pillow closed by hand. 
It was tough sewing, and it took about four times longer than a normal pillow, but it turned out great!

Tuesday, March 26, 2019

All the Best, Part 2

The qualities of wool that make it luxurious are also the qualities that dictate special handling when using it for window treatments.  Wool's fluidity and drapiness make it prone to sagging and rippling, so we add internal structure to allow it to look its best.
The gridded canvas table is our most valuable workroom tool.  We ensure that the fabric is straight on grain by aligning it with the grid.  The bottom hem was calculated to be even with the top of the trim, and it was pressed and opened back up so the interlining could be layered in.
I considered options for making sure the wool did not sag below the fold line, which was even with the bottom of the trim.  Using my "best of both worlds" approach, I ran a line of Jewel adhesive tape to secure the wool and the interlining right where I wanted them.  Yes, I did consider joining the layers with a herringbone stitch.  I was still a little leery of the wool sagging below the trim, and chose the tape instead.   You'll see in a moment that the top was secured in such a way that I was confident that it would not sag.
Borrowing a technique from English curtain-making, the lining was folded up so the raw edge would be even with the raw edge of the wool, and hand-sewn into place.
Stabilizing the top edge was the key to keeping the fabric from sagging.   The interlining ends right at the board line, to reduce bulk; therefore staples won't hold it in place.  So the first step is to secure it to the lining.
A running stitch exactly at the board lines bastes the face fabric to the lining.  When the valance is stapled to the board, the layers naturally shift a bit from the "turn of cloth" but the layers shift at different rates.  They automatically grade themselves.  That's why they have to be basted exactly at the board line.  If they're secured further back, then there will be a little buckle in the layers.
 I leave the thread ends on the right side so that after the valance is stapled I can easily find the basting thread to remove it.  To keep it from loosening up or coming unstitched, I weave a bit back through the stitches.
The sides are hemmed by hand.
A variety of threads were chosen for the hand-sewing- here they are, along with the Jewel tape.
And now the valance is ready for mounting to the boards, and that will be the topic for "All the Best, Part 3," coming up later this week.

Friday, March 22, 2019

All the Best, part 1

I've been waiting a long time to do this blog post about one of my favorite projects of 2018, for designer Susan Marocco.
Last summer we created these valances that are a whole lot more than the sum of their parts.  They are the result of the finest materials, intense hand-sewing, internal structure, and special handling.
It's going to take several posts to tell the whole story, and today is the day to begin. 
Susan Marocco's clients live in a sprawling home overlooking a lake.
Accustomed to having no window treatments, but wanting the room to look finished, they chose top treatments in a sky-and-lake palette to create continuity between the indoors and outdoors.
After considering a dozen or more possible fabrics, a striĆ© Rogers & Goffigon wool was selected.  I knew immediately that I had to plan to make these treatments entirely by hand.  A geometric border from Samuel & Sons was chosen to define the bottom and add to the layers of color.
There were 7 separate kick-pleated valances, each a different size.  Each section size was determined accordingly.  The trim's geometric pattern was centered on each.  That in turn influenced the size of the kick pleat because the motif needed to be centered in the pleat as well. 
AND there were two right-angle corners- the left corner, in the photo above, and the right corner, which ran into the bookcase and needed a little fiddling.
The only machine sewing on the entire project was joining the sections.
We decided to sew the trim to the fabric before making the valances.  Running stitches in a matching blue thread completely disappeared into the trim.
When working with fine materials, I love to use what I call the best of both worlds- a combination of fine handwork that is facilitated by the use of modern tools and materials.  In this case, we used a removable double face adhesive tape from Rowley to secure the trim so it could be sewn with more control.  After the bottom stitch line was finished, we peeled off the "basting tape" before sewing the top stitch line.  This is actually a tape that is sticky on both sides, as opposed to an adhesive film on tape.  Removing it left no sticky stuff behind. 
Here you can see why the trim had to be sewn on by hand.  Whenever sewing happens, there is a bit of take-up, because as little as a single line of thread adds bulk and slightly distorts the fabric.  Even with the most attentive hand-sewing, in this photo you can see the slightest bit of rippling behind and below the trim.  Hand-sewing allows the most control over thread tension, which minimizes the take-up.  If this had been sewn on by machine, even a walking foot machine, the take-up would've been noticeable.  This is true of any fabric, but wool especially. 
Once all the trim was sewn, it was time to layer in the linings.  The goal was to have the wool fold up enough to create the tiniest lip of trim showing on the back, as you can see here if you peer closely at the bottom edge of the back of the valance.
And that's where I will pick up on the next post- layering in the linings and adding internal structure.  Now, it's time to get back to sewing my current project. 

Friday, May 18, 2018

84" tieback

The story of the 84" tieback is the third installment of the oversize ripplefold project for Crosstown Shade and Glass.    Though it looks simple, it was anything but- to create the smooth, sleek crescent I envisioned, I decided to hand-sew it.
The first step was getting the correct proportions.  Obviously if the panel was just 8' long, the tieback would've been much narrower.  Steve from Crosstown measured and determined that the wide point should be 8" and taper down to 4" ends.
It was up to me to draft the boat-shaped pattern.  The tieback was 84" wide in all,  and the fabric widths were joined so the seam would be in the back.  This was the only machine sewing.
I thought that buckram was necessary to help the tieback keep its shape, and I also knew that machine-sewing right sides together and turning was not going to give me the sleekness I envisioned, so I made the tieback sort of like I make a soft cornice, layering the face fabric, interlining and Skirtex. 
The interlining was trimmed close to the buckram, the curves were clipped in the face fabric, and Jewel tape applied to the buckram.
The face fabric was folded over, secured with the tape, then gently steamed into shape.
The self lining was layered on, the raw edges turned under leaving a little edge that I could sew to.  Then the entire perimeter of the tieback was hand-sewn with tiny ladder stitches to secure the self lining to the face.
This gave me exactly the look I wanted to achieve.
I think it's perfect :)

Friday, December 29, 2017

Curtains in 2017!

For someone mainly known as a Roman shade maker, I sure have had a LOT of drapery orders these last few months.  And since I acquired a few old/new-to-me sewing machines this year, I was able to handle the volume and enjoy the process.
I still LOVE sewing draperies by hand, however!  The penultimate drapery job before Christmas break was Ripplefold for 34' of window space, and these 20 widths of fabric were entirely hemmed by hand.  Nicole Gray of Suite Dream designed the treatment with 4 panels, each using 7 yards of a double-wide poly-linen blend.  Right now the Architrac rods are visible, but soon they'll be covered with a painted cornice.   This is the installation day photo- more to come after the job is complete.
 A few days before the Ripplefold, Nicole installed these 8 banded panels for a bay and two side windows.
Appropriate fabric choice is a key element of successful draperies.  Here the woven-patterned banding fabric paired perfectly with the medium-weight poly-linen blend.
The hems were pressed into the face fabric before the widths were joined, eliminating the need to table the bottom separately.
I'm loving my newly acquired machines!  From the straight stitch machine, the fabric moved to the new/old super-fast Rimoldi for the raw edges to be overlocked......
 .....then down the line to the blindhemmer for the bottom hems.
The banding fabric was basted in place with Dofix's Bortenfix K basting adhesive before sewing to keep it from shifting.  The banding was sewn at the 4" line so it could be wrapped with a full 4" on the back as well.  Although I'm showing the photo here, the banding was actually the first thing done, even before the widths were joined.  That meant less bulk to handle while sewing the band.
 I worked in pairs so I'd be sure not to make a mistake and make more lefts than rights.  The first panel took longer than it should have because I hadn't developed a method yet.  After the first one I realized I'd save time by doing as much of the bottom corner as possible before laying in the lining.  The edge was pressed, the bottom trimmed, and the panel laid into the Drawmatic clamp bar with the corner kept free.  The hemline of the band fabric was kept loose and unpressed, so the bottom line could be manipulated a bit in case there was take-up.
I shifted the corner onto the table so I could work with it more easily.  The corner weight was tag-gunned in place.
The band is folded up....
Tucked in...... (the first 4" of hem was left unstitched to allow for this step).......
And re-positioned under the clamp.
The lead edge was folded, pressed, and pinned after laying in the napped sateen lining.
The bottom corners were pinned in place.  The lead edges, with the banding, were sewn by hand, and the return edges were machine blindhemmed.
My favorite thread for hand-sewing side hems is Silamide thread.  It doesn't tangle, it glides easily, and has just a wee bit of give that keeps the seams from clenching up.   I use a single thread for most hemming, but for drapery bottom and top corners I double the thread.
The bay window panels had two lead edges with banding, for a total of 8 panels, 13 widths, and 10 lead edges.
Quite an adventure!  These 43 widths were made in addition to a set of sheer pinch pleat (14 widths), two pairs of lined and interlined top tack with decorative tape (6 widths), and two pairs of sheer lined with sheer top tack (6 widths).  A total of 69 widths in the 10 days before closing for Christmas break!  All side hems were machine blind-hemmed except for the ripplefold above, and the 10 banded lead edges.
Not shown: low-bulk method for tabling the tops, and the pleats being tacked with my new/old Chandler tacker- a super-time-saver!