THE BLOG IS HAVING TROUBLE WITH COMMENTS! SOMETIMES THEY DON’T GET PUBLISHED, AND WHEN THEY ARE I AM UNABLE TO REPLY TO THEM. IF THAT HAPPENS, JUST EMAIL ME AT stitchlore@gmail.com.

Looking for something specific? Check out the Topic Index, or the Search bar, just below, on the left.


Sorry about this problem!

SO.........WHAT ARE WE WORKING ON TODAY??
Showing posts with label silk. Show all posts

Sunday, December 3, 2017

Austrian shade

Fabrics just want to have fun.  You know, they want to drape and swoop, swish and sashay, and look smashing.  That's why Austrian shades will never go out of style, like swags: they allow fabric to look and perform at its absolute best.
So I thought I'd show off my latest Austrian shade, for Crosstown Shade and Glass, letting its fabulousness detract from the fact that this is my first blog post in a month (I'm sorry!).
While sheer fabrics swoop languidly, dupioni silk drapes in a delicious, crunchy way.  This shade is unlined, so we allowed more than triple fullness vertically.  The shade needed two cuts of 54" fabric.  We folded and pressed along the separate swoop lines to provide a stitching guide for the tapes.
We prepared the two cuts, sewed three rows of tape onto each, then joined the widths in the center and sewed the final tape.
 The sides were folded with a single hem and the tapes sewed over the raw edges.
In the old days, I would tie the tape strings to a post in order to shirr them up.  For this shade, I got to use my new Drawmatic clamp bar to secure the bottom of the shade, one clamp at each tape.
I began shirring the shade down the table. 
The printed grid table canvas allowed me to keep track of the length.
With the bottom securely clamped, it was easy to ensure that all the columns were shirred equally.
I use safety pins at every third ring as visual guides to check that the swags are distributed equally.  Once the shade is dressed, the pins are removed.
The rod pocket style is an unusual- perhaps old-fashioned- but effective way to manage the horizontal fullness.
This was fun to tackle this unwieldly project in the new, more spacious workroom!
 
I hope to have many more Austrian shades in my future.

Monday, July 18, 2011

Coverlet

Infrequent posting is not a sign of inactivity- more a sign of a frenetic pace and inattention to photography. 
Last week we produced shades at the usual rate and neglected to take a single photo.
In addition we made this luscious silk coverlet.


The face is a silk damask, and it's interlined with silk batting, lined with a fine quilt-weight cotton sateen.

I was thrilled with the drape of the silk batting.  I wish the photo could capture that.


After the widths are joined and the components layered and pressed, the tacking is done.  I forgot to take a picture of the tiny X tacks.  The widely spaced tacks secured the layers with scarcely a dimple. 
Then everything is trimmed to size, shaped, and basted.  I love basting!  Yes, it could be pinned, but it's not the same.   Thread basting is so much better and doesn't take long. 


Once basted, the edges are bound with a 5/8" self bias binding.  First the strip is sewn to the perimeter right sides together.  Bias strips tend to stretch and thereby lose some width so it's important to cut them a little wider than you think you'll need.  For a 5/8" binding the strips are 3" wide.  The shrinkage can be uneven if there is a woven pattern. 

Then I like to press from the right side, pressing the main body of fabric as well as the binding outwards, then, working from the right side, fold evenly to the back, pinning as I go. 

Especially on the round corners, the bias binding folds itself over into a neat finish with very little coaxing.

Isn't that round corner lovely?  You make the curve by measuring in from the bottom and the side the amount of the drop, in this case 14", then draw the quarter-circle from that point. 

Then the fun part: stitching in the ditch.  This is done from the right side.  As you sew, you pull the face and the binding apart slightly and stitch carefully in the "ditch" and when you let go and do a final pressing, the stitches are barely visible on the front.  You can see them on the back, but that is why the back is the back.  I considered hand-sewing the binding, but as this coverlet is going to get a lot of tossing around, I wanted the security of machine stitching. 

To stitch in the ditch effectively, it's best (for me) to not think too much about what I'm doing.  If I concentrate too much on the stitching, I miss my mark.  Also don't go too fast, and try to remember to keep checking the back side, otherwise when you check your work at the end, you'll find missed spots like this!

A long time ago I learned a machine-quilting trick that I use for re-sewing a spot like this: take two stitches forward, then two back, then sew; end your sewing in the same way, two back then two forward; when finished, clip the thread on the right side right up next to the fabric, then on the wrong side pull the bobbin thread til the tiny tail of thread on the right side pops through to the back, then clip.  The stitch join should be secure and unnoticeable.

Saturday, November 20, 2010

Not as simple as it looks

For such a simple-looking valance style, there was not one step in the fabrication that was easy.

We were asked to duplicate this valance, which is made out of a nice sturdy cotton.  Our yellow stripe is a paper-thin fine silk.
Hmmmmm.

The patterns were drafted based on the photo.  There are two valances this size, and one with five sections.
The two small valances have seven individual pieces- 2 scallops, 2 returns, and 3 jabots; and the large valance has 13 individual pieces.

To help make it easier to sew the welt to the stripe without puckering I fused the fabric pieces to Rowley's fabric stabilizer- a knit interfacing that adds stability and substance without stiffness.
Oh, boy, I love this stuff.  I bought it several years ago and never used it til now.
This was as eye-opening as glue basting was earlier in the year!
Interlining might have made it easier, but the order did not call for interlining.

All the little return pieces have a painfully close curve at the bottom, so I took special care with them.  Here you see five of them in different stages of completion:  I traced the piece onto the napped lining and pinned it without cutting the curve in the lining.  Then sewed on the welting and pinned it back to the traced shape and sewed around.  After it was sewn I trimmed off the lining around the curve.  The seams were graded before turning and then the piece was carefully ironed.....

Using this pressing ham to try to keep puckers out of the curve..... with varying degrees of success.  As a 35-year vegetarian, this is the closest I get to ham.


Once all the pieces were cut, sewn, turned, and pressed, time to staple.  The little "jabots" were pleated into place and stapled.  Then to compensate for the bulk of the jabots, I built up the board edge to the same height using rolled fabric, so the top would be even.


At long last, all done!

I'm so glad I'm not installing these.  I dressed these valances a dozen times already, at different stages along the way, and now it's someone else's turn!

Saturday, October 9, 2010

Gorgeous shades!

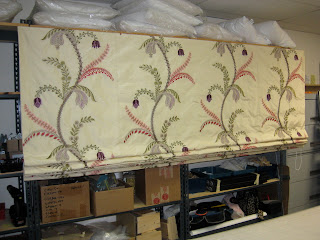
A workroom shot of one of the two shades, mounted for testing, partly raised.  How do you like the pattern layout? 
Embroidery always leaves the fabric puckered and sometimes it's impossible to iron out.  But I'm totally in love with my latest Rowenta- that pointy nose is HOT and gets right in between the embroidery and irons out even the tiniest wrinkles.  The iron's wider "belly" was also useful for pressing sideways into a rippled section, sort of tricking it into flatness.
All this silk/viscose blend fabric had to be ironed first from the right side then turned over and ironed to size from the wrong side and then ironed again with the interlining, and then again with the lining- about an hour of ironing per shade before the sewing even starts! 
Can you believe this is the nursery scale that John's mom used when he was a baby?  John weighed a lot less than this shade!  We weighed everything to be sure we could use a slim clutch since there was little space for mounting these very wide shades so we couldn't use a regular 30# Rollease clutch.  The scale says 10 pounds, including the weight rod, face fabric, lining, and interlining, and the clutch components- whew!  the slim clutch can handle 15 pounds.   
There was not enough fabric to use three cuts per shade, and we had only 1/4" over on each side for the side hems, so we used an alternative construction technique, adapting a method from English interlined panel fabrication: the interlining was layered over the face fabric and both were folded over together, then the lining laid on top and ironed down just 1/8" or less from the edge- just wide enough to get a skinny needle into the space- and the sides were blind-hemmed by hand with itty bitty stitches.  It was tempting to just whip stitch the sides but in the end it was only a couple of extra minutes to do a blind hem, and I don't have to feel guilty!  That narrow bit of face fabric looks so nice, like a microcording.  I can think of a few situations where I might use this technique again.

The decorator just called to report that the shades look fabulous in her client's home and that they are very happy with them- yay!  I'm SO thrilled.  I don't know if folks realize how personal these projects are to us workrooms- a little piece of us goes into every job and we agonize over the decisions we have to make during fabrication.  I love hearing when one of my products has made someone happy!

Friday, June 25, 2010

Tools my grandmother didn't have!


Does this fabric look familiar?  Back in the winter I posted pictures of a small shade out of this fabric.  It was fun using twill tape to band the edges and the shade turned out great.

The decorator wanted to use it again for this shade which is wider than the width of the fabric.  We needed to find a way to join the widths.

The face fabric is a very sheer silk, with a 1/4" hemp rope woven in horizontally.  The rope is very bulky, making it impossible to sew the widths, so we thought of using the twill tape to hold the widths together and at the same time hiding the join line.  The twill tape is topstitched down each side, through all the layers.

This is where some modern workroom tools really made it possible to fabricate this shade with confidence.

The shade was made almost entirely on the table.  Since you can see through the sheer silk and the sheer linen lining, I used the gridded canvas table to press and lay out the fabric and keep the rope lines and the lining grain line straight.

Adhesive tape was used as a basting tool.  Once the half widths were positioned next to the full center width, I ran adhesive tape down the join line and pressed the twill tape into place.  I also used the tape to position the twill tape used for the banding.  The tapes were also pinned to keep the layers together.

Fabric staples across the top kept the fabrics from shifting while the shade went off to the machine for topstitching.


Back to the table, wrong side up, the grid again assisted in marking for the rings.  As a matter of fact, I didn't even mark- I just followed the rope lines and the vertical grid lines and sewed the rings on by hand right on the table.  The clear plastic rings and tan lift cord are nearly unnoticeable from the front.


The twill tape in folded in half and made a pocket for the weight bar which I sewed right behind the bottom band, following the topstitching line.

I've had my gridded canvas table for 4 or 5 years now and can't imagine going back to fabricating anything without it.  


Tuesday, June 8, 2010

Inverted pleats

The other day I had the opportunity to see some draperies hung up that we made awhile back.

These are inverted box pleats- very small box pleats with a lot of space in between.  The ripple effect was a complete surprise to me!

I like to use clear buckram- the kind used for sheers- in flat panels whether with or without little pleats, because the top line holds without drooping yet is fluid.  The heading is doubled in the back for extra body. 

I was on the run that day- we have work installed in 3 or 4 rooms in this house and I was there to measure more rooms.  I'll take good photos of it all when we install the next phase.

Monday, May 24, 2010

They jogged my memory.....

Today I hung some curtains in the home of a very personable couple who are the parents of clients we made window treatments for a couple of years ago.  The parents told me how much they love the work we did with Diane Satenstein for their son's home, and when I got back to the studio I wanted to take a look back at those treatments- and here they are for you to see.
The dining room swags are board-mounted, the living room swags on poles.
Diane loves full, gathered swags and jabots which makes me really happy, because so do I.
These treatments are hand-sewn of imported silks, interlined, and trimmed with luxurious tassel fringe.
In both rooms the shades are hand-sewn of sheer silk with delicate glass bead trim.

Wednesday, March 17, 2010

Inverted Box Pleat


Well, my apologies for the crummy photos.  I had the opportunity to show these two very different applications of inverted box pleats but no time to set up any sort of shoot for them, so here we are.
The top shows interlined silk, inverted box pleats to normal 2 1/2 times fullness, as well as contrast microcord and yummy silk tuxedo buttons.   The rings are sewn on, but the panels could be hung the rings with drapery pins.
The bottom shows very tiny inverted box pleats on an unlined sheer with 2" translucent buckram in the header.  The pleats on the sheer are there just to control the fabric on what are essentially flat panels;  they provide a good place to place the drapery pins so they'll be hidden.
The technique is exactly the same but what a different interpretation!
The bottom picture shows both examples from the back side.  There are a number of ways to finish an inverted box pleat, but I like the stitch-in-the-ditch method because it flattens the pleat out, provides a place for the pin, and gives some control. 

Wednesday, March 3, 2010

Another exercise


Another workroom sample exercise!  Here is a cuffed panel with an over-stuffed lead edge banding with tassel trim.  One thing I would change if I could is the size and shape of the cuff.  I thought a shaped cuff would be cool but actually the shape kind of gets lost and might look like a mistake if it's not dressed well.  And I think the cuff should be an inch or two longer, but that was all I had of that delicious silver silk, so there you are.  Rather than just sew the rings on, I though I'd try making a little pinch and sewing the ring into it.  That seemed to work pretty well so I rummaged around until I found these pale aqua glass beads, and we sewed them on with prominent French knots to show off the thread color.  This panel is lined with a heavy cotton sateen, and interlined with a heavy cotton flannel.  I didn't take a picture of the bottom, but the hem is padded with interlining as well as the lead edge.