THE BLOG IS HAVING TROUBLE WITH COMMENTS! SOMETIMES THEY DON’T GET PUBLISHED, AND WHEN THEY ARE I AM UNABLE TO REPLY TO THEM. IF THAT HAPPENS, JUST EMAIL ME AT stitchlore@gmail.com.

Looking for something specific? Check out the Topic Index, or the Search bar, just below, on the left.


Sorry about this problem!

SO.........WHAT ARE WE WORKING ON TODAY??
Showing posts with label flange. Show all posts

Wednesday, December 6, 2017

Mastering the Miter, one corner at a time

A miter queen I definitely am not- I know a miter queen or two, but I'm not one of them!  I have to carefully think my way through it every time.  As with many fabrication tasks, such as installing zippers in pillows, the only way to become proficient is to practice, practice, practice.
For these pillows, precision was key.  The Samuel and Sons 2" woven braid had to be turned into a 1/2" mitered flange.
When I made a trial flange, I immediately discovered that the soft braid would not hold its shape.
This was not the precise, tailored look I needed to achieve.
I made another experiment using fusible fabric stabilizer from Rowley Co. 
When I trimmed and turned the corner, there was the look I was going for!  The stabilizer gave me control over the shifty tape.
So I got out my rotary cutters and cleared my mother-of-all-cutting-mats tabletop.  I needed a sharp blade for the stabilizer, so I put a fresh one in my cutter.
I cut the strips just shy of the trim width.
I learned the hard was that the tape should be ironed on OVER the stabilizer, not the other way around.  A few miles of ironing later.....
Nothing for it but to plunge in and get started.  Once you get the hang of it, this is actually fun.
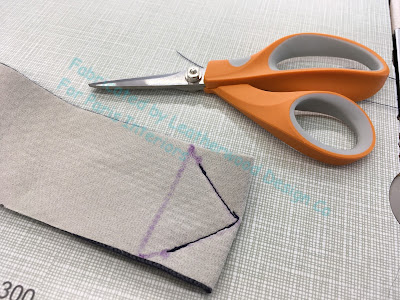
Maybe the Miter Queens can do the rest of this job with math, but I can't!  I pinned the flange to the table to mark the exact spot for executing the next corner- another use for my can't-live-without gridded table canvas from The Workroom Channel.
The pressed fold helped make it easier to be precise.
 I completed the corners one at a time, going back and forth from table to machine (it's only 3 feet away, LOL) for each step.
When they were done I laid the trim out to cut and pin the join, in the center at the bottom.
 The last step before applying to the pillow face was to stay-stitch the entire perimeter just inside the final stitching line, to keep the layers from shifting.
The completed trim was sewn to the pillow face as if it were a lip cord.
I just barely tapered the corners, to help avoid pointy pillow ears.
The pillow was finished the ususal way- right sides together and a color-matched zipper.  The rule for color-matching with a contrast zipper: match the trim, not the fabric.  This holds true 99% of the time in my experience.  Now they're ready for their new owner!

Friday, March 9, 2012

The hardest pillows I've ever made!

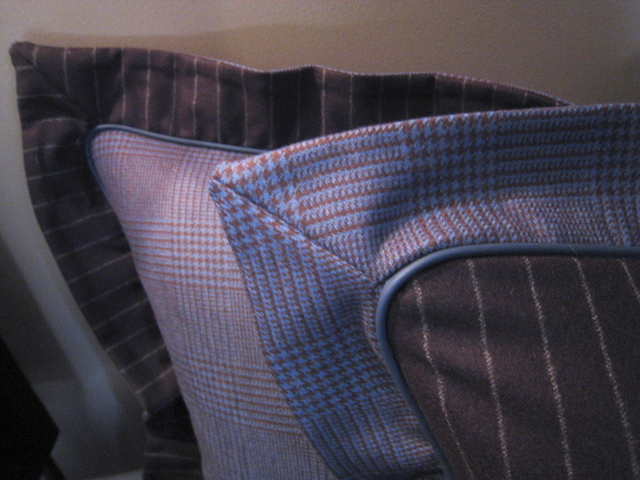
Earlier this week I showed the workroom sample pillow I made in order to work out the kinks before making the real pillows- the reversible inset flanged plaid and striped wool shams with leather welting on both sides.
Well, today was supposed to be the big day- the bed was to be delivered today, and we were all set to display the pillows spectacularly on the new bedding, and guess what, no bed!  Very disappointing!  So we arranged the pillows in the corner of the room and photographed them there.


I did a lot of research to decide on a fabrication method.  Making the sample pillow ensured that the technique was sound, but I also needed to be sure that it would work with the actual materials, since they were so challenging; so I then made one corner mock-up with the wool and leather.


The big aha moment came when I realized that I could apply the welt to the flange first, rather than to the pillow body.  More on that below.  I even put in a mini zipper to be sure that would work.  To my amazement, the zipper was easy.


Since the flanges were also reversible, I cut the plaid strips and laid them out to size and pressed in the diagonal miter before sewing.  Then I laid out the striped wool on top to be sure I was making them exactly the same size.  After sewing together and pressing, I used fusible interfacing to stiffen the flange and keep the fabrics from flopping apart.

As I said earlier, my big breakthrough moment was when I thought of applying the welt to the flange instead of the body of the pillow.  I tried that technique with the little corner mock-up and was really happy with it, so I forged ahead with the four pillows.

At the corner, I clipped the welt and made a big right-angle notch, so there would be no bulk when the pillow was turned right side out.  I left the needle in the work and pivoted the flange, so the sewing continued on a straight line.

Then the flanges were applied to the pillow bodies....

and the second layer of welting went on next.... 

and finally, eventually!,  the backs and the zippers.
Since so much time went into thinking, envisioning, experimenting, and practicing, the actual fabrication was easier than I had expected, and the outcome was quite dramatic.  I delivered these pillows happily!

Monday, March 5, 2012

Inset Flanged pillow with welt both sides

I have recently had to master a pillow style that I've spent decades avoiding.  Inset flanges used to inspire, well, terror in me.
Now I've had an order which I'll be delivering this week for inset flange pillows, reversible, with welt ON BOTH SIDES and ZIPPER, and mitered corners on the flanges.
To make it even more challenging, the welt is LEATHER; the fabrics are WOOL; and the last paralyzing detail- one fabric is a plaid and one is a stripe.  On one side the body is the stripe and the flange is the plaid, and on the other side the body is the plaid and the flange is the stripe.

So in addition to practicing and making mock-ups, I made myself a complete pillow, and here is the result, front side:

And the back, with an invisible zipper:

And to prove that it really is one pillow, not two: 

More later in the week!