Showing posts with label mock-up. Show all posts
Showing posts with label mock-up. Show all posts
Friday, August 24, 2018
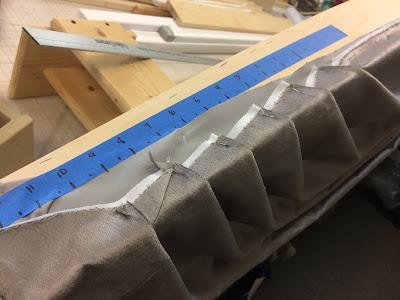
Mocking up a skinny shade with spring lift system
Tuesday, June 13, 2017
Wool Ripplefold
We love Ripplefold as much for its clean, practical sensibility as for its knack for showcasing a fine fabric by allowing it to cascade in cool, serene columns.
Fabricated for Susan Marocco Interiors, the Holland and Sherry wool panels hang from a mitered square Svelte pole in Silver Leaf from J. L. Anthony (with 8" returns) and are trimmed with wide embroidered banding from Travers.


 To avoid calculation errors, we knew it was smartest and easiest to mock up the track before planning the fabrication. With the snaps labeled, we were able to trim the widths of the wool before joining so the seams fell to the back folds.
 Mocking up the lead edge also ensured correct trim placement. With "buttmaster" carriers, the lead edges abut each other instead of overlapping, so the trim was sewn in from the edge to allow it to show on the front of the panel.
 There is much more to the story of these draperies...... I'm off to the city now, so more later!
Fabricated for Susan Marocco Interiors, the Holland and Sherry wool panels hang from a mitered square Svelte pole in Silver Leaf from J. L. Anthony (with 8" returns) and are trimmed with wide embroidered banding from Travers.


Tuesday, March 7, 2017
Grey velvet swags, installed!
I'm happy to say that the grey velvet swags were successfully installed today! Thanks to Danny at Fabric Factory Outlet for sending me his photo.
 I've made a variety of arched treatments before, but once I began making this, I realized that I had never actually made arched SWAGS. Thanks to the excellent instructions in Ann Johnson's books on swag fabrication, I was able to draft these swags perfectly on the first try.
 The side swags were pretty tricky. I read the instructions a dozen times before starting. I've made asymmetrical swags, but never with an arched top. It was fun!
 The face of the board was covered in grey lining....
 .....and the outward-facing part covered in white. The horizontal board is there to help the frame stay put; it was removed after the arch was installed.
 I marked the arch with masking tape in 1/2" increments so I'd have symmetrical reference points for each side.
 The reference points allowed me to go back and forth and make small adjustments evenly on each side.
 The side swags were attached first, starting with the flat section. When stapling mirror image swags, I do both together, one pleat at a time, so they can be pleated the same way.
 It was pretty thrilling to see the pleats to fall into shape almost immediately!
 I used cardboard tack strip to even out the center where the pleats stack up. After the center swag was stapled, I flipped it back and filled in the gaps with little pieces of cardboard, then secured it all with hot glue.
 Actually the hot glue made a good filler too. I wanted the top curve to be sleek. Once the glue cooled, I trimmed it smooth with scissors.
 To shape the jabots to the frame, I made a little paper mock-up of the jabot silhouette and cut the shape of the frame.
 After the jabots were pleated (using my Parkhill jig), I cut them to shape, leaving a board allowance for the returns and first pleat.
 Since the jabots followed the frame precisely, they were easy to attach to the face. Only the return and part of the outermost pleats were stapled up onto the dustboard; the rest was attached to the front to reduce bulk.
 It didn't seem likely that anyone would climb up and see the raw edges, but I covered them will twill tape just to be safe.
 The dustboard cover was stapled just behind all the tack strip build-up which shaped the top. It's fun to staple it on then flip it over right side up!
 It's a wrap!


Tuesday, October 29, 2013
Extreme Mock-up
There were many questions about this drapery project, and a lot of decisions to be made, and since the homeowner had about 80" extra of the 120" wide fabric, we decided to make a full-size mockup.
The biggest issue was lining. The woven damask pattern completely washed out when sun came through the fabric. To decide on the best lining option, we sewed together 20" of four different lining combinations.
 To the right, one layer of napped sateen. Next to that is natural
interlining, then dim-out thermal lining, and all the way to the left,
khaki napped sateen, all three of those layered between the face fabric
and ivory sateen.
To the right, one layer of napped sateen. Next to that is natural
interlining, then dim-out thermal lining, and all the way to the left,
khaki napped sateen, all three of those layered between the face fabric
and ivory sateen.
When the panel was hung, of course the linings are in the reverse order. On the left, the single layer of napped sateen was very little help in preventing pattern wash-out. To the far right, the khaki layer blocked a surprising amount of sun. In the middle, the two other options were similar, except that the natural interlining enhanced the yellow in the ocher ground to produce a beautiful luminous gold color, and and also lent its rich fullness, which the dim-out could not match. We agreed that natural interlining and ivory lining were the way to go.
 For the mockup I wanted to actually sew the shaped goblet pleats, which as you can see I did not get around to tacking; that helped us determine a few other things- first, the 6" deep pleat is just a little too much, as the shadow line falls below the bottom of the window trim; and the more rigid buckram was the best of the 3 options we tested.
Up close we also decided we liked the gold silk for the microcord, but we'll make it a tad bigger so it will show up better.
 Also I think that the cutout shape could be a little more exaggerated, so I'll modify my pattern for the real thing. One thing I learned from this trial panel is that it would be much easier to welt the facing rather than the body of the drape. To prevent distortion around the curves, I'll use a fusible fabric stabilizer on the facing. I think I will not cut the shape in the panel until sewing the layers is completed.

The biggest issue was lining. The woven damask pattern completely washed out when sun came through the fabric. To decide on the best lining option, we sewed together 20" of four different lining combinations.

When the panel was hung, of course the linings are in the reverse order. On the left, the single layer of napped sateen was very little help in preventing pattern wash-out. To the far right, the khaki layer blocked a surprising amount of sun. In the middle, the two other options were similar, except that the natural interlining enhanced the yellow in the ocher ground to produce a beautiful luminous gold color, and and also lent its rich fullness, which the dim-out could not match. We agreed that natural interlining and ivory lining were the way to go.

Up close we also decided we liked the gold silk for the microcord, but we'll make it a tad bigger so it will show up better.


Lastly, we both liked the panel puddled- neither of us being "puddle people," we were surprised!
Friday, September 20, 2013
Fab Fabric Friday!
 | ||
| For Mock Hobbled Valances |
 |
| My Mock Hobbled Valance Sample- nearly finished.... |
 |
| For a London shade with contrast inserts in pleats |
 |
| Faux bois for a bolster |
 |
| Breathtaking sheer for skirted balloon shades |
 |
| Workroom sample of skirted balloon, a work in progress.... |
 | |
| Detail of tiny blue trim on shade skirt |
Thursday, September 12, 2013
Swag variation- straight bottom- and a "duh" moment!
Recreating window treatments from a photograph is sometimes part of the workroom's job. Sometimes we have design input, but sometimes we are required to simply make what is ordered.
I was asked to duplicate a swag with a flat, straight bottom, that was seen in a magazine. After much experimenting, I developed this mock-up. I based the swag specs on that bottommost fold, using Ann Johnson's swag book. I pretended that was the swag silhouette, and then left a lot of excess fabric, which I cut away to get the shape I sought.
Postscript *** Here's the "duh" moment: Now I am realizing that I basically was creating a variation of an Empire valance. Those straight sides are where horns would be sewn to an Empire.***
 I was so surprised when I unstapled the mockup- for the bottom to appear practically straight, the bottom edge actually is a concave curve. This is the weirdest swag pattern I've ever made!

The real fabric is a plaid, however, and I didn't want the bottom edge to be cut off-pattern, so on this one point I compromised and cut it straight on the bottom, which meant the sides raised up a little higher than wished, but I didn't think the alternative would've been attractive at all. Here it is before pleating..... strange, huh!
Postscript *** and now that I've had my "duh" moment, I see that it's just a very big Empire swag, with separate jabots instead of attached horns! ***
 Ta-da! The final product. The swag dimensions, as well as the jabot style, short point, long point, and face width, were all specified by the client to be based on the very fuzzy photocopy of a photograph.
Postscript *** Well, if I had recognized this treatment as a wide Empire, I still would have had to draft a pattern from scratch, but it might have been easier if I had visualized this pattern shape in the first place. ***

I was asked to duplicate a swag with a flat, straight bottom, that was seen in a magazine. After much experimenting, I developed this mock-up. I based the swag specs on that bottommost fold, using Ann Johnson's swag book. I pretended that was the swag silhouette, and then left a lot of excess fabric, which I cut away to get the shape I sought.
Postscript *** Here's the "duh" moment: Now I am realizing that I basically was creating a variation of an Empire valance. Those straight sides are where horns would be sewn to an Empire.***


The real fabric is a plaid, however, and I didn't want the bottom edge to be cut off-pattern, so on this one point I compromised and cut it straight on the bottom, which meant the sides raised up a little higher than wished, but I didn't think the alternative would've been attractive at all. Here it is before pleating..... strange, huh!
Postscript *** and now that I've had my "duh" moment, I see that it's just a very big Empire swag, with separate jabots instead of attached horns! ***

Postscript *** Well, if I had recognized this treatment as a wide Empire, I still would have had to draft a pattern from scratch, but it might have been easier if I had visualized this pattern shape in the first place. ***

Wednesday, December 12, 2012
London Shade variation
Here is a silhouette we've created before, but never on such a large scale.
 We made two valances, 118" wide, for two palladium windows, to be mounted below the arch, and there is a third valance, 96" wide, for a regular window.
 With so much fabric across such a wide expanse, we wanted to be sure, before cutting into the fabric, that the silhouette was going to turn out the way the designer expected. It is 24" at the long point of the swaggy sections. I emailed pics of the various options to the designer for her approval.
 Pulled up to 18" at the center of the swaggy part, we thought it looked pinched and awkward. The actual valances are adjustable with a cord lock, so the installer can set it to exactly where the designer chooses.
 In case the designer thought the sides were too long, I pinned up one side at an angle to shorten the tails, but in the end she preferred the longer version, as did I.
 I made this no-sew mockup with a ring tag gun and little split rings to clip them together.
In case you wondered, on the final product the lining was railroaded, so the length of the valance before pulling it up was just 52".
 There is 12" of fabric in each mockup pleat, but in the real thing there is 13.75" in each pleat, because I wanted the pattern to match where the folds meet. I had to join the widths one motif into the width of the fabric to make the seams fall in the pleat instead of on the face.
.jpg) For the last step of the mockup, I tag-gunned the trim to the face at 1.25" below the board, for the designer's approval.
For the last step of the mockup, I tag-gunned the trim to the face at 1.25" below the board, for the designer's approval.


In case you wondered, on the final product the lining was railroaded, so the length of the valance before pulling it up was just 52".

.jpg)
Tuesday, November 13, 2012
More swags: gathered this time

For a wide window with a high cathedral ceiling, the designer planned raised swags on boards. After drawing the concept to scale, I started playing with chain weight on the hallway wall to get the exact silhouettes in the right proportions. The biggest challenge was to get the long points to not cover too much of the window, and the short points long enough to cover the molding.


It's hard to remember to document projects like these- so much experimenting going on, I forget to take pictures throughout the process. The decorator has promised plenty of photos at installation time..................
Thursday, May 31, 2012
Mock-ups part 4: the faux roman valance

Kim Freeman's project, featured recently in several posts, included faux Roman valances over the solar shading. After pictures of earlier faux Romans helped clarify the treatment, we sent along a mini mockup out of the actual fabric. The fabric was a wide horizontal stripe sheer linen, so the folds alternated which section of the stripe showed.


Subscribe to:
Posts (Atom)