I have another way to eliminate pinholes of light in blackout shades.
These are French blackout lined.
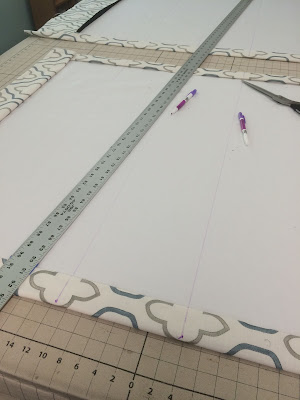
As most of you know, French blackout is a sandwiching technique: face fabric, interlining, black sateen, and lining, which provides a lush product that is also blackout. It can used for shades, draperies, or top treatments. Here you can see the layers. I've laid out two shades side by side on my gridded table.
Using a purple disappearing pen, I drew a grid on the back of the shade for ring placement.
At each attachment spot, I sewed the ring OVER a tiny "bandaid" of Silky Blackout lining. You can see how the needle insertion points are staggered, so that the holes in the shade are blacked out by the "bandaid" and the hole in the "bandaid' is centered between those two points, so that all the holes are blacked out by another blackout layer.
I dabbed glue on each side of the bandaid to hold it down and neaten it up.
The bandaids are about the size of a Ring Lock, so they are barely noticeable. What do you think of this?
THE BLOG IS HAVING TROUBLE WITH COMMENTS! SOMETIMES THEY DON’T GET PUBLISHED, AND WHEN THEY ARE I AM UNABLE TO REPLY TO THEM. IF THAT HAPPENS, JUST EMAIL ME AT stitchlore@gmail.com.
Looking for something specific? Check out the Topic Index, or the Search bar, just below, on the left.
Sorry about this problem!
SO.........WHAT ARE WE WORKING ON TODAY??
Showing posts with label blackout bandaids. Show all posts
Showing posts with label blackout bandaids. Show all posts
Thursday, August 20, 2015
Friday, January 13, 2012
Totally blacking out drapery panels
Our NYC client is hoping for total blackout from her new draperies. They're being installed this morning so I'll update this post with pictures if "someone" sends me any! These upholstery weight panels have 2" 2-finger pleats tacked 1" down from the top, at approximately double fullnesss, with a low-bulk top. The tack thread is wrapped around the front of the pleat rather than stabbed through the sides.
I tried to do everything humanly possible to be sure light did not bleed through any stitch holes. We did not blindstitch the lead edge; instead we sewed it, turned, then sewed in an extra strip of blackout to cover the first stitch line, folded back 1/4" to be sure the entire lead edge is filled with blackout. Not easy to describe, but it worked perfectly.
For the lining seams, we bonded double-sided adhesive tape to the wrong side of the blackout, then cut into 3/8" strips with a rotary cutter.
Then the strips were adhered to the seams. Merlyn, if you're reading this, THANK YOU for this tip!
It looked fine as it was but we decided to cover the strip with gimp, also using double-sided adhesive tape.
Short pieces of blackout "bandaid" strip were applied over the pleat seams- another place where light sneaks through. Leftover blackout strips were sent with the installer so he can cover up anyplace that I might have missed.
Next time I think I might go ahead and blind-stitch or hand-sew a rolled lead edge border, as usual, and adhere a blackout-lined coordinating gimp or other flat trim over the seamline. I think it could be a beautiful detail.
Thursday, December 8, 2011
Ladder shroud and blackout lining
A number of cord shroud techniques for shades have been available for nearly a year now, and we use whichever one is most appropriate for the fabric and shade style.
Ladder shroud is very useful with blackout lined shades because it's possible to apply little blackout "bandaids" to very effectively block light that wants to peek through the holes left from the needle where the rings are sewn.
I have discovered that the "bandaids" are applied most easily with a hot glue gun. They're cut about 1/4" wide by about 1" long. They don't get in the way of the cord as the shade is raised.
Subscribe to:
Posts (Atom)


