THE BLOG IS HAVING TROUBLE WITH COMMENTS! SOMETIMES THEY DON’T GET PUBLISHED, AND WHEN THEY ARE I AM UNABLE TO REPLY TO THEM. IF THAT HAPPENS, JUST EMAIL ME AT stitchlore@gmail.com.

Looking for something specific? Check out the Topic Index, or the Search bar, just below, on the left.


Sorry about this problem!

SO.........WHAT ARE WE WORKING ON TODAY??
Showing posts with label double London shade. Show all posts

Thursday, May 1, 2014

Repurposing

The original two Londons.....
There is a lot of "re-purposing" going on these days!  and why not?  if you can re-use treatments that you love when you move, or for a different room when redecorating, you can save a lot of money on new materials.
Nicole Gray's client moved house, and we combined her two interlined London shades into one for her daughter's new room with a larger window.  We had just enough of the green fabric to make a new header; otherwise the measurements worked out just perfectly.  We were able to remove one contrast pleat, join the sections and the ruffled trim, and do a little nudging and fudging to make it fit the new dustboard.  It was all surprisingly simple.


Now they are one!


The kitchen in the old house had a smaller window and a larger window.  We had made Kingston valances mounted on small covered boards.
Now, the new kitchen has two same sized windows.  We took two sections off of the larger valance and added them onto the smaller valance, and Nicole raised the center sections on the sink window to fill in that awkward space above the top of the cabinets.  A little poetic license was taken to join the sections, but it turned out great.

Friday, April 11, 2014

Special touches.....

Layers of pattern distinguish this nursery: wallpaper, embroidered linen sheer, and embroidered silk.

London shades serve as toppers for operable linen sheer relaxed romans.
(Please note: after these photos were taken, hold-downs for the bead loop chains were installed!!!)
The subdued lighting created by the fabrics makes this room feel like the perfect place to escape the summer heat, with a book, some iced tea, and a few extra minutes for napping.
The next two photos are over-exposed, so the details are easier to see.
The double London shade on this short, wide window needed special attention to proportion.  
Because the windowss are next to the crib, extra steps were taken to ensure that the shades are ultra-safe.  Originally posted last June, you can read here about how we encased the cord in a sheer shroud that was fully sewn shut so there would be no possible way to reach the cords.
On the right, the angled ceiling cut into the board line, so we made an angled dustboard, naturally!

Another special touch was a little leaf applique from the linen sheer on the inside of the silk shade.  Chances are nobody will notice it, but I know it's there!
Since the sheer linen was unlined, the bottom rings were reinforced with a little scrap, to strengthen the fabric under the stitch.

Monday, October 21, 2013

Installation day!

I can't believe all of last week went by without a single post.  Things were really hopping.  Friday was the culmination of much of the week's work, with the installation of these wonderful window treatments.
The guest house main floor is all open, so all treatments are visible with no walls in between.
In the living room, four mock hobbled valances, which I learned to make from Ann Johnson's webinar, are perfect- vertically, the pattern flows naturally, and horizontally, marches around the room very impressively.

On the other side are soft cornices for the kitchen- I pulled out Donna Skufis's video to refresh my memory on how to fabricate this style.
And in between, a London valance as soon as you come in the front door, unifies everything.  I posted a workroom shot of this valance last week.  The pink geometric of the soft cornices is used on this valance as contrast pleat inserts and microcord.
You might remember previous posts about the mockups/samples I made in preparation for the mock hobbled valances and the soft cornices.  The mock hobbled sample was indispensable to understanding how to work with the pattern on the real thing.  
For the four valances, the ikat-look China Seas fabric was railroaded.  I was thrilled with how well the pattern lined up!  Four valances around the room was pretty impressive. 

The soft cornice mockup was equally invaluable.

I learned that I needed to reinforce the fabric with fusible stabilizer (from Rowley) to support the diagonal cuts that go directly into each internal corner, right down to the quick!  Scary!
I was able to get very neat corners.
Often, simple is awesome.
For a very tall window in a narrow space, this plain, tailored valance is 24" long.
The Greek key trim is all it needs.

Friday, October 11, 2013

Fab Fabric Friday!- Chinoiserie

Seriously, does it get any better than this?
Ready to be installed next week, this Statement Treatment for an Important Window- high over a staircase, a deep London valance with just enough subtle contrast to make you take a second look.
Sometimes serendipity happens, and proportions, product, and materials come together in perfect harmony.  This fabric was split down the middle, joined with a contrast insert defined with microcord, and there was just enough selvedge to allow the pattern to meet perfectly at the splits.
Coming soon,  treatments out of the pink geometric print for the adjoining room.

Wednesday, December 12, 2012

London Shade variation

Here is a silhouette we've created before, but never on such a large scale.
We made two valances, 118" wide, for two palladium windows, to be mounted below the arch, and there is a third valance, 96" wide, for a regular window.

With so much fabric across such a wide expanse, we wanted to be sure, before cutting into the fabric, that the silhouette was going to turn out the way the designer expected.  It is 24" at the long point of the swaggy sections.  I emailed pics of the various options to the designer for her approval.

Pulled up to 18" at the center of the swaggy part, we thought it looked pinched and awkward.  The actual valances are adjustable with a cord lock, so the installer can set it to exactly where the designer chooses.

In case the designer thought the sides were too long, I pinned up one side at an angle to shorten the tails, but in the end she preferred the longer version, as did I.

I made this no-sew mockup with a ring tag gun and little split rings to clip them together.
In case you wondered, on the final product the lining was railroaded, so the length of the valance before pulling it up was just 52".

There is 12" of fabric in each mockup pleat, but in the real thing there is 13.75" in each pleat, because I wanted the pattern to match where the folds meet.  I had to join the widths one motif into the width of the fabric to make the seams fall in the pleat instead of on the face.

For the last step of the mockup, I tag-gunned the trim to the face at 1.25" below the board, for the designer's approval. 

Friday, October 12, 2012

Double London double-take, and finished length demo


The client loved her treatments......

...but hated the fabric she chose.  So she chose another fabric, and had us make the same treatments.

Long point 42"


It's hard to decide how much fabric to use in a stationary shade valance.  These double Londons provide a good show-and-tell opportunity.  Here you see the shade fully lowered.

Long point 42"


Before swooping up, flat on the table, there is 44" of fabric.  After tying up the bottom 4 rings, the shade has a long point of 42".

Long point 30"


Here it's pulled up to 30", about the longest you'd want to finish a valance.


Long point 30"


There is 13" in each pleat- it would be too much for a full-length operable shade, but just fine for a valance.

Long point 25"


And here it's pulled up to about 25", which is what the designer requested.  Here the proportions look the best; though different widths will have different optimal long points.

Long point 25"


There are 7 rings per shade, and 4 are tied up permanently.  A cord lock makes it adjustable.

Long point 20"


Shades look ridiculous when pulled up too far, as you can see here- this is pulled up as high as it will go, and the long point is 20".
The short point is all squished together and hiked up way too far.
I know homeowners say they will want to see as much of their "view" as possible, but there's no point in misleading them into thinking that they can pull up a relaxed silhouette to an absurdly short drop. 

Wednesday, February 2, 2011

London shades and a fab fabric

Single and double London shades:
There were two of this size....

And two of these.


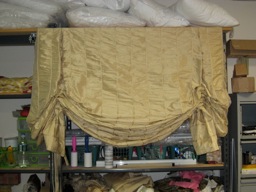
Definitely this is a fab fabric: gold silk, lightly ruched between vertical rows of a chain cording.   Hard to minimize the glare in the photo.

The widths were joined in the middle of the sections between the cord.  Because of the ruching it was nearly impossible to press the seams open.  I remembered this cool Rowenta travel iron/steamer that I bought years ago to take on installations but haven't used in awhile.  It fit nicely between the rows although the seams were still a pain in the neck to iron!

Also while I'm at it a quick acknowledgment of gratitude to the inventor of the amazing purple disappearing pen.  I'd be lost without this super-useful tool.  Often I draw a grid on the backs of shades for spacing the rings and/or encased cord tapes.  The purple ink usually disappears quickly, and if it lingers, the other end of the pen is the eraser.

One more thing, I bought Napped Sateen in the new 110" width, from Angel's Distributing, for these shades, and it made the lining process a breeze!

Saturday, January 22, 2011

London shade with encased cord

This London shade works perfectly with encased cord, even though it's made from a rather heavy upholstery fabric.

Here's the back.  There is no clutch, just a cord lock, so I ran two cords up the far side to help the cord tension remain even.  I tied a doubled cord to the encased cord and pulled it through. 

Originally this shade was a big "oops."  I mixed up the width and length; instead of 45" wide and 61" long, I made it 61" wide and 45" long.  Luckily, I had made a deep facing, plus there was enough fabric leftover from the repeat to add to the length, so there was enough fabric to re-make it correctly.  Though I suppose I should be embarrassed about my mistake, I'm posting my "oops"anyhow so you can see a 61" shade versus a 45" shade.  In my opinion, 61" is just too wide for a London, so I'm glad this one was wrong!

Here is the "good" shade again.  The pleats are set in at 5".  They can be whatever distance in you want, but the client didn't want the tails to droop lower than the swag, so I placed the pleat close to the end of the board to make the tails shorter. 

Here is a shade with pleats set in more like 8", and the tails droop more.

And the position of the pleats on this shade were determined by the width of the fabric, in order for the seam not to show.  This shade is about 80" wide.  We added a third lift line in the center since 80" is way too wide for a single-swag London shade.  There is no center pleat.


Here is the same idea, but with a center pleat.  This one is about 75" wide.  

And the same double shade with its neighboring single-swag shade.