THE BLOG IS HAVING TROUBLE WITH COMMENTS! SOMETIMES THEY DON’T GET PUBLISHED, AND WHEN THEY ARE I AM UNABLE TO REPLY TO THEM. IF THAT HAPPENS, JUST EMAIL ME AT stitchlore@gmail.com.

Looking for something specific? Check out the Topic Index, or the Search bar, just below, on the left.


Sorry about this problem!

SO.........WHAT ARE WE WORKING ON TODAY??
Showing posts with label linen. Show all posts

Wednesday, May 16, 2018

Getting comfortable with oversize

At last I can post photos of the 173" long and 156" wide ripplefold panel!  35 yards each of 100% linen and napped cotton sateen lining went into the panel, valance, and tieback.  After fabricating this treatment for Crosstown Shade and Glass, I am feeling pretty comfy with oversize.  Jeff and Steve thought through every detail to ensure a perfect fit and smooth installation.
I hinted at this project in my last post, which was a whole month ago.  To backtrack and fill you in on that month- my friend Rosemarie Garner and I were co-presenters at the NJ WCAA chapter's annual Windows to Success event.  Organizing all our material and samples was an exercise in down-sizing!- we had so much to choose from and had to edit carefully.  It was a fantastic experience and we're both grateful to the Chapter for inviting us.  The preparation ahead of this presentation kind of ate into my blogging time, but now- I'm back!
The huge ripplefold fabrication began with the 156" motorized rod.  We insist, for good reason, on having ripplefold tracks in the workroom before cutting the fabric.   Crosstown Shade and Glass ordered the track and delivered it to the workroom. 
This project provided a great illustration of why it's so important for the workroom to have the track.  For starters, the manufacturer had rigged the master carrier backwards, as a left stack instead of right stack- not at all difficult to switch, but what installer wants to do that on-site on installation day?
For another thing, the return had removable snap pieces that I might not have known about if I hadn't had the rod.  Lastly, the master carrier on the lead edge was unlike any master I'd ever worked with before, and because it's essential that the tape be fitted, cut, and re-joined so the snaps fit perfectly, it was a good thing I had it in the workroom.
I leave nothing to chance with ripplefold.  I cut the tape and snap it on all the way across, labeling the forward and backward "ripples" in order to plan seam placement.  Seams must go alongside the snaps, not halfway between them, so they'll be the least visible when the curtain is hung.  
This curtain used 7 widths of fabric, and with 185" cuts, it was a monster to handle.   We joined pairs of cut lengths, then joined those; that way I didn't have to handle all the weight quite as often. 
Keeping the grain true and achieving the correct finished length took discipline.  For each cut I pulled a thread to be sure I cut on grain.  Jen and I made the curtain in stages, starting at the bottom.  After hand-sewing the return side hem, we worked the panel across the table, basting both vertically and horizontally.  The horizontal basting line became the reference line from which to measure the finished length after the bottom of the entire 7 widths was tabled.
Photos of massive amounts of basted fabric are pretty boring, so here is the last stage when we finally reached the lead edge!  The vertical line you see there is the estimated lead edge of the panel- it isn't going to be cut and finished until after the ripplefold tape is sewn on.  The reason?  The tape will most likely "walk" a bit as it's sewn onto the fabric, so it's important to leave a little leeway and finish the curtain where the tape actually winds up.
Jen daisy-chained the hems together every quarter-width to keep the layers from billowing apart from each other.
After the bottom was done, we shifted the whole curtain downward to work on the top.  We measured up from the basted reference line and basted the top fold line.  Then we turned the panel to run the top along the length of the table.  We trimmed, folded, pressed, then basted yet again.
 The top edge was finished neatly even though it was going to be covered with ripplefold tape.
Since our sewing machines are on glides, we were able to slide the straight stitch over to the table, instead of dragging the curtain over to the machine.  I wanted to be comfortable while sewing the ripplefold tape!
Eleven yards of snap tape later.....
It came out to within an inch and a half of the projected lead edge!  Do you know how happy I was to see that???
NOW we finish the lead edge.  Using nice long John James needles with silamide thread, this was a peaceful and relaxed ending to the panel fabrication.
NEXT UP: HOW ABOUT THAT FITTED VALANCE AND GIGANTIC SHAPED TIEBACK?
TUNE IN TOMORROW!

Friday, September 9, 2016

Blackout shades with no pinholes of light

They might look plain, but these blackout shades for Monica Plotka Interiors are some of the best shades I've ever made.  There are no pinholes of light sneaking through the blackout.
The fabric is a thin, blueish-grey linen sheer, with a chambray feel to it.  The first step, as usual, was to pull a thread to get a line for cutting on the grain.
The inner blackout lining is Bella Notte Silky "Duette" which has an interlining bonded to one side.  The outer layer of blackout lining is "Silky" blackout.  The bottom hem is reinforced with fusible buckram, and a weight bar tube is run at the top of the hem and lightly secured with Jewel tape.
My No-Pinholes method is constantly evolving, and this is my best version yet.  All stitches are staggered so no light can peep through.
 Ribs have been sewn in, in between the rings, so they fall at the fold lines as the shade is raised.  The side hems are secured with Dofix and reinforced with the sewn rings.
The resulting shade is substantial and important-looking.  It's hard to believe it started as a delicate semi-sheer!  The method and materials used are perfect for the project, but I can also imagine how beautiful this linen would be as hand-sewn semi-sheer cafe curtains.
The shades were left up for days so the folds would train.  The linen has a memory of the folds, and the ribs in the front of the folds keep the fabric from buckling, so no dressing is needed.  I'm super happy with this job!


Tuesday, December 21, 2010

Machine work

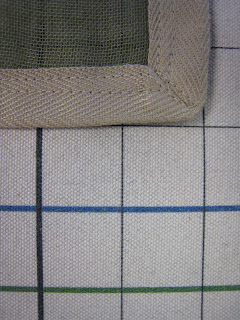
We do a lot of hand-sewing around here, but sometimes it's all about patient machine work.  For this small shade, we bound two layers of green sheer linen with 1 5/8" twill tape on 4 sides.

This ripply self-lined linen was a little hard to handle.  First the twill tape was secured with a narrow strip of fusible interfacing tape.  The fusible stuff penetrated both fabric layers, serving as basting.  Then it was folded and pressed and top-stitched, with the corners mitered.

For this lacy unlined cotton, I wasn't sure I would do a good job matching the pattern using a French seam.  So I sewed right sides together, and felled the seam.

Pressed to the side, the felled seam is very cool.  This really beautiful fabric is about to become a softly gathered London shade valance.

More about French seams here.

Some may disagree with me, but for sheers, especially stretch panels, when the budget does not allow for hand-sewing, I prefer the blind hem of a regular household machine to that of a blindhemming machine.  I think the blindhemmer makes a stitch that looks too commercial and also distorts the fabric if the tension is not just right.  Say what you like, I happen to like the domestic machine blind hem.  I love those little V-stitches all in a row.  I love that it looks like a person made this using a machine, not a factory.

Patient topstitching creates precise headers and pockets to complete these sheer linen stretch panels.  The fabric was cut by pulling threads to be sure it was cut perfectly on-grain, in both directions.

Monday, November 1, 2010

Shades

Beautiful embroidered linen
Here's a handful of recent shades:
Brunschwig "On Point" with bullion fringe

Sheer embroidered linen, unlined

Friday, August 20, 2010

Linen Drapery Installed!

Some years ago, at the fabulous Farmers' Museum in Cooperstown NY, I saw a demonstration of dried flax stalks being turned into linen fiber, by hand.  It gave me insight into linen fabric I would never have had otherwise.
(I'm dying to get back to the museum... if you ever have the chance, be sure to check it out.)
The tall stalks go through a five-step process to prepare it for spinnning, delightfully called rippling, retting, scutching, grassing, and hackling.  First, they are combed to remove seeds and leaves, then soaked, then dried.  Then they are beaten, and the stalks separate out into long individual strands, and then they are put through a fine comb to create yarns for spinning.
The resulting yarns and eventual fabrics contain all the irregularities of the original plant stalk, which is why linen has a "memory" and does not retain a pressing.
Linen fiber is one of the strongest, which is why it can be combed into extremely slender yarns for fine linen like lace, bedding, and table linens.   Linen also is lint free which makes it perfect for kitchen dishtowels.
Seeing the linen yarn appear before my eyes at the demonstration at the Farmers' Museum was one of those "aha!" moments for me.  It was like magic, and I don't look at fabric in the same way since. 
Yesterday we installed these interlined linen draperies- they were incredibly heavy!  The linen is rough and irregular.  I was fascinated by how the fibers' appearance changed when the sun shone through it.  Flat on the worktable, it was a dull, consistent off-white, but when the sun shone through it was warm and golden.  The jute and cotton banding was a nice complement.