THE BLOG IS HAVING TROUBLE WITH COMMENTS! SOMETIMES THEY DON’T GET PUBLISHED, AND WHEN THEY ARE I AM UNABLE TO REPLY TO THEM. IF THAT HAPPENS, JUST EMAIL ME AT stitchlore@gmail.com.

Looking for something specific? Check out the Topic Index, or the Search bar, just below, on the left.


Sorry about this problem!

SO.........WHAT ARE WE WORKING ON TODAY??
Showing posts with label railroading. Show all posts

Sunday, April 3, 2011

Tiny bias band


Horizontal stripes must be "railroaded" or run sideways if they are to be used vertically.  This woven stripe was railroaded; as it came off the roll, it was horizontal.  Luckily the shades were short enough that we could use the width of the fabric as the length of the shade.
Also luckily, the stripe remained straight after blocking- it had quite a "smile" to it at first.  Trimming off the selvedges helped and then a lot of obstinate pressing.
These shades are blackout lined, ribbed, and strung with encased cord.
The bottom would have had to be faced even if it hadn't been banded.  Despite its small size, that narrow bias banding was a lot of work!

Sunday, January 9, 2011

Pink Day

Coordinating window treatments and pillows were made for two sisters whose rooms are across the hall from each other.  The round pillows are boxed, and small square pillows and shams have a flat flange that is gathered in the corners. 
All welting and banding is done in the same pink dot that covers the window seat cushion.

Over the window seat in the little sister's bedroom is an Imperial valance out of a crazy-quilt print.  The back is faced so the dot is visible peeking out from behind the horns.  Blackout lining inside eliminates the shadow the 4" shaped facing would have cast.  The dot worked nicely as 3/8" welting.
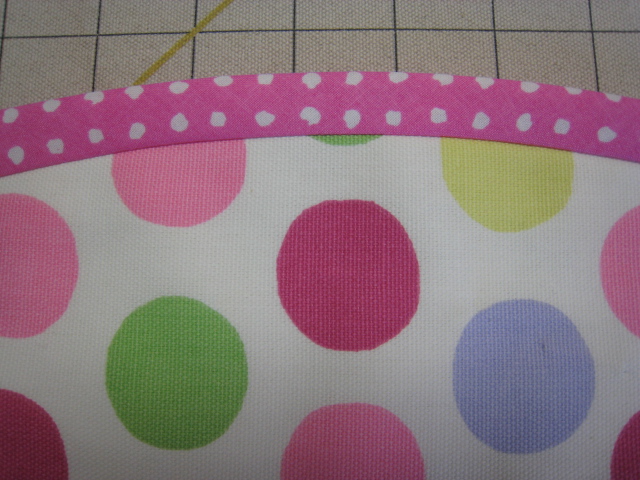
The older daughter's room has a 12' window with a flat, shaped, banded valance.  Here it is laid out on the table.   Luckily this large polka-dot could be railroaded.   The 1/2" banding was done binding-style.

To draft the pattern for the bottom serpentine silhouette, I drew the general shape right onto the fabric with a purple disappearing pen.  Then I laid gridded paper over my roughly sketched line to begin drafting the pattern.  The 12' section has 7 scallops.  The serpentine shape continues onto the separate 2' sections at each side for the small windows at right angles to the 12' window.
After cutting the face I laid it wrong sides together against napped lining, cut, and pinned well.  The bias banding strips were a little over 2" wide; it stretched enough to ease around the curves with a 1/2" seam allowance; then wrapped perfectly around to the back to make a 1/2" band on the front.   This is just like binding a quilt.

To finish the back, there are 3 options- top-stitch by machine from the front side, bond with glue or other adhesive, or hand-sew.  I chose to top-stitch-in-the-ditch for this product since the fabrics were well-behaved and they didn't warp with stitching.

Friday, July 2, 2010

Sheer shades, in the moment

Sheer shades continue to be amazingly popular.

This is a poly sheer which looks and feels so ethereal it's hard to believe how sturdy it really is.  

I love making these shades.  They're made entirely on the table so nothing shifts, and I totally enjoy the process of taking one step at a time until it's all done.  Sometimes I forget, and insist on looking forward to the end of the process while I'm actually still near the beginning, and the joy goes out of the project, because it feels like it will never be done; anxiety mounts; impatience sets in; dare I say that I even feel bored.  Once I re-focus on the step I'm performing that moment, I love it again. 
Boredom is something I loathe more than almost anything, so I make sure not to feel that way.  I always find something to fascinate me, or to think about.

Thursday, June 10, 2010

A Totally Satisfying Installation

Top tack unlined sheers
The first fold is basted to keep it from drooping since it's so wide
Today's installation was one of the rare ones that I could walk away from totally satisfied that there is nothing I would have done differently!

These unlined semi-sheer striped draperies are all hand-sewn, with top tack pleats and just a little break at the floor.

The light and dark sections are equal in width at 4 7/8".  We debated how to lay out the stripes, finally choosing to keep the darker stripe in the back and on the lead and return edges, and the lighter stripe to the front, pleated; this made the fullness 2x.

I thought the lead edges and return edges should be hemmed along the edge of the full stripe, as opposed to a regular 1 1/2" side hem.  That meant doubling 4 7/8" and I was worried the first fold would droop inside the side hem, unless it was secured.  So before making the second turn, the fabric was basted with long stitches on the inside and just 1/4" to the front, which is pretty much invisible.

The little narrow shiny white woven stripe dividing the wide stripe provided the perfect place to secure the hem stitching so that it's not visible at all.

The effect is a totally smooth lead edge with no stitching showing, and a nice soft padded feel thanks to the wide, doubled side hem.

And the best part of the lead edges is that the little white woven line is at the very edge.  I love how that looks!

Translucent buckram in the heading gives a clean but fluid line.

The second fold is hand-hemamed along the little woven line.
The shades were sewn by hand, too.  I love how on their 1" boards they just fit under the rough-hewn beam that serves as a sort of cornice.

The fabric is 118" wide, railroaded.
For the 74" long shades, all 118" was used, which means that there is more than 36" extra in length, tied up with 7 rings.  That is a lot of bottom fullness!- but for this drapey fabric, it's perfect.

The room pictures, below, show the three walls of draperies and shades.
The relaxed Roman shades are very full at the bottom.

Thursday, April 15, 2010

Pleated balloon with header


These pleated balloons have separate headers, with lip cord in between and a loopy braid run horizontally across the center of the header.
This is a silk plaid which was railroaded in order to get the header out of the most appropriate section of the plaid.
It's interlined, and as you can see trimmed at bottom with a tassel fringe.
Though they will be used as stationary valances, we have strung them with a cord lock so the length can be adjusted on-site.
I don't see all of the treatments we make here in the homes for which they were created, because, as in this case, a lot of designers pick them up and arrange and supervise the installation.
I dressed these for the photo but dressing is NOT my strongest point!

If anybody wonders if blue is back, take a look at the trims I have sitting in my workroom for current jobs.  There was one more that I forgot to include.

The side hems on these shades were sewn by hand.  I took the opportunity to practice hand blind-hemming, although there was no need to use that technique here.  Once you get the hang of it, it goes almost as quickly as a slip stitch, but it does take practice.  

Saturday, April 10, 2010

Empire valance variation

g
Here is an Empire valance with extended gathered horns.  
This particular order was a challenge to fabricate mainly because of the need to reduce bulk at so many stages along the way.


As you can see in the second picture, the face fabric is a heavy woven upholstery fabric.  You can also see the very heavy lip cord that was sewn into the bottom.
The valance is also interlined, which adds a lot of bulk to an already bulky face fabric and a medium weight lining. 
All the seams had to be trimmed and layered to reduce bulk.


 The third photo shows the swag section laid out on the lining on the bias.  Since the face fabric is stiff and awkward pleated up into a swag, the lining and interlining are bias cut to give the swags a little drapeability.
For valances composed of many pieced sections, lining and interlining are railroaded if possible to reduce bulk at the seams.  Because we wanted to cut the swags on the bias, we could not railroad the linings.  However, with this style of valance, railroading wasn't an option anyhow, as you can see in the bottom photo.  Once the pieces are joined it forms a big arc. 
The bottom photo also shows how the interlining has been trimmed away from the board line of the swag pleats to reduce the bulk when it's pleated up.  Both interlining and lining have been cut from the board line on the slender cascades, since the layers all had to pleat up into 3" of space.  The flat "picture area" of the swag has been padded to lift it up to the pleat level.