THE BLOG IS HAVING TROUBLE WITH COMMENTS! SOMETIMES THEY DON’T GET PUBLISHED, AND WHEN THEY ARE I AM UNABLE TO REPLY TO THEM. IF THAT HAPPENS, JUST EMAIL ME AT stitchlore@gmail.com.

Looking for something specific? Check out the Topic Index, or the Search bar, just below, on the left.


Sorry about this problem!

SO.........WHAT ARE WE WORKING ON TODAY??
Showing posts with label French seam. Show all posts

Monday, April 15, 2019

A pleat-to-pattern natural

Pleat to pattern, pleat to pattern, are we tired yet of pleat to pattern?  UMMMM...... NO!
At least not on this project for Crosstown Shade and Glass.
Pleat to pattern just keeps getting more fun.  This applique stripe is such a cool fabric, OF COURSE it had to be pleated to pattern.
The homeowner's original idea was ripplefold draperies with this fabric.  I made mockups to help the client and designer choose how to best show off this pattern and address the practical issues.
With ripplefold, half the fabric goes to the front, half to the back, just like grommet draperies.  A workroom sample like this helps everyone visualize the effect.
I did a mockup with buckram on a string to simulate the profile. 
We also made a mockup of inverted pleats, so the client could compare styles.  This creates a wave effect, which visually is very similar to ripplefold, except instead of a backward-projecting ripple, that fabric is pleated to the back and stitched down flat.
Guess what, inverted pleats were the choice.
The pleats are sewn to the back, instead of to the front as they are with pinch pleats. 
Since these draperies were unlined, we French seamed the widths together, so there were no raw or serged edges.
The pleats were flattened out and "stitched in the ditch" on the front.
The pleats lie flat, but once they're hung on a rod, the flat part rolls forward like a wave.
Everybody was happy with this project!


Tuesday, June 6, 2017

French seam and a horizontal striped sheer

Unless a fabric is woven by hand, no matter how random it looks, it is going to have a pattern repeat.  Weaving is all done with computer guidance, so there is no randomness in its production.
Textured sheers are a great example.  It took some careful peering to find the pattern repeat on this sheer, but once you see the repeat, you can't un-see it.
When joining widths for an unlined sheer shade, I prefer to use a French seam so no raw edges show.  The fabric is first sewn wrong sides together, then serged, pressed, and sewn again right sides together, encasing the raw edges, creating a beautiful, clean finish on the back side.
The difficulty with French-seaming a horizontal stripe is keeping the stripes aligned twice.  The fabric wants to "walk" and get itself out of alignment with each other, which happened in a few sections on this project.
The seam ripper got a good bit of use while I was trying to expertly join these widths.  One thing I've learned: replace your seam ripper often!  A new one picks smoothly through the stitches, while a used, dulled ripper can slip and rip the fabric.  Replace often- they're cheap!  (See that velcro?  That keeps it in place on my machine, at the ready, and out of harm's way.)
The side hems and rings were sewn by hand.
Now one of the deep truths about sewing is that "sewing causes take-up."  The French seam, having been sewn twice and not just once, created a little extra takeup which created a "frown" in the joined piece.  The shade stayed on the table throughout fabrication, so I basted across the board line, following the table grid, to mark the stapling line.
 This meant that the board line was a little wobbly in reference to the horizontal stripe.
But by manipulating ever so slightly while stapling to the board, I was able to mitigate the little "frown" and straighten it out.  
This client wanted a soft, unstructured look to this sheer roman.  I did put clear buckram in the hem to keep the bottom straight, but I kept the rows a little further apart than usual so it would have a little bit of droop but not too much.  Not shown: I attached a self-fabric flap to the back of the board to hide the Rollease clutch mechanism from the outside view, and provide shading to avoid seeing the mechanism from the inside.

Tuesday, December 21, 2010

Machine work

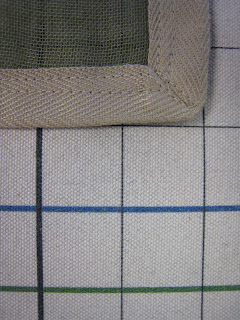
We do a lot of hand-sewing around here, but sometimes it's all about patient machine work.  For this small shade, we bound two layers of green sheer linen with 1 5/8" twill tape on 4 sides.

This ripply self-lined linen was a little hard to handle.  First the twill tape was secured with a narrow strip of fusible interfacing tape.  The fusible stuff penetrated both fabric layers, serving as basting.  Then it was folded and pressed and top-stitched, with the corners mitered.

For this lacy unlined cotton, I wasn't sure I would do a good job matching the pattern using a French seam.  So I sewed right sides together, and felled the seam.

Pressed to the side, the felled seam is very cool.  This really beautiful fabric is about to become a softly gathered London shade valance.

More about French seams here.

Some may disagree with me, but for sheers, especially stretch panels, when the budget does not allow for hand-sewing, I prefer the blind hem of a regular household machine to that of a blindhemming machine.  I think the blindhemmer makes a stitch that looks too commercial and also distorts the fabric if the tension is not just right.  Say what you like, I happen to like the domestic machine blind hem.  I love those little V-stitches all in a row.  I love that it looks like a person made this using a machine, not a factory.

Patient topstitching creates precise headers and pockets to complete these sheer linen stretch panels.  The fabric was cut by pulling threads to be sure it was cut perfectly on-grain, in both directions.

Tuesday, August 31, 2010

French Seams

Perfect French seams are just a little labor-intensive.  They require two stitching lines, and up to five pressings.  Usually the first stitch is serged: that keeps little loose threads from going astray making it easier to do the second stitch line really close and narrow.  Depending on how easy or difficult the fabric is to manipulate, it may need pressing each time from each side.  But the results are worth it, especially with sheers like this where the seam needs to be a beautiful feature, not a necessary evil.

A neat, trim French seam always gives me a little thrill.  
After the seam is serged, wrong sides together, the seam is pressed to one side, then flipped over and pressed flat again.
Then it's folded over, so now right sides are together, and pressed yet again.
It's sewn as close as possible to the serging, and then goes back to the table for pressing from the wrong side and then once more from the right side.