THE BLOG IS HAVING TROUBLE WITH COMMENTS! SOMETIMES THEY DON’T GET PUBLISHED, AND WHEN THEY ARE I AM UNABLE TO REPLY TO THEM. IF THAT HAPPENS, JUST EMAIL ME AT stitchlore@gmail.com.

Looking for something specific? Check out the Topic Index, or the Search bar, just below, on the left.


Sorry about this problem!

SO.........WHAT ARE WE WORKING ON TODAY??
Showing posts with label Rod pocket drapery. Show all posts

Friday, March 23, 2018

Epic installation day....

Four installations in one day!
None were huge projects, but if you combine four small-to-medium installations, you wind up with one epic day.
After we installed the flat-back reverse mount blackout hobbled shades that I wrote about last week, we made three drapery installation stops, all for Croton on Hudson designer Denise Wenacur.


After installing those seven complicated shades in the morning, it was nice to start the afternoon with a less challenging second stop: a rod pocket valance over grey voile rod pocket sheers, for a tween bedroom makeover.


At the third home, pretty two-finger pinch pleat sheer-lined-with-sheer draperies freshened up the dining room.  We love the simplicity of H-rail tracks, with glides instead of rings.
And- the homeowner reports that upstairs, a window seat is now irresistable, with a new cushion, bolsters, and pillows.  She and her daughters vie for the spot for afternoon lounging!  The bolsters are filled with custom-made wedge foam forms, and generously wrapped in batting.  We had the homeowner sit on the window seat and we measured her back to get the exact right size for maximum comfort.
The last stop of the day was for a repeat client.  Grommet panels in her dining room are pretty totally wonderful- this modern Thom Filicia print making a huge impact next to the grey grasscloth wall.
I planned the grommet placement carefully, making my cryptic notes on blue tape that I left on the curtain while I worked. 
A long strip of tape marks the line where the tops of the grommets lie, and the short tapes mark one side of the grommet.
The inside of the grommet is marked with pencil, so the cutter can be positioned precisely.
This ensures perfect placement.
Are grommets making a comeback?  Based on the number of quotes we've been doing lately, I think so!  When they look as good as these do, it's a great style for a modern wave heading.


Thursday, September 15, 2011

Okay, back to the routine!

Vacation week is over, the hurricane week is over, and now it's time to get back to the blogging routine.
I did get new mini blinds for the workroom......... The best thing about them is that they are clean, plain, and I can angle the light.  Thanks to John for putting them up for me!

Thanks to the hurricane, September sort of started a week late, but we're back in full swing now, working madly.  There have been some big installations and best of all, new work is flowing in every day.

We recently finished this two-layer drapery treatment.  The overdrape is a rod pocket interlined embroidered silk rod pocket on a 2" pole.  Underneath, the pencil pleated striped panel will peek out.  Both layers will be swooped to the side, tied back, and puddled.  Both layers are hand sewn.


The beautiful floral silk came with a big flaw right in the middle of the goods.

Don't ask me how the manufacturer thought this darning repair job could be disguised.  Although the vendor did send extra yardage to compensate, the flaw still interfered with the cut lengths, so we had to make short cuts and put in a smaller hem at the bottom, and a false pocket at the top. 


The pocket is a single layer of beige lining, layered over the heading to hide its raw edge, pinned in place, and topstitched.

I love how this method reduces the bulk of fabric in the top.

And since the pocket is run railroaded, there are no clunky seams inside for the pole to catch on when it's being threaded through the pocket.

More tomorrow on this double layer treatment, focusing on the striped panel.    


Wednesday, July 21, 2010

The fabric that could not be sewn, installed!


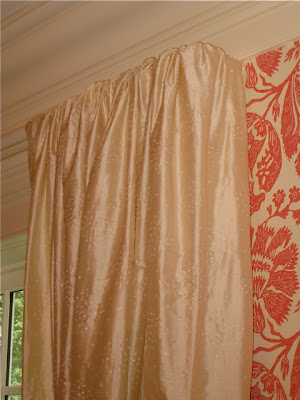
The all-over beaded draperies were installed today, and the site was close enough that I took a moment to run over and get a photo.

This is the fabric that could not be sewn by machine because of the all-over beading.  I was just barely able to join the widths with a 1/4" seam, and all the rest had to be hand-sewn.  The problem was how to create a rod pocket without being able to sew it by machine.

To read the whole story, scroll down to the previous post and find out more about the solution I came up with for this dilemma.

I'm pretty pleased with the results- it's an interesting waterfall effect.

Monday, July 19, 2010

My mother used to say......

"Pretty is as pretty does" was a favorite saying my mother used to remind us 4 girls that good looks was no substitute for good behaviour.
Someone should have told that to this pretty creamy silk with all-over pale pink beading.


The beads made it impossible.... repeat, impossible.... to sew by machine.  The widths could barely be joined with a 1/4" seam allowance because if a bead got anywhere near the feed dogs, the machine would jam.
Hand-sewing the bottom and side hems is everyday work around here, but how would I sew the rod pocket?  There was no way to sew it by machine, and I just couldn't see sewing the actual pocket by hand.  For one thing, my hands ached at the thought of such a tedious process, and I also didn't think it would be strong enough, let alone professional looking.


It took a lot of ideas percolating through my brain before one method filtered through and became feasible.
It boiled down to sewing the pocket in the lining and interlining only, and hand-sewing the face fabric to the back afterwards.


After hemming the sides nearly to the top, I trimmed the lining & interlining to finished length plus 3" and cut it in to the edge of the side hem, leaving the selvedges on.


The 3" of lining and interlining were folded down and pinned through the lining & interlining only.  All 3 layers were pinned a few inches below the seam line to keep them from shifting while the panel went to the machine.


After sewing the pocket, back on the table, I folded the selvedge end back in, folded over the silk, and hand-sewed the edges to give a neat finish inside the pocket so there were no loose edges to catch the pole while it was being inserted.


The loose edge of the silk was trimmed earlier to finished length plus about 5".  The last step was to turn it under and whip-stitch it across the back to the lining.  This was a went quickly because the silk is not carrying any of the weight of the hanging fabric so tight, close stitching was not necessary. 


There is no pocket line showing in the face fabric, which is kind of cool, and I can imagine using this technique again for other applications.  I like how the fabric just sort of waterfalls over the edge.