THE BLOG IS HAVING TROUBLE WITH COMMENTS! SOMETIMES THEY DON’T GET PUBLISHED, AND WHEN THEY ARE I AM UNABLE TO REPLY TO THEM. IF THAT HAPPENS, JUST EMAIL ME AT stitchlore@gmail.com.

Looking for something specific? Check out the Topic Index, or the Search bar, just below, on the left.


Sorry about this problem!

SO.........WHAT ARE WE WORKING ON TODAY??
Showing posts with label ribbon. Show all posts

Monday, June 9, 2014

Wool and grosgrain draperies

Oh, my poor blog and blog readers, I've been so neglectful.......
Well,  I have this project to show off: hand-sewn interlined wool top tack draperies with grosgrain trim, for Christopher Robert Matson.  Did I take even a single photo during fabrication?- No!  I did not.  This was a tricky job and all my concentration went into making it, not documenting it.  Now I'm sorry.
Wool from Elizabeth Dow was a dream to sew with its thick, forgiving weave.  With additional layers of lining and interlining we chose to use a low-bulk header so the pudgy 3" 3-finger top tack pleats would not have too much bulk.
I wish there were a perfect method for applying grosgrain ribbon.  Unfortunately it's usually a choice between less than optimal techniques.  Applying anything to wool is a real challenge.  In this case the first step after joining widths was to fuse the ribbon to the wool with Sealah tape, which came to just below the top of the trim to give a teeny tiny space for the hem stitches.  Blue painters' tape marked the side and bottom hemlines, thanks, Scot Robbins! 
Christopher asked us to duplicate the style of the original sheer, unlined curtains, including the cutouts which accommodate the molding.


On installation day we were excited to be delivering these luxurious draperies to this Upper East Side flat in our new pink garment bags from Wawak!  Thanks, Merlyn.....
We took down the original curtains and hung the new ones on the existing rods.
A minimal amount of steaming was all this amazing wool required and the pleats dressed wonderfully.
In another room, a similar wool and trim were used for side panels and a scalloped kick pleated valance.  The beautiful cotton batiste sheers disguised the asymmetry of the space.

Thursday, April 17, 2014

Multiple treatments for versatility

So many windows would benefit from multiple treatments.  You want light control, temperature moderation, sound insulation, and beauty. Throughout the day and the seasons your needs change; as many as three or four treatments on some windows would not be unrealistic, to achieve various combinations of sheer, semi-sheer, lined, or blackout layers. 

Anyhow, my clients needed two layers of treatments on their kitchen windows, and there was no room for a curtain layer, so we did two shades.  Underneath is a sheer linen relaxed roman shade, and on top a split roman, so they have multiple options for privacy and light control.
Both shades are trimmed with the sweetest most delicious grosgrain ribbon- REAL grosgrain, French, in subtle organic greens, from Hyman Hendler in NYC.

For the split romans, the grosgrain serves as binding.  Since it's tiny- just 7/8" to start then folded in half- the whole shade was basted together beforehand, to keep all the parts in place.  Sometimes you see buttons used to cinch the split  together, but here the ring tacks do the job.  This style can be dressed out, too, with a scrunchie effect between the cinches.  Plain white sateen is used in the pleat.  We chose not to add microcord at the pleat, instead letting the shadow of the meticulously trimmed seam allowance define the pleat line.
The ribbon on the undershade is aligned with the split in the roman shade.
Each shade is on its own board, and there is a linen valance on the window-side of the board to disguise the mechanisms from view from the outside.
There were so many ways to lay out the motifs on this Pierre Frey botannical print.  We wanted to lose as little pattern as possible, and didn't want both shades to be identical.  I took half a dozen photos along the lines of these with different layouts to choose from.  The goal was not so much centering as it was tonal balance.

Thursday, January 30, 2014

Vintage tablecloth re-purposed

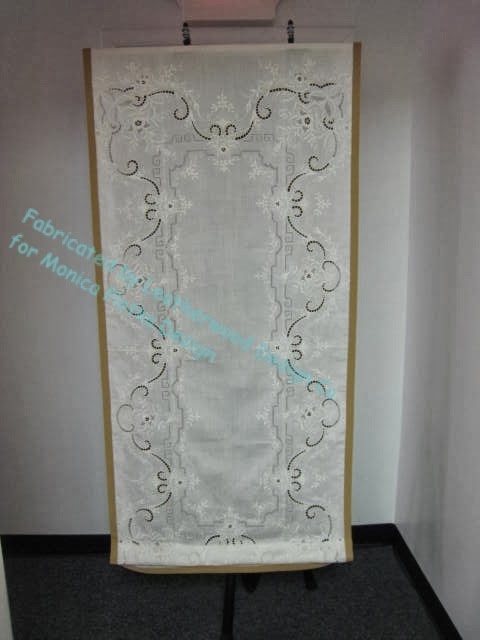
Monica Plotka called me for this project, knowing that I would thoroughly enjoy it, and I sure did- this is one of the coolest shades I've ever made.  Her client dipped into her stash of vintage textiles and brought out this embroidered linen cutwork tablecloth to remake into a shade.
This very fine white linen pressed beautifully.  After the whole tablecloth was ironed, I marked out the exact finished size plus 1.5" for the board, then cut it out carefully, leaving the perimeter intact because..... well, just because I couldn't bear to cut into it.
Because of the openwork areas, it was easy to see the grid of the table behind the fabric.  That made the layout easier.
2" French cotton grosgrain ribbon was adhered to the back with Sealah tape, then pressed around to the front, mitering the corners along the way.
From the front, the ribbon was topstitched all around.

A length of Rowley's weight bar tubing was machine-sewn 3" above the top of the ribbon, the stitching ending right before the ribbon, with an extra couple of inches left at each end.
The first ring started 6" above the fabric tube, with ladder tape.  After all the rings were sewn on, the weight bar tube was folded up to meet the bottom rings, and tacked to that bottom ring.  The weight bar was inserted into the tube, and the ends finished. 
The fold created one permanent pleat at the bottom, even when the shade is fully lowered; the extra fold hides the weight bar pocket stitching, and any other clutter that might show through the open areas.
This project was right up my alley!  Thanks Monica, I'll do this again any time!

Thursday, July 18, 2013

Some folks do love their banding.....

Here is a way of using grosgrain ribbon that I can live with.

Notoriously annoying to apply, grosgrain is easy to work with as a binding, which in essence is what this banding is.
The face fabric and lining were cut to the exact finished size; the pink ribbon was top-sewn to the front and then wrapped to the back and secured with hand-stitching.


A little scrap of ribbon covers the ends of the board. just in case they are visible.


Monday, September 17, 2012

More Layered Trim......

This print sort of swallowed up the blue trim until I tried narrow strips of red peeking out from behind.

The narrow ribbon created such a great pop that I decided to carry the red-blue to the top.  Making microcord out of 1/2" wide grosgrain is not easy!  Actually it wasn't much easier to make pencil welt out of the heavy, textured blue braid, either.  I never layered welt before- I like it!

Although the pattern on the topper was carefully matched to the shade when looking straight on, from a lower sight line there seems to be a gap.  The bottom row of red ribbon fills in the space and gives one last bit of pop.

Wednesday, September 12, 2012

Eight mitered corners... Yikes!

I'm going to keep plugging away at featuring the shades we made for my friend Liz's store.  Yes, other work has been going on!  I'll catch up to that soon.
This was the most difficult of the shades Liz ordered.  Any shade with trim on four sides is going to cause a lot of angst.  Everything must be square, but printed patterns are hardly ever printed true.  Also since there is take-up every time you sew a stitch in fabric, by the time the sewing is done, the shade might be a little shorter than you had planned.
And that's not all.  What you see there is not one trim, but two!  The yellow trim is layered over the grey ribbon.

That meant eight miters..........   a time-consuming process.
This was a scary shade.

This shade was made with ribs in pockets on the back to help keep the folds.  The layered trim makes the folds bulky so the shade looks best pulled up no more than half-way......
which is how we displayed it in the store. 


Monday, September 10, 2012

Scalloped bottom with grosgrain ribbon

It sure is taking me a long time to get back into the blog groove.  I think I know what it is: my desk is REALLY messy and I don't like sitting here feeling guilty about it.  So this week is Desk Week.
Meantime, before I start cleaning (ha!), I want to continue showing some of the display shades I featured two posts ago, for my friend Liz's new store.

For this shaped-bottom flat Roman, Liz chose an adorable grosgrain ribbon with little buttons.

I didn't think I could get the ribbon to go around the curves of the scallops, but by hand-sewing with teeny-tiny stitches and easing the fullness around the curves, it worked.   This is time-consuming!

After the shade was on the board it clearly needed something to define the top and balance the ribbon.  I rummaged around and found a gorgeous pink velvet that I bought at a Couton & Tout warehouse sale.  Perfect!

Friday, August 3, 2012

Grosgrain ribbon

Grosgrain ribbon is hot stuff right now.  It's shown up a lot lately, but my most recent personal favorite was this lime green shade with navy ribbon in two widths.

This was easy to apply using double-sided adhesive tapes.  I use my clear rulers from my patchwork days to keep the rows straight.

Doubling up ribbons is popular right now, too.  I loved this combination of brown and purple for a Roman shade.  Yes, that is an upholstery weight fabric.  It turned out fantastically well.

A more difficult application was white grosgrain on ivory wool sateen.  We hand-sewed the ribbon on 6 shades..... a big investment of time!
Adhesives of any type were inappropriate for the wool- whether tape or liquid.  White glue just stiffened up- it felt like cardboard.  Double-sided tape that did not need steaming showed a shadow, and also made the wool pucker.  And for fear of shrinking the wool I did not want to use a tape that required steaming.  And machine sewing distorted the wool.
So out came the John James needles and my favorite Coats & Clark Dual Duty Button and Carpet thread (also the favorite of Alabama Chanin for hand-sewing!), and a pleasant day with my friend Camille ensued as we hand-sewed ribbon in a U-shape around 6 shades.  We each did 3, and there was a serious learning curve.  My first shade took nearly 2 hours, the second one 1 1/2 hours, and the last one maybe an hour and a quarter.  Yes, I got faster, but I bet if I measured the stitches, I'd find that they got a little longer with each shade........

Other recent grosgrain applications for shades: this was a linen blend fabric......

and this is wool- not quite a sateen, more like a suiting weight, and unlined.

And of course the Greek Key version.....

Monday, May 7, 2012

Greek Key shade, continued-

Well, I have quite a backlog of projects to show you; I've been waiting for installations, client photos, before-and-after opportunities, or whatever, so I'd have the whole story.  This week I'll focus on getting some of those photo series posted.

For the Greek Key shades I just couldn't wait for the "after" picture, so I showed the workroom shots last week- scroll down to read the previous post. 
Today, yay, I can show you the shades on-site, courtesy of Daniel Silva at Fabric Factory Outlet in Fairfield NJ: 
I had a hard time deciding how to apply the ribbon until I read a post by Liz Hawkes on the CHF Forum about her stencil method, and then it all fell into place.
First I drew out the entire shade, 4 corners and all, on 1" gridded pattern paper.

I then cut a stencil out of template plastic and pinned it in place on the fabric.

I traced the entire pattern onto the shade with purple disappearing pen, which I tested beforehand on the glazed linen fabric. 

Starting at the spot where the ribbon overlaps itself, I sewed around the pattern, holding the outside corners in place with a seam ripper while pivoting.  The hardest part was turning the fabric, keeping the needle in place and stuffing it all under the machine arm trying not to crumple it! 

With just one side sewn, it's a little scary looking, all wobbly and a little unnerving- I wondered if I'd ever get it to sew down nice and crisp- (and professional-) looking.

But after the second go-round, and tacking down the corners, it was neat as a pin. 

Now I have to say something about the machine I used, my Juki TL-98Q, designed for quilters.  It can be instructed to end with the needle in or out of the fabric, and there is a button which clips the thread for you.  It makes a wonderful neat stitch with perfect tension.  For the mitered corners, I used that auto-clip at the beginning and end of every corner.  This machine has its issues, but I do love it for fussy sewing like this.

Here is the shade from the back, tabled and pressed, waiting for its lining:

I didn't want any stitching on the front, so I devised a new way (to me, at least) to insert the lining.  On the sides the lining is pressed under.  At the bottom it's pinned to the hem:

Then opened back up, transferred to the machine, and sewn in two parallel rows to create the weight bar pocket.  After it was back on the table and laid out, the sides were hand-sewn.