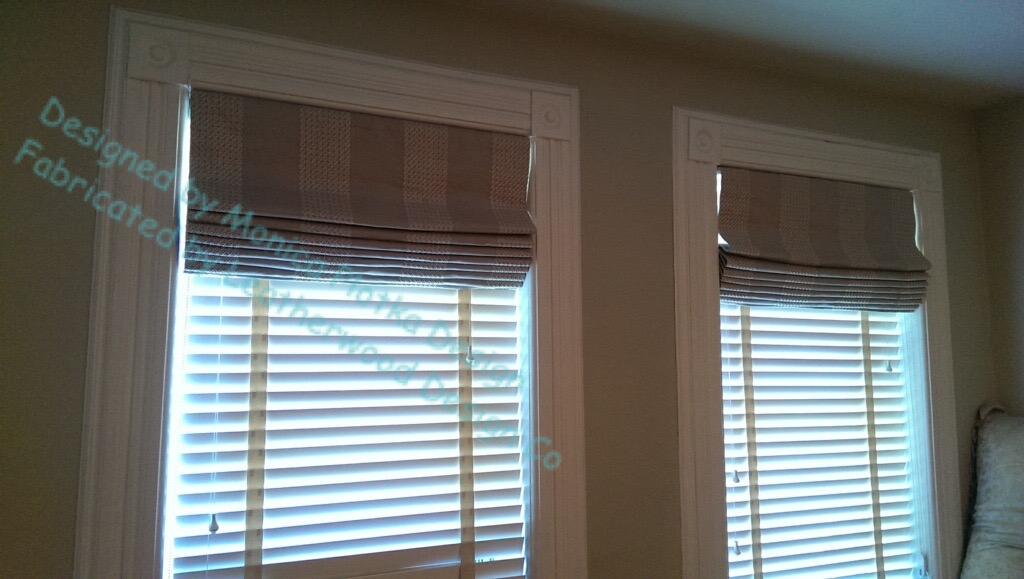
Here's a mistake I made, how I discovered it, and how I fixed it.
Fabricators are always on a quest to eliminating pinholes of light in shades with blackout lining.
I've been refining my blackout shade method to ensure that it is 100% guaranteed foolproof, is streamlined to the max, and yields a beautiful product. I now have a method I love to use.
Recently I made 5 flat romans with blackout lining for 3 bedrooms. These were reverse mounted on velcro, with toppers to conceal the grommets that guide the cords to the RBS lift system.
When I lowered the shades, there were no pinholes of light, but to my horror, light bled through at the grommets and the gap at the top of the velcro! Why? Because I forgot to blackout line the toppers!
I did some quick thinking about how to remedy this, and once I had my concept, I decided to leave the shades in place, since the homeowners weren't moving in for 3 more days.
Back at the studio, I fused face fabric to a Dofix fusible blackout lining, and using a rotary cutter, sliced it into strips a little shorter than the topper.
Returning to the house, I used double-sided adhesive tape to attach the strips to the board under the toppers to hold them in place, then stapled them to the board face. They are an inch shorter than the toppers so they can't be seen, but in case someone lifts up the toppers, they see face fabric.
They totally black out that awful light bleed!
THE BLOG IS HAVING TROUBLE WITH COMMENTS! SOMETIMES THEY DON’T GET PUBLISHED, AND WHEN THEY ARE I AM UNABLE TO REPLY TO THEM. IF THAT HAPPENS, JUST EMAIL ME AT stitchlore@gmail.com.
Looking for something specific? Check out the Topic Index, or the Search bar, just below, on the left.
Sorry about this problem!
SO.........WHAT ARE WE WORKING ON TODAY??
Showing posts with label Blackout shade. Show all posts
Monday, May 29, 2017
Friday, February 10, 2017
Extra long shades
Our workroom has standard 8' drop ceilings. I had an order for 4 shades 42" wide and 99" long. Since the shades were being shipped to Florida, I was not going to be at the installation, so I had to find a way to hang them. Enter John: he took out a 48" ceiling panel, extended our hydraulic stand, and we raised them up into the ceiling so I could level them!
I left the basting stitches in and I left the raw edges- blackout linings don't fray, and the fused velcro hid the face fabric raw edges.
Not only were these shades long; they also were blackout lined with my no-pinholes method and ribs; and because circumstances necessitated mounting them on the molding, they also needed to be reverse mounted with a valance. I used my standard no-pinholes method with ribs, which means working from the inside of the shade. The combination of Bella Notte Duette (bonded with flannel) and Bella Notte Silky blackout makes a very handsome and substantial shade.
My favorite lift system for a reverse mount is a system such as Rowley's EZ-Rig, whose headrail comes with velcro on one side. The shade goes on the back of the headrail so it will be snug up against the window molding and let less light in the sides.
I hand-basted the layers together at the top, then fused Dofix velcro to the face. I did worry because of the weight so I took the totally completed shade to the machine and sewed the velcro for extra security. This was a little awkward because the ribs and weight bar were sewn inside the shade, but since they were only 42" wide I managed it.
Each lift line needed a grommet for the cord to pass through to the front. They need to go as high up as possible without causing any buckling; I usually put them about 6" below the top.
The shades were strung using Ring Locks from SafeTShade in order to be compliant with the safety standards.
I wasn't sure how long the valance would need to be to cover the grommets. After the headrails were mounted on the boards we raised one up with a piece of paper taped to it to see how long to make the valances.
The self-lined valances had to go 1" farther back than the board, so they would reach the wall. I wanted to fit them with velcro to make the underneath more accessible for the installer, so I mitered the corners of the valances and added Dofix fusible velcro.
That is sweet!
Regular hook velcro from Rowley was stapled to the back edge of the board.
They fit beautifully and the installer's job was easier since he could peel back the corners to hang the shade.
Eventually I hope I'll receive photos of the installed shades, but for now, a table shot will have to do.
Sunday, August 16, 2015
About those blackout shades with no pinholes of light.
Back to the blackout shades.
The pinholes of light that come through where stitches are taken in blackout fabric are the bane of shade fabricators.
For the past year I've been thinking about how to eliminate those dots of light, experimenting with different products and methods. I've focused on layering blackout so that one hole is blocked by another layer of blackout. My secondary goal is to make this process as quick and efficient as possible.
Here's my favorite method so far.
These shades were made with an inner layer of Bella Notte Duette, to provide an interlining-like layer, with Silky Blackout on the outside.
The Silky layer was folded back and a ring-placement grid marked on the Duette.
A needle was threaded for every inner row of rings, in this case just two, and a stitch taken through the Duette and face fabric, about 3/16" to the side of the grid intersection.
The Silky was folded right up to the line, and the needles inserted right at the grid intersection.
The Silky was turned up and the threads pulled through and the ring sewn. Those stitches are far enough away from the holes in the Duette that all the light is blocked!
All that's left is to do the side hems, and they don't really need special treatment. However, ribs were requested for these shades, so they were simply slid in over the rings- no pockets!
I felt like I wanted to secure the ribs a bit, though it probably wasn't necessary. I ran a double-sided adhesive tape to stabilize the ribs and secure the two lining layers.
Another strip of tape secured the face fabric to the Silky, and rings were sewn on the outer edges.
Ta-da!
The pinholes of light that come through where stitches are taken in blackout fabric are the bane of shade fabricators.
For the past year I've been thinking about how to eliminate those dots of light, experimenting with different products and methods. I've focused on layering blackout so that one hole is blocked by another layer of blackout. My secondary goal is to make this process as quick and efficient as possible.
Here's my favorite method so far.
These shades were made with an inner layer of Bella Notte Duette, to provide an interlining-like layer, with Silky Blackout on the outside.
The Silky layer was folded back and a ring-placement grid marked on the Duette.
The Silky was folded right up to the line, and the needles inserted right at the grid intersection.
The Silky was turned up and the threads pulled through and the ring sewn. Those stitches are far enough away from the holes in the Duette that all the light is blocked!
All that's left is to do the side hems, and they don't really need special treatment. However, ribs were requested for these shades, so they were simply slid in over the rings- no pockets!
I felt like I wanted to secure the ribs a bit, though it probably wasn't necessary. I ran a double-sided adhesive tape to stabilize the ribs and secure the two lining layers.
Ta-da!
Thursday, October 23, 2014
What we did for the past two weeks.....
It is so much fun to watch an empty house being transformed into a home. With her distinctive style, Denise Wenacur applies color and texture to a room's elements, creating a cohesive whole, like a painting.
Although not fully furnished yet, our recent window treatment installations have set this renovated house well on its way to looking like a home.
In the living room, blending textures and tones, a smooth grey roman shade is flanked by slubby linen grommeted panels on brushed nickel poles.
These panels were two full widths per side. Eight #12 grommets were used per width on 1" poles, and the each panel stacks down to about a foot wide.
On an adjacent wall, we used single width panels on a window half this size with no room for stackback.
Thanks to various webinars from CHF Academy, Rowley Company, and other sources, I think maybe I've finally gotten my grommet knowledge internalized.
The most important tip I that I learned that I can pass on is: make a template out of buckram. Actually cut the holes and thread them onto a pole. That's how you can be really sure that you're planning correctly and that the seam isn't going to come out facing forward. The other most important piece of information is that you always must have an even number of grommets.
In the dining room, the embroidered floral kick pleat valance with side panels warms up the space, while the gold textured solid relaxed shade offers privacy.
Viewed here from the second floor landing, the family room is warm and inviting, with new furniture, shades, and cornices.

Here's the family room before.
To maximize the potential light in the sunroom, the homeowners keep the shades up as high as possible. But for viewing TV, the shades are lowered, and the double-sided blackout lining method eliminates the pesky "pinholes of light" that we workrooms dread.
From outside, the lining folds up neatly. All of these downstairs windows had a generous 3" of mounting space inside, which made it feasible to do the double-sided shades. It also gave enough room to use the larger Rollease clutch which operates SO smoothly.
The kitchen sink window is dressed with a kick pleat valance out of the same textured gold as in the dining room.
The large master bedroom window is quite tall at 110". The homeowners need light control. A blackout shade would have been unmanageably massive and heavy, so Denise offered blackout draperies with a light-diffusing sheer behind, on a double track with glides, operated with sturdy 5' metal batons in a matching finish.
The smaller window on the adjacent wall had too little room for draperies, so Denise chose a flat Roman shade. We made this with our latest new method for eliminating pinholes of light, which involves two layers of blackout lining. More on that another time.
Not photographed: a small shade for the back door, another for an upstairs bathroom, and sheer stretch panels for the front hall sidelights.
A big thank you to my fantastic installer Mario Fuentes...........
And that's what we've been doing for the past two weeks!
Although not fully furnished yet, our recent window treatment installations have set this renovated house well on its way to looking like a home.
| Living Room Before |
These panels were two full widths per side. Eight #12 grommets were used per width on 1" poles, and the each panel stacks down to about a foot wide.
Thanks to various webinars from CHF Academy, Rowley Company, and other sources, I think maybe I've finally gotten my grommet knowledge internalized.
The most important tip I that I learned that I can pass on is: make a template out of buckram. Actually cut the holes and thread them onto a pole. That's how you can be really sure that you're planning correctly and that the seam isn't going to come out facing forward. The other most important piece of information is that you always must have an even number of grommets.
In the dining room, the embroidered floral kick pleat valance with side panels warms up the space, while the gold textured solid relaxed shade offers privacy.
Viewed here from the second floor landing, the family room is warm and inviting, with new furniture, shades, and cornices.
Here's the family room before.
To maximize the potential light in the sunroom, the homeowners keep the shades up as high as possible. But for viewing TV, the shades are lowered, and the double-sided blackout lining method eliminates the pesky "pinholes of light" that we workrooms dread.
From outside, the lining folds up neatly. All of these downstairs windows had a generous 3" of mounting space inside, which made it feasible to do the double-sided shades. It also gave enough room to use the larger Rollease clutch which operates SO smoothly.
The kitchen sink window is dressed with a kick pleat valance out of the same textured gold as in the dining room.
The smaller window on the adjacent wall had too little room for draperies, so Denise chose a flat Roman shade. We made this with our latest new method for eliminating pinholes of light, which involves two layers of blackout lining. More on that another time.
Not photographed: a small shade for the back door, another for an upstairs bathroom, and sheer stretch panels for the front hall sidelights.
A big thank you to my fantastic installer Mario Fuentes...........
And that's what we've been doing for the past two weeks!
Friday, August 15, 2014
Extreme blackout; or, where are the pinholes of light?
"Extreme blackout"- this blog post title could actually apply also to my blog in general- I having been out of sight since early July! I've checked the blog stats and am shocked (but delighted) to see that people are still reading this blog every day even though it's been 6 weeks since my last post.....
Ever since returning from vacation, I have been swamped with very intense production deadlines. It's hard to remember to take photos when working so hard, but I do have some, and a few stories to tell.
Here's one of them.
"Extreme blackout" is what I call this homeowner's request for her bedrooms. We created three-layer treatments that came as close as one could get to total blackout, without fully covering the windows with draperies, which she did not want.
We installed phase one of her renovated home on July 31, the family moved in on August 1, and on August 4 their baby boy was born. He came home the next day to his own very, very dark bedroom.
Now that is DARK!
Here's what you see by daylight:
Now, you might be wondering, where are the pinholes of light that are the inherent drawback to blackout shades, the thorn in the side for shade fabricators, and the bane of our existence?
Yeah, we solved that problem.
A double-sided shade with multiple layers of linings made it possible. Here's what the back looks like (this photo is of a similar shade in another room.) These are serious shades, folks, more like furniture than curtains!
BUT FIRST.
Before going into detail, I want to acknowledge that my train of thought about those pesky pinholes of light began during an enlightening webinar by Susan Woodcock (Home Dec Gal) which I attended in the spring. She developed her own clever way of dealing with the pinholes, which over a couple of months percolated through my brain and evolved into this method for this particular job.
First we made the shade using three layers of lining. Next to the face, Bella Notte Silky Blackout. Then interlining, and finally regular cotton sateen.
The shade is strung, using ladder tape on the outer two rows.
Another layer of Silky Blackout is tacked over each ring, one tack on each side of the ring. So one layer of blackout hides the hole(s) in the other layer. No pinholes of light!
Coming up next: more on the double-sided blackout; more rooms with variations on the three-layer treatment; more on the slender cornices; more on box pleated draperies. No more 6-week hiatus for me. Thanks for hanging in there, and coming back!
Ever since returning from vacation, I have been swamped with very intense production deadlines. It's hard to remember to take photos when working so hard, but I do have some, and a few stories to tell.
Here's one of them.
"Extreme blackout" is what I call this homeowner's request for her bedrooms. We created three-layer treatments that came as close as one could get to total blackout, without fully covering the windows with draperies, which she did not want.
We installed phase one of her renovated home on July 31, the family moved in on August 1, and on August 4 their baby boy was born. He came home the next day to his own very, very dark bedroom.
Now that is DARK!
Here's what you see by daylight:
![]() |
| More on the toppers in a future post- meanwhile, thanks to Joanna Braxton for her instructional DVD on making these sleek cornices.... |
Now, you might be wondering, where are the pinholes of light that are the inherent drawback to blackout shades, the thorn in the side for shade fabricators, and the bane of our existence?
Yeah, we solved that problem.
A double-sided shade with multiple layers of linings made it possible. Here's what the back looks like (this photo is of a similar shade in another room.) These are serious shades, folks, more like furniture than curtains!
BUT FIRST.
Before going into detail, I want to acknowledge that my train of thought about those pesky pinholes of light began during an enlightening webinar by Susan Woodcock (Home Dec Gal) which I attended in the spring. She developed her own clever way of dealing with the pinholes, which over a couple of months percolated through my brain and evolved into this method for this particular job.
First we made the shade using three layers of lining. Next to the face, Bella Notte Silky Blackout. Then interlining, and finally regular cotton sateen.
The shade is strung, using ladder tape on the outer two rows.
Another layer of Silky Blackout is tacked over each ring, one tack on each side of the ring. So one layer of blackout hides the hole(s) in the other layer. No pinholes of light!
Subscribe to:
Posts (Atom)