THE BLOG IS HAVING TROUBLE WITH COMMENTS! SOMETIMES THEY DON’T GET PUBLISHED, AND WHEN THEY ARE I AM UNABLE TO REPLY TO THEM. IF THAT HAPPENS, JUST EMAIL ME AT stitchlore@gmail.com.

Looking for something specific? Check out the Topic Index, or the Search bar, just below, on the left.


Sorry about this problem!

SO.........WHAT ARE WE WORKING ON TODAY??
Showing posts with label topstitching. Show all posts

Thursday, January 30, 2014

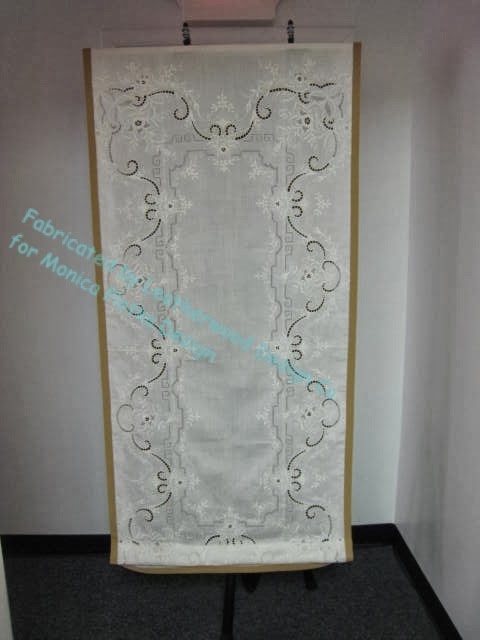
Vintage tablecloth re-purposed

Monica Plotka called me for this project, knowing that I would thoroughly enjoy it, and I sure did- this is one of the coolest shades I've ever made.  Her client dipped into her stash of vintage textiles and brought out this embroidered linen cutwork tablecloth to remake into a shade.
This very fine white linen pressed beautifully.  After the whole tablecloth was ironed, I marked out the exact finished size plus 1.5" for the board, then cut it out carefully, leaving the perimeter intact because..... well, just because I couldn't bear to cut into it.
Because of the openwork areas, it was easy to see the grid of the table behind the fabric.  That made the layout easier.
2" French cotton grosgrain ribbon was adhered to the back with Sealah tape, then pressed around to the front, mitering the corners along the way.
From the front, the ribbon was topstitched all around.

A length of Rowley's weight bar tubing was machine-sewn 3" above the top of the ribbon, the stitching ending right before the ribbon, with an extra couple of inches left at each end.
The first ring started 6" above the fabric tube, with ladder tape.  After all the rings were sewn on, the weight bar tube was folded up to meet the bottom rings, and tacked to that bottom ring.  The weight bar was inserted into the tube, and the ends finished. 
The fold created one permanent pleat at the bottom, even when the shade is fully lowered; the extra fold hides the weight bar pocket stitching, and any other clutter that might show through the open areas.
This project was right up my alley!  Thanks Monica, I'll do this again any time!

Saturday, March 31, 2012

A little cutie

This shade is one of three for a guest suite- three different styles but all using the lime green in one way or another.  I'll do a post featuring all three, but I'm too impatient- I want to show off this little cutie, now.

The main fabric is a puckered faux silk, with a band on three sides.  For such a tiny shade, this one required a lot of contemplation- how to make a nice flat band on a puckered fabric?  I decided to topstitch it on.
First I laid out the lining, interlining, and face fabric, face fabric up.  I drew lines with my purple pen and basted just inside the line.  You know how I feel about hand-basting- it's worth every second.  There is something reassuring about basted fabric. 

The green was pressed under 1/2".   I planned to line it up against the purple pen line, but on the pucker fabric the line was too wobbly, so I re-marked with masking tape, butting it right up against a straightedge using the grid.  

You know how I feel about topstitching- when carefully done it is a beautiful detail and sometimes is the best technique for the situation.

 So I topstitched through all 3 layers with matching lime green thread.  Look at that glorious late afternoon spring sunshine!

The excess pucker fabric was cut away.

The green band wrapped around and covered the stitching line on the back.

The weight bar pocket was sewn and the trim glued to the stitching line, ending it where the designer specified.  Ta-da!  Some rings, some strings, and a cord lock- and it'll be done!

Sunday, January 9, 2011

Pink Day

Coordinating window treatments and pillows were made for two sisters whose rooms are across the hall from each other.  The round pillows are boxed, and small square pillows and shams have a flat flange that is gathered in the corners. 
All welting and banding is done in the same pink dot that covers the window seat cushion.

Over the window seat in the little sister's bedroom is an Imperial valance out of a crazy-quilt print.  The back is faced so the dot is visible peeking out from behind the horns.  Blackout lining inside eliminates the shadow the 4" shaped facing would have cast.  The dot worked nicely as 3/8" welting.
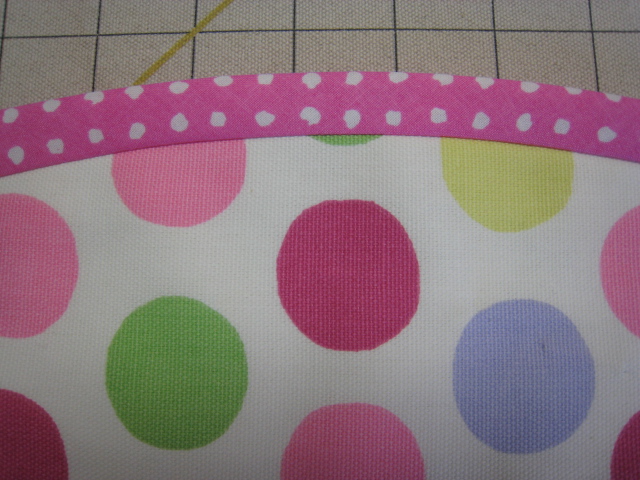
The older daughter's room has a 12' window with a flat, shaped, banded valance.  Here it is laid out on the table.   Luckily this large polka-dot could be railroaded.   The 1/2" banding was done binding-style.

To draft the pattern for the bottom serpentine silhouette, I drew the general shape right onto the fabric with a purple disappearing pen.  Then I laid gridded paper over my roughly sketched line to begin drafting the pattern.  The 12' section has 7 scallops.  The serpentine shape continues onto the separate 2' sections at each side for the small windows at right angles to the 12' window.
After cutting the face I laid it wrong sides together against napped lining, cut, and pinned well.  The bias banding strips were a little over 2" wide; it stretched enough to ease around the curves with a 1/2" seam allowance; then wrapped perfectly around to the back to make a 1/2" band on the front.   This is just like binding a quilt.

To finish the back, there are 3 options- top-stitch by machine from the front side, bond with glue or other adhesive, or hand-sew.  I chose to top-stitch-in-the-ditch for this product since the fabrics were well-behaved and they didn't warp with stitching.

Tuesday, December 21, 2010

Machine work

We do a lot of hand-sewing around here, but sometimes it's all about patient machine work.  For this small shade, we bound two layers of green sheer linen with 1 5/8" twill tape on 4 sides.

This ripply self-lined linen was a little hard to handle.  First the twill tape was secured with a narrow strip of fusible interfacing tape.  The fusible stuff penetrated both fabric layers, serving as basting.  Then it was folded and pressed and top-stitched, with the corners mitered.

For this lacy unlined cotton, I wasn't sure I would do a good job matching the pattern using a French seam.  So I sewed right sides together, and felled the seam.

Pressed to the side, the felled seam is very cool.  This really beautiful fabric is about to become a softly gathered London shade valance.

More about French seams here.

Some may disagree with me, but for sheers, especially stretch panels, when the budget does not allow for hand-sewing, I prefer the blind hem of a regular household machine to that of a blindhemming machine.  I think the blindhemmer makes a stitch that looks too commercial and also distorts the fabric if the tension is not just right.  Say what you like, I happen to like the domestic machine blind hem.  I love those little V-stitches all in a row.  I love that it looks like a person made this using a machine, not a factory.

Patient topstitching creates precise headers and pockets to complete these sheer linen stretch panels.  The fabric was cut by pulling threads to be sure it was cut perfectly on-grain, in both directions.

Friday, June 25, 2010

Tools my grandmother didn't have!


Does this fabric look familiar?  Back in the winter I posted pictures of a small shade out of this fabric.  It was fun using twill tape to band the edges and the shade turned out great.

The decorator wanted to use it again for this shade which is wider than the width of the fabric.  We needed to find a way to join the widths.

The face fabric is a very sheer silk, with a 1/4" hemp rope woven in horizontally.  The rope is very bulky, making it impossible to sew the widths, so we thought of using the twill tape to hold the widths together and at the same time hiding the join line.  The twill tape is topstitched down each side, through all the layers.

This is where some modern workroom tools really made it possible to fabricate this shade with confidence.

The shade was made almost entirely on the table.  Since you can see through the sheer silk and the sheer linen lining, I used the gridded canvas table to press and lay out the fabric and keep the rope lines and the lining grain line straight.

Adhesive tape was used as a basting tool.  Once the half widths were positioned next to the full center width, I ran adhesive tape down the join line and pressed the twill tape into place.  I also used the tape to position the twill tape used for the banding.  The tapes were also pinned to keep the layers together.

Fabric staples across the top kept the fabrics from shifting while the shade went off to the machine for topstitching.


Back to the table, wrong side up, the grid again assisted in marking for the rings.  As a matter of fact, I didn't even mark- I just followed the rope lines and the vertical grid lines and sewed the rings on by hand right on the table.  The clear plastic rings and tan lift cord are nearly unnoticeable from the front.


The twill tape in folded in half and made a pocket for the weight bar which I sewed right behind the bottom band, following the topstitching line.

I've had my gridded canvas table for 4 or 5 years now and can't imagine going back to fabricating anything without it.  


Friday, April 16, 2010

Fab Fabric Friday again


Is this perfect for Fab Fabric Friday, or what?

(The colors aren't as true as I'd like.  The brown is more chocolate, the embroidery is deep as the bluest summer sky.  The contrast lining matches the embroidery but I couldn't get it to look that way.)

Anyhow, this fabric is in the process of becoming flat panels, interlined, with a contrast decorative lining.

I've folded the lining side over to show the lead edge and the return edge.

The portiere lead edge has our signature narrow band of face fabric wrapped to the back, and topstitched.  There's no trim to hide the topstitching, but because of the dark color the stitching disappears.  I like this technique because it secures all the layers so they don't bag open.

The return edge, as well as the bottom face fabric hem, is hand-sewn.

At the top, 2" translucent buckram is folded in and stitched securely on the back side.   Narrow "grooves" of vertical stitching hold it all in place and provide a secure place for the drapery pins.  Again, thanks to the dark color, the stitching blends right in.

We like to use the translucent buckram on flat panels because it adds structure with fluidity.  These panels won't droop between the rings, but they also won't be rigid.

These panels are 116" long.  Because of the portiere edge, I can't think of a way to make these without tabling them twice..... lots of walking!

Saturday, March 13, 2010

Portiere Draperies

This week has been busy with a job that is almost ready to be photographed.  There are several components, one of which is Portiere drapery panels.  These photos illustrate our portiere fabrication method, which has been used on the draperies that haven't been photographed yet.
"Portiere" drapery, traditionally, is heavy draperies hung across a doorway (derived from French "porte" which means door).  The fabrication method takes into account the fact that they are seen from both sides... there is no "back" or "wrong side" and therefore a regular rolled side border is not appropriate.  The lead edge of the drapery needs to be "knife-edged" or "pillowcased" and may or may not have a trim.
Nowadays "portiere" might refer to any drape where the lead edge is made this way rather than rolled and blind-stitched, even if the drape isn't going into a doorway.  Usually the lining is a decorative contrast fabric.
What bothers me about portiere draperies is when the fabrics gap away from each other at the lead edge, which might happen because the fabrics don't cling to each other, or because of the weight of trim applied on one side.  I wanted to find an attractive way to secure the lead edge to prevent that.
We devised a fabrication method for draperies with top-sewn trim that yields a beautiful edge on each side.  The face fabric is rolled around to the back about 1/8" and "stitch-in-the-ditch" topstitched.  The tassel trim covers the topstitching on the face side, and on the back there is the illusion of a microcording.  This method has been effective with a variety of applications.  The photo shows a workroom sample we made as a show-and-tell for clients.
The seamstress needs a good eye and a steady hand to topstitch perfectly!  No extra caffeine til the sewing is done.
I must mention here that the only song I've ever heard that contains the word "portiere" is Warren Zevon's "Disorder in the House."

Tuesday, February 16, 2010

Another Sheer Shade challenge

Here is a sheer shade challenge for which I needed to find a fabrication method.
The face fabric is a silk sheer with jute rope woven in horizontally.
The lining is a loosely woven yet stiff linen sheer.
In the first photo you can see both fabrics laying next to the tabled shade which is being prepared.
Around the sides and bottom is a twill tape 1 3/16" wide to be folded in half and wrapped around to the back.
First I used fusible adhesive webbing to fuse the edges of the 3 sides- it is narrower than the twill tape and won't show.  I wanted to do this to keep the edges from fraying.
Then I laid the tape on the back and fused it, then wrapped to the front and fused again, mitering the corners as I went.
From the front I topstitched close to the edge.
The rings are sewn on by hand, into the jute rope so no stitches show from the front.
I wrapped the weight bar with the twill tape- it just exactly made it around the weight rod and I whip-stitched it shut, then sewed it to the shade at the rings, so the rings are mostly bearing the weight.
The last picture shows the shade from the wrong side, the rod sewn to the rings.  It might need more securing but I'll wait til it's hanging to determine whether or not that will be necessary.
That's as far as I've gotten- it's now ready to be stapled and strung- and I'll add those pictures later.
I love sheer shade challenges!  They're my favorite shades to make, and nearly every one presents a unique challenge.  Finding the solution is my favorite part of my work.
Ta-da!