THE BLOG IS HAVING TROUBLE WITH COMMENTS! SOMETIMES THEY DON’T GET PUBLISHED, AND WHEN THEY ARE I AM UNABLE TO REPLY TO THEM. IF THAT HAPPENS, JUST EMAIL ME AT stitchlore@gmail.com.

Looking for something specific? Check out the Topic Index, or the Search bar, just below, on the left.


Sorry about this problem!

SO.........WHAT ARE WE WORKING ON TODAY??
Showing posts with label translucent buckram. Show all posts

Wednesday, September 4, 2013

Gold mesh curtains

Yesterday I forgot to post the pictures of the curtains that go over those unlined hobbled shades.
This mesh is viscose and poly.  It took the iron well, pressed readily, and was easy to sew.  It's very fluid, and drapes beautifully.   Because the curtains will be inside mounted, we kept the fullness down by making two-finger French pleats.  

The curtains are short, so we used 2" translucent buckram.   Side and bottom hems were all hand-sewn, as well as the little pinches for the pleats.  In fact, the only machine sewing is the where the pleats are sewn.

Monday, November 29, 2010

Two Fab Fabrics

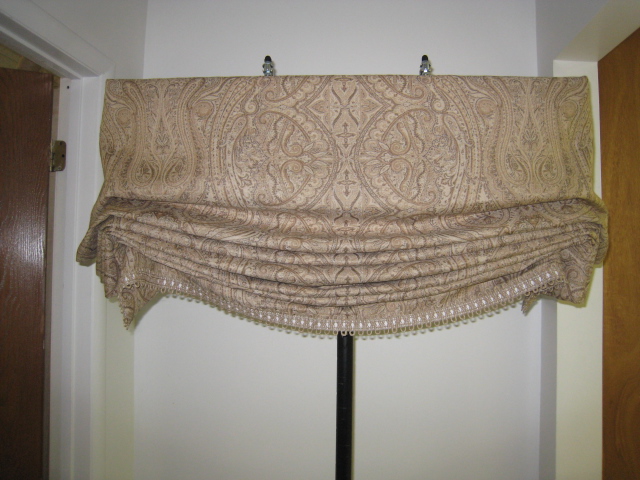
One is an amazing soft wool paisley, the other is.... I have no idea what.  It feels like.... plastic macrame?  But it's not plastic, because it ironed beautifully.
The wool became a relaxed Roman shade.

It's trimmed with a loop fringe layered over white grosgrain.

The mesh fabric became long drapery panels, which I wish I had seen on-site, but alas I only saw them here.  But the homeowner and decorator flipped over them!  They called twice to say how happy they were.  All hand-sewn of course, except for the actual pleats.  The picture does not do them any kind of justice.  The top-tacked heading has translucent buckram.


Khaki chain weight in the bottom is thanks to Kelly from Scarlet Poppy Interiors in Texas who saved the day!  I tried to order it from Rowley but it is on backorder.  Kelly responded to my plea on the CHF Forum.

And that wasn't all.  We made Roman shades too out of the mesh.  Here they are not hiding the shelves full of supplies and tools.  They are reverse-mounted, but we didn't have to make a self-fabric valance because they went under cornices.

The best part was, we didn't have to put in grommets- just ran the matching tan string through the mesh!

Thursday, June 10, 2010

A Totally Satisfying Installation

Top tack unlined sheers
The first fold is basted to keep it from drooping since it's so wide
Today's installation was one of the rare ones that I could walk away from totally satisfied that there is nothing I would have done differently!

These unlined semi-sheer striped draperies are all hand-sewn, with top tack pleats and just a little break at the floor.

The light and dark sections are equal in width at 4 7/8".  We debated how to lay out the stripes, finally choosing to keep the darker stripe in the back and on the lead and return edges, and the lighter stripe to the front, pleated; this made the fullness 2x.

I thought the lead edges and return edges should be hemmed along the edge of the full stripe, as opposed to a regular 1 1/2" side hem.  That meant doubling 4 7/8" and I was worried the first fold would droop inside the side hem, unless it was secured.  So before making the second turn, the fabric was basted with long stitches on the inside and just 1/4" to the front, which is pretty much invisible.

The little narrow shiny white woven stripe dividing the wide stripe provided the perfect place to secure the hem stitching so that it's not visible at all.

The effect is a totally smooth lead edge with no stitching showing, and a nice soft padded feel thanks to the wide, doubled side hem.

And the best part of the lead edges is that the little white woven line is at the very edge.  I love how that looks!

Translucent buckram in the heading gives a clean but fluid line.

The second fold is hand-hemamed along the little woven line.
The shades were sewn by hand, too.  I love how on their 1" boards they just fit under the rough-hewn beam that serves as a sort of cornice.

The fabric is 118" wide, railroaded.
For the 74" long shades, all 118" was used, which means that there is more than 36" extra in length, tied up with 7 rings.  That is a lot of bottom fullness!- but for this drapey fabric, it's perfect.

The room pictures, below, show the three walls of draperies and shades.
The relaxed Roman shades are very full at the bottom.

Tuesday, June 8, 2010

Inverted pleats

The other day I had the opportunity to see some draperies hung up that we made awhile back.

These are inverted box pleats- very small box pleats with a lot of space in between.  The ripple effect was a complete surprise to me!

I like to use clear buckram- the kind used for sheers- in flat panels whether with or without little pleats, because the top line holds without drooping yet is fluid.  The heading is doubled in the back for extra body. 

I was on the run that day- we have work installed in 3 or 4 rooms in this house and I was there to measure more rooms.  I'll take good photos of it all when we install the next phase.

Friday, April 16, 2010

Fab Fabric Friday again


Is this perfect for Fab Fabric Friday, or what?

(The colors aren't as true as I'd like.  The brown is more chocolate, the embroidery is deep as the bluest summer sky.  The contrast lining matches the embroidery but I couldn't get it to look that way.)

Anyhow, this fabric is in the process of becoming flat panels, interlined, with a contrast decorative lining.

I've folded the lining side over to show the lead edge and the return edge.

The portiere lead edge has our signature narrow band of face fabric wrapped to the back, and topstitched.  There's no trim to hide the topstitching, but because of the dark color the stitching disappears.  I like this technique because it secures all the layers so they don't bag open.

The return edge, as well as the bottom face fabric hem, is hand-sewn.

At the top, 2" translucent buckram is folded in and stitched securely on the back side.   Narrow "grooves" of vertical stitching hold it all in place and provide a secure place for the drapery pins.  Again, thanks to the dark color, the stitching blends right in.

We like to use the translucent buckram on flat panels because it adds structure with fluidity.  These panels won't droop between the rings, but they also won't be rigid.

These panels are 116" long.  Because of the portiere edge, I can't think of a way to make these without tabling them twice..... lots of walking!

Wednesday, March 17, 2010

Inverted Box Pleat


Well, my apologies for the crummy photos.  I had the opportunity to show these two very different applications of inverted box pleats but no time to set up any sort of shoot for them, so here we are.
The top shows interlined silk, inverted box pleats to normal 2 1/2 times fullness, as well as contrast microcord and yummy silk tuxedo buttons.   The rings are sewn on, but the panels could be hung the rings with drapery pins.
The bottom shows very tiny inverted box pleats on an unlined sheer with 2" translucent buckram in the header.  The pleats on the sheer are there just to control the fabric on what are essentially flat panels;  they provide a good place to place the drapery pins so they'll be hidden.
The technique is exactly the same but what a different interpretation!
The bottom picture shows both examples from the back side.  There are a number of ways to finish an inverted box pleat, but I like the stitch-in-the-ditch method because it flattens the pleat out, provides a place for the pin, and gives some control.