THE BLOG IS HAVING TROUBLE WITH COMMENTS! SOMETIMES THEY DON’T GET PUBLISHED, AND WHEN THEY ARE I AM UNABLE TO REPLY TO THEM. IF THAT HAPPENS, JUST EMAIL ME AT stitchlore@gmail.com.

Looking for something specific? Check out the Topic Index, or the Search bar, just below, on the left.


Sorry about this problem!

SO.........WHAT ARE WE WORKING ON TODAY??
Showing posts with label encased cord. Show all posts

Thursday, June 2, 2011

Cord Shroud Tape

I like to make hobbled shades with the cord shroud tape from Rowley.  It serves two purposes at once- it hobbles the shade, and shrouds the lift cord.

 It can be sewn on entirely by machine.  I use my little domestic Juki which automatically cuts the thread at the tap of my finger, so I barely even need to use scissors.  I sew back and forth on one side, then raise the needle and sew back and forth on the other side, leaving the lift cord free.

When I cut my tapes for this shade I wasn't thinking, and cut them all to the finished length, so when ready to string, I didn't have enough lift cord to carry across the top as the operating cords.  This is easy to fix without doing the tapes over again.  Just tie some new cord to the bottom with a small but secure knot;

and gently pull from the top to feed the new cord through, allowing enough to carry across and down the other side.

This works for all the other shroud products as well: mesh tube shroud, ladder tape, or cord loop shroud.  I've had to do it with them all, one time or another, either because I cut them too short, or because I "lost" the cord inside the shroud.

Sunday, February 27, 2011

Encased cord- a faster way

This will be incredibly boring to anyone other than a workroom person seeking a faster way to sew encased cord to Roman shades.  Plus, the pictures are not great.
This method evolved over the course of a bunch of identical shades.  I won't say it's tons of fun, but it does streamline the process.

After laying out the face fabric and lining (blackout) and pressing to the finished size and securing the side hems, with purple disappearing pen I drew the vertical lines for the lift cords, then marked every 6" along the lines for the tacking points.

There were to be 8 tacks per row, so I threaded 8 needles with double 30" lengths of thread, knotted at the ends.  That amount of thread was enough to do all five rows without having to re-thread, a big time-saver.

Along the first vertical row, each needle was stabbed through all layers to the right side, 1/4" away from where the cord would be running, then stabbed back through to the back of the shade, letting the threads with the needles dangle off the table.

I laid out the tape (steam it first to pre-shrink it!!!) and weighted it down at each end, then worked my way up the row, tacking twice at each tack point.  The thread tail was hidden behind the tape but not cut yet.

After all 8 were sewn, I worked my way back up the row and clipped, leaving each needle and thread in place.

Then I worked my way along the row again, knotting each thread and stabbing it through the corresponding point on the next row until all 8 were stabbed through and sticking into the canvas grid.


I laid out the second tape and secured at each tacking point, clipping all the threads and knotting each and stabbing into the corresponding point on the next row.

And so on! until it's all done.
Do yourself a BIG favor, and as you complete each row, fish out the cord at the bottom 1/2" up from your bottom hem and attach an orb, so the cord can't pull out.  After the tacks are done, the tape will be tucked in when the pocket is sewn, and a ring will be attached.

Another BIG favor you should do for yourself is to loosely tie the tapes at the top so the cord can't get messed up up there, either.
In this photo you can see the weights holding down the area I'm not working on.

For the center rows you can neatly roll up the fabric so you can reach it more easily as you stab back up to the back of the shade.  Just be careful that the layers don't shift.  They can be pinned, but since this is blackout lining, I didn't want to use any more pins than necessary, so I just tried to be very careful.

Friday, February 18, 2011

Update on the Top-Down Shades

The shades shown in the previous post, just below this one, were completed and installed a week ago.  Pictures?  No, sorry, no pictures! 

These were top-down only hobbled shades with a Rollease clutch and a self-fabric valance.  There were three layers of fabric: the face fabric was a semi-sheer with a woven pattern, a middle layer of a nearly-upholstery weight woven mini-diamond, and the outer back was blackout- the new Bella Notte "Silky" from Angel's Distributing.
There were five shades, all with 2" banding in the mini-diamond on 3 sides with mitered bottom corners.
Shall I mention now that three of the five were side-by-side in a bay window?
Rowley's new encased cord served as both the hobbling tape and the lift cord.  Luckily, for hobbled shades the encased cord can be machine-sewn, saving a bit of time.

This was by far the most complicated job I have ever done, both physically and mentally.
Where shall I begin???

Right off the bat, the first challenge was banding the sheer.  Glue-basting helped keep the layers from shifting, but none of my sewing experience could mitigate the take-up that naturally occurs whenever two fabrics are sewn together.  The pattern was nice and straight at the bottom, but had a big downward smile at the top.  Usually you try to compromise and put the skewed end wherever it would be least noticeable, but with a top-down shade, both top and bottom are prominent!

Once the three fabrics were layered and the side hems pressed in, the lines for the rib pockets were drawn with that miraculous disappearing purple pen.  Some blackouts won't hold that purple mark for long, but fortunately the new "Silky" did.
The new "hazardous loop" standards prevent us from making a combined fabric-plus-tape that exceeds 16.9", which means that with 6" "ring" spacing, the rows for pockets can't be more than 9.9" apart.  I was able to stagger the repeats at about 9.5", and the "ring" spacing was 5.75", so the pattern on the folds were consistent on every other fold, AND it met with the hazardous loop guidelines. 

The pockets for the ribs were relatively easy to sew, with plenty of pinning, but unfortunately the textured sheer was the inside of the pocket and made inserting the ribs a difficult task.  Many of the pockets had to be strategically opened to get the ribs through.  Rowley's clear plastic ribs made it through okay, but that was plan B- originally I wanted to use the 1/8" fiberglass ribs.  But they caught on the fabric and would not slide through, and would have caused runs in the fabric if we'd tried to force them.

But back to the pockets.  There were 10 rib pockets, and I sewed every other one in the opposite direction, to keep the layers from shifting.  My arms are all torn and scabby from the pins gouging them while I wrangled with the very heavy shades at the sewing machine.  The next step, sewing on the encased cord by machine, was probably the easiest part of the whole job.  I kept the top unfinished until all five shades were done, so I could lay them out and make sure the pattern was consistent on all.

Did I mention yet that three of these shades were side-by-side in a bay window?  Oh, yeah.  I did.  So it was essential that the folds line up perfectly with each other on each shade.

That part was so totally not fun.  I made good use of the printed grid canvas and the purple pen, and drew all over the table and made notes right on the canvas about where each fold needed to fall and what part of the pattern had to be at the very top.

Remember the part about how the pattern turned from straight lines into a downward smile towards the top of the shade?  Well, I have no idea how, but by the time it was all done, that line seemed less smiley, and also the busy-ness of the folds and little flowers made the skew less noticeable.

After the pocket for the top was pressed in, John put in the little brass grommets that allow the lift cords out of the pocket.  Then the pocket was sewn- and at that moment I realized the top of the tape needed to be sewn accurately into the seam- yet another step I hadn't been able to think through until I was actually doing it.

These shades had a regular 3/8" round bottom weight bar, but they also needed a top bar that is very rigid which keeps the top of the shade straight, with no sway.  Shopping with John one day in the electrical department at Home Depot, we found something called "wire molding" which is extremely strong metal housing for running wires.  We bought that for the top weight bar because it had virtually no flex in either direction.  It turned out to be perfect.  Brilliant John used the reciprocating saw with the compressor (a non-manual hacksaw) to cut grooves in the metal and we wound the cord around the bar making sure it was settled into the groove so it couldn't slip.  After the two middle cords were tied on this way (there were 4 lift lines) we borrowed again from the electricians and use a wire  snaking technique to get the strings through the pocket, followed by the bar.  I know I'm not describing this well.  (I should make a YouTube video.  Yeah, in my spare time!)  Anyhow, it worked, and let the record show that I would never have been able to make these shades without John's imaginative engineering!

I also must mention that I couldn't have made them by the deadline without a dear friend's patient and good-natured stubborn persistence- she put in a whole back-breaking day of what I had promised as "fun" and "interesting" tedium, did not walk out on me, AND never complained!

Leveling a top-down shade is a major ordeal, and having to level five of them identically is just cruel and unusual.  We were not going to be present at the installation, so we had to come up with a way to make all the lines adjustable.  The orbs used for shades were the answer.  These shades have two sets of lines:  the guide cords which set the length, and the operating cords.  We used orbs at each end of each line, and tied them off leaving a long tail.  This allowed the installer to make slight adjustments.

We were thrilled when we finally heard back from the decorator on installation day that everything had gone well and the next day we heard that the man of the house had called the decorator with his compliments on the job!!!

I feel that I am babbling now- I am sure that no one reading this has the slightest idea what I'm talking about, and I'd be astonished if anyone's made it to the end of this post.  I'm sorry I don't have photos.  The fabrication was just so intense, I had no time to stop and take pictures.  And this was one of those jobs I will never see installed.  But if anything you've read piques your curiosity and you have any questions about any of the process, please let me know and I'll try to be more thorough.

Monday, January 17, 2011

More Pink Cuteness

I was not a pink girl- I rather loathed it, actually- but eventually reconciled myself to pink under certain circumstances, especially combined with closely related reds, oranges, corals, and other pinks.  Here is a shade combining two pink stripes with an orangish-red pompom fringe.

Rib pockets are fused to the inside of the blackout lining.


Encased cord

Monday, December 27, 2010

Snow day!

We're digging ourselves out of the blizzard/nor'easter! 
I doubt that I'll go to the studio today, but I had the presence of mind to bring my work computer home with me before Christmas- so I thought I'd post a couple of things from the past few weeks that hadn't made it into the blog.
Here is a hobbled shade made with Rowley's encased cord- super-easy to use and works really well.


This is the first shade using the encased cord where I've been able to tack the casing by machine- the shade was small enough to be able to manage.  Quick and easy.

There were 3 Austrian shades in this order- two with single sections, and this double.  It's hanging over my messy-looking (though amazingly organized, honestly) shelves in the studio, and you can see the shadow of me taking the picture.

Because the fabric is sheer, I used the cord shroud made by TechStyles.  I've done a few now with the cord shroud and have gotten more proficient with it.  Every single time it has been a different type of shade- Austrian, ribbed, hobbled, flat, and relaxed- and I've had to figure out a different way to use it every single time.     

Here's a view of the back:

Instead of regular Austrian shade tape with the loop "rings" I decided to use plain translucent shirring tape, the one that does tiny little pencil pleat type shirring, and clear rings, with light tan cord shroud.   

For this sheer hobbled shade I used translucent twill tape to "hobble" the fabric, with clear rings and the light tan cord shroud.  Clear plastic ribs are unnoticeable in their pockets.


Here it is from the front:


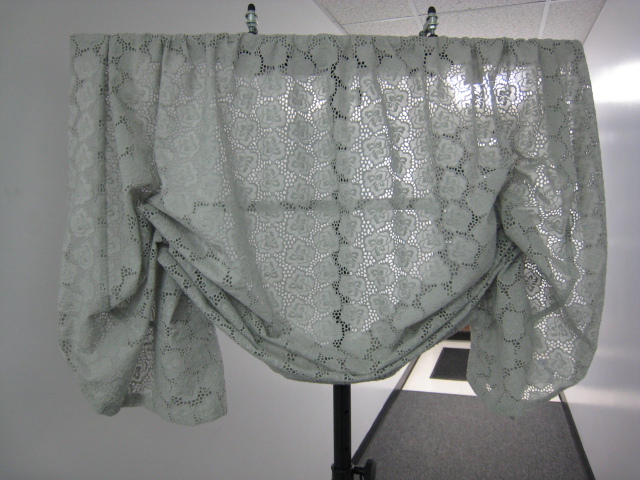
Last but not least, this sweet gathered London valance was made from a delicious soft grey flowery cotton lace for a powder room.

The weight bar pocket was made from the selvedge, and we used grey lift cord and clear rings; the board is covered in the cutoffs with white lining behind it.   For shade-style valances we usually put on a cord lock so it can be adjustable within 6" or so.

Sunday, December 12, 2010

Finally- First Encased Cord Shade

It took awhile but here, finally, are a few pictures from last week's installation.


This is the first shade we've installed that has used the new encased lift cord from Rowley, which brings the shade into compliance with the new standards for corded window treatment safety.  It was easy to use, and I think it looks just fine from the back.


Instead of sewing rings, the tape is tacked by hand where the rings would have been.  It takes no more time than sewing rings would take.  The tape is strong but soft and shirrs up to practically nothing.

Here is the new tension device from Rollease which brings the bead chain loop into compliance.  The shade will not operate fully until the device is in place.  And it looks nice, too.  Like most of our shades, this one is operated with a standard Rollease clutch lift system.


The panels have my favorite pinch pleat style- fat two-finger pleats, hand-tacked with coordinating thread wrapping around the front of the pleat, rather than stabbed through the sides.
This is definitely not a low-bulk panel!  The heading is double-topped, meaning two layers of print, and one each of lining and interlining, in the back, along with the buckram.  I love the full, happy, bulky pleat all that fabric creates.


Wandering back to the dining room, I took a fresh shot of the draperies we made last year with the amazing orange faux panel.  Click here to read more about them.  Those pictures were taken before the room was finished; now it's ready for entertaining.