Powder rooms are the perfect place to use a fabric or a window treatment style that you love but would get sick of in large quantities.
If you could make them yourself, you could make a new one each month out of next to nothing, and switch them around, or pass them along.
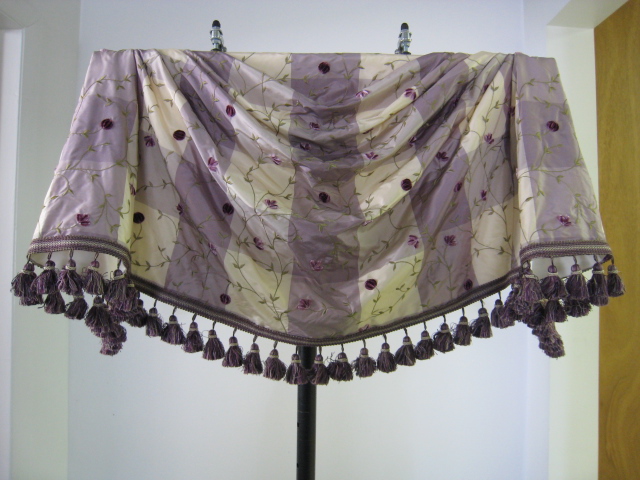
This is a single-swag Empire valance.
THE BLOG IS HAVING TROUBLE WITH COMMENTS! SOMETIMES THEY DON’T GET PUBLISHED, AND WHEN THEY ARE I AM UNABLE TO REPLY TO THEM. IF THAT HAPPENS, JUST EMAIL ME AT stitchlore@gmail.com.
Looking for something specific? Check out the Topic Index, or the Search bar, just below, on the left.
Sorry about this problem!
SO.........WHAT ARE WE WORKING ON TODAY??
Tuesday, March 8, 2011
Monday, March 7, 2011
Inverted pleat curtains
Here are those adorable "June Bug" curtains, with the black and white polka-dot bottom banding.
These photos shows how inverted pleat curtains stack up.
These were made to about 2.25x fullness, to allow enough room between pleats for them to stack.
For inverted pleat draperies that need to draw, we like to use transparent buckram because it gives fluidity to the header and allows that ripply look.
After we sew the pleat to the back, we flatten it out and "stitch in the ditch" so it's secured in the center of the pleat but the sides are left free to allow for stacking.
Here is the back of an inverted pleat. If the "stitch in the ditch" is done well, no stitching shows on the front.
Here's another example. These curtains, however, have pretty small pleats to the back, probably barely 1.5x fullness.
These photos shows how inverted pleat curtains stack up.
These were made to about 2.25x fullness, to allow enough room between pleats for them to stack.
For inverted pleat draperies that need to draw, we like to use transparent buckram because it gives fluidity to the header and allows that ripply look.
After we sew the pleat to the back, we flatten it out and "stitch in the ditch" so it's secured in the center of the pleat but the sides are left free to allow for stacking.
Here is the back of an inverted pleat. If the "stitch in the ditch" is done well, no stitching shows on the front.
Here's another example. These curtains, however, have pretty small pleats to the back, probably barely 1.5x fullness.
Sunday, March 6, 2011
like
1" flange, pleated in corners.
Flange fabric is a super-heavy, stringy upholstery fabric. Everything inside had to be serged, and serged again.
Saturday, March 5, 2011
Living on the Edge of the Learning Curve
It's something new every day, lately.
This past week, we assembled our first "VersaRail" headrails from Rollease. This miniaturized traversing clutch system fits into a 1" headrail, ideal for inside mounts with limited space, or doors. The three shades in this order are inside mounted.
Accessed from the top, the space is pretty small and we needed to use tweezers and needle-nose pliers when our fingers were just too big!
The shade is attached with velcro sewn to the back. The short valance hides the stitching line. I really really really don't like using velcro for shades, so in the future we will adapt these to board installations.
I do love how all the pieces are enclosed and hidden by the headrail. From underneath, it is very neat.
I would now like to spend a week doing small, ordinary, easy projects. Enough of the learning curve! It really eats up a lot of time. Earlier in the week we made 12 shades that were strung with Rowley's EZRig system. Although we had used it before, it's not our everyday system, so there was a lot of learning and second-guessing.
Accessed from the top, the space is pretty small and we needed to use tweezers and needle-nose pliers when our fingers were just too big!
The shade is attached with velcro sewn to the back. The short valance hides the stitching line. I really really really don't like using velcro for shades, so in the future we will adapt these to board installations.
I do love how all the pieces are enclosed and hidden by the headrail. From underneath, it is very neat.
I would now like to spend a week doing small, ordinary, easy projects. Enough of the learning curve! It really eats up a lot of time. Earlier in the week we made 12 shades that were strung with Rowley's EZRig system. Although we had used it before, it's not our everyday system, so there was a lot of learning and second-guessing.
Monday, February 28, 2011
Curved Box Pleated Valance
aka Sheffield-
Made to the M'Fay pattern specifications with a dramatic contrast between short point and long point.
Sunday, February 27, 2011
Encased cord- a faster way
This will be incredibly boring to anyone other than a workroom person seeking a faster way to sew encased cord to Roman shades. Plus, the pictures are not great.
This method evolved over the course of a bunch of identical shades. I won't say it's tons of fun, but it does streamline the process.
After laying out the face fabric and lining (blackout) and pressing to the finished size and securing the side hems, with purple disappearing pen I drew the vertical lines for the lift cords, then marked every 6" along the lines for the tacking points.
There were to be 8 tacks per row, so I threaded 8 needles with double 30" lengths of thread, knotted at the ends. That amount of thread was enough to do all five rows without having to re-thread, a big time-saver.
Along the first vertical row, each needle was stabbed through all layers to the right side, 1/4" away from where the cord would be running, then stabbed back through to the back of the shade, letting the threads with the needles dangle off the table.
I laid out the tape (steam it first to pre-shrink it!!!) and weighted it down at each end, then worked my way up the row, tacking twice at each tack point. The thread tail was hidden behind the tape but not cut yet.
After all 8 were sewn, I worked my way back up the row and clipped, leaving each needle and thread in place.
Then I worked my way along the row again, knotting each thread and stabbing it through the corresponding point on the next row until all 8 were stabbed through and sticking into the canvas grid.
I laid out the second tape and secured at each tacking point, clipping all the threads and knotting each and stabbing into the corresponding point on the next row.
And so on! until it's all done.
Do yourself a BIG favor, and as you complete each row, fish out the cord at the bottom 1/2" up from your bottom hem and attach an orb, so the cord can't pull out. After the tacks are done, the tape will be tucked in when the pocket is sewn, and a ring will be attached.
Another BIG favor you should do for yourself is to loosely tie the tapes at the top so the cord can't get messed up up there, either.
In this photo you can see the weights holding down the area I'm not working on.
For the center rows you can neatly roll up the fabric so you can reach it more easily as you stab back up to the back of the shade. Just be careful that the layers don't shift. They can be pinned, but since this is blackout lining, I didn't want to use any more pins than necessary, so I just tried to be very careful.
This method evolved over the course of a bunch of identical shades. I won't say it's tons of fun, but it does streamline the process.
After laying out the face fabric and lining (blackout) and pressing to the finished size and securing the side hems, with purple disappearing pen I drew the vertical lines for the lift cords, then marked every 6" along the lines for the tacking points.
There were to be 8 tacks per row, so I threaded 8 needles with double 30" lengths of thread, knotted at the ends. That amount of thread was enough to do all five rows without having to re-thread, a big time-saver.
Along the first vertical row, each needle was stabbed through all layers to the right side, 1/4" away from where the cord would be running, then stabbed back through to the back of the shade, letting the threads with the needles dangle off the table.
I laid out the tape (steam it first to pre-shrink it!!!) and weighted it down at each end, then worked my way up the row, tacking twice at each tack point. The thread tail was hidden behind the tape but not cut yet.
After all 8 were sewn, I worked my way back up the row and clipped, leaving each needle and thread in place.
Then I worked my way along the row again, knotting each thread and stabbing it through the corresponding point on the next row until all 8 were stabbed through and sticking into the canvas grid.
I laid out the second tape and secured at each tacking point, clipping all the threads and knotting each and stabbing into the corresponding point on the next row.
And so on! until it's all done.
Do yourself a BIG favor, and as you complete each row, fish out the cord at the bottom 1/2" up from your bottom hem and attach an orb, so the cord can't pull out. After the tacks are done, the tape will be tucked in when the pocket is sewn, and a ring will be attached.
Another BIG favor you should do for yourself is to loosely tie the tapes at the top so the cord can't get messed up up there, either.
In this photo you can see the weights holding down the area I'm not working on.
For the center rows you can neatly roll up the fabric so you can reach it more easily as you stab back up to the back of the shade. Just be careful that the layers don't shift. They can be pinned, but since this is blackout lining, I didn't want to use any more pins than necessary, so I just tried to be very careful.
Friday, February 25, 2011
Subscribe to:
Posts (Atom)


