This warm sheer stripe shade required a little bit of special handling......
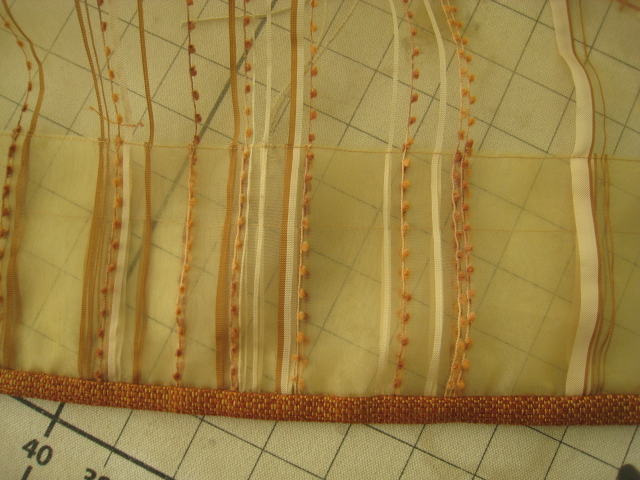
..... because it was banded at the bottom with a skinny strip of pumpkin-colored upholstery weight fabric.
The shade was laid out on the fabric gridded table top, hemmed on the sides, and pinned in place.
Camel-colored cord loop shroud was pinned in place, too, and tacked to the fabric along with the clear rings. You can't even see the little monofilament loops which will shroud the lift cord when the shade is strung.
The grid makes it easy to place the rings without marking, since you can see through the sheer!
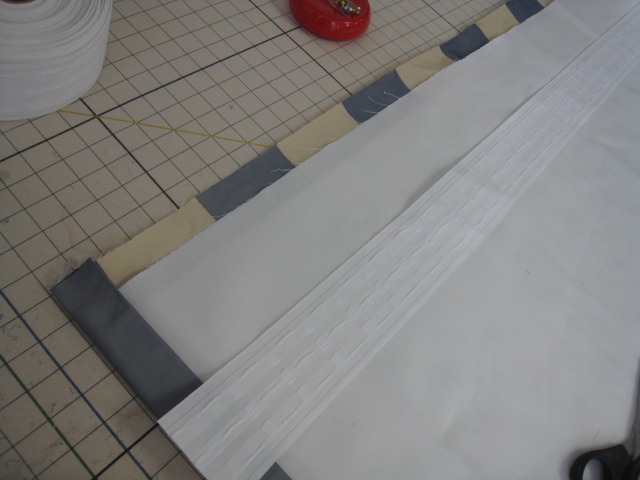
For the bottom weight bar pocket and hem, a separate strip was folded in half and placed on the back of the shade. Masking tape was helpful for marking, basting, and stabilizing. The basting line of red thread marked the bottom of the shade and held the three layers together.
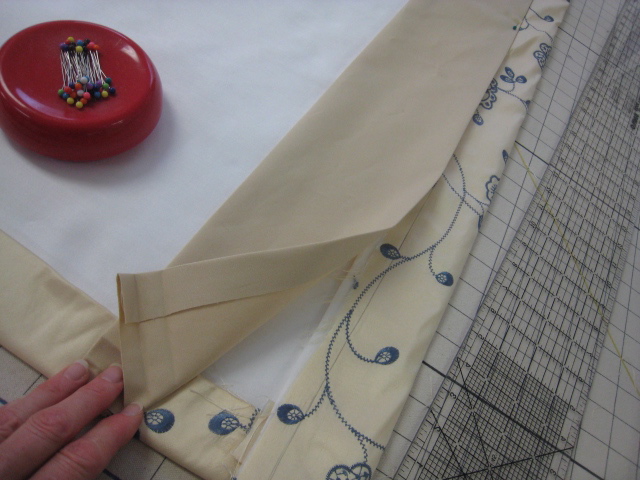
The skinny strip of orange fabric was sewn to the right side, and the red basting line made it easy to line them up. Do you see the mistake I made? This photo shows the banding pinned next to the wrong side- an error I didn't notice til it was sewn, so I had to take it off and re-sew it to the right side.
Once I fixed that little boo-boo, the layers were trimmed close to the stitching line.
Then the band was turned to the back, carefully pressed, then hand-stitched.
Nice!
Technically I think this is actually a binding rather than a band.
The pocket was sewn in the hem strip, then the strip was sewn to the shade body following the masking tape stitching line. The shroud was extended down to the pocket, looped, and secured with the stitching line. Later the loose end was tied to the bottom ring for extra security.
Here's the finished bottom before the weight bar was inserted.
A scrap of warm tan fabric served to create a cover for the weight bar. The tan lift cord blends with the fabric and the cord loop shroud.
The same tan fabric was used to cover the board, which you can see in this shot of the back. Also you can see how nicely the unobtrusive cord loop shroud shirrs up as the shade is raised.
There were valance for these shades, too, out of the orange fabric, and I'll show those next time.
THE BLOG IS HAVING TROUBLE WITH COMMENTS! SOMETIMES THEY DON’T GET PUBLISHED, AND WHEN THEY ARE I AM UNABLE TO REPLY TO THEM. IF THAT HAPPENS, JUST EMAIL ME AT stitchlore@gmail.com.
Looking for something specific? Check out the Topic Index, or the Search bar, just below, on the left.
Sorry about this problem!
SO.........WHAT ARE WE WORKING ON TODAY??
Thursday, September 29, 2011
Friday, September 23, 2011
Riding on the Marrakesh Express
| "Marrakech" by Manuel Canovas |
But alas, the designer wanted hobbled shades- short hobbled shades that will be permanently pulled up to act as a valance.
There are two main motifs per repeat to be juggled and re-arranged in a pleasing way.
In the process of planning this project I folded and taped out various possible arrangements, first trying to keep the medallions sort of symmetrical:
But after experimenting more I liked this version better:
| Yes, that's my foot on the table..... |
It looked a little cluttered so I modified that layout with 7" folds instead of 6" folds, which opened the pattern up a little more:
I kept the tapes on throughout the fabrication process. That pattern was making me dizzy. Since the fabric was unlined, I was able to see the pattern on the wrong side well enough to make it easy to sew the pockets. It was hemmed by hand, and the ends of the pockets had to be hand-sewn as well because the layers were too thick to fit under the presser foot.
The shades matched each other perfectly. I still think a cornice would have showed off the fabric more effectively, or at least, a cornice version of a mock hobbled roman which would have eliminated all that bulk on the sides.
Still, they turned out well.... and I kept in mind that they would be pulled up so only the three top folds would be showing. I think that if you look at just the top three folds, the presentation is pretty well balanced.
Friday, September 16, 2011
Pencil Pleat Drapery
The red and white couching really brings to life to this blue and white stripe.
The pencil pleated panels will peek out from under the floral silk I showed yesterday.
Choosing a thread color for hemming would have the first challenge, if the fabric was machine-hemmed. Since the hemming was done by hand, I didn't have to choose!
I have a huge aversion to seeing pleating or shirring tape on the back of draperies, so I hide it with the fabric. About a year and a half ago I showed shirred panels using this technique. Shirring and pleating tapes remind me of foundation garments- girdles, to be precise. They should work their magic without being seen.
The top is cut the size of the tape plus a couple of inches extra to fold under. The tape goes all the way to the ends; later, after the strings are pulled, tied, and clipped, they will be tucked into the ends which will be hand sewn shut.
I fold over the top and make sure the tape is nestled close up to the top, and pin securely.
The top is sewn- I keep checking to be sure the pull cord doesn't get caught.
Before sewing the next two rows, the excess lining and interlining were trimmed away. Then those two rows are sewn carefully, keeping a good eye on the seamline guide to be sure the pull cords don't get caught. These two rows are not sewn all the way to the ends- the stitching lines begin about 1" in- enough room for fingers to reach the pull cords.
The excess face fabric is trimmed, leaving enough to tuck under.
The pencil pleated panels will peek out from under the floral silk I showed yesterday.
Choosing a thread color for hemming would have the first challenge, if the fabric was machine-hemmed. Since the hemming was done by hand, I didn't have to choose!
I have a huge aversion to seeing pleating or shirring tape on the back of draperies, so I hide it with the fabric. About a year and a half ago I showed shirred panels using this technique. Shirring and pleating tapes remind me of foundation garments- girdles, to be precise. They should work their magic without being seen.
The top is cut the size of the tape plus a couple of inches extra to fold under. The tape goes all the way to the ends; later, after the strings are pulled, tied, and clipped, they will be tucked into the ends which will be hand sewn shut.
I fold over the top and make sure the tape is nestled close up to the top, and pin securely.
The top is sewn- I keep checking to be sure the pull cord doesn't get caught.
Before sewing the next two rows, the excess lining and interlining were trimmed away. Then those two rows are sewn carefully, keeping a good eye on the seamline guide to be sure the pull cords don't get caught. These two rows are not sewn all the way to the ends- the stitching lines begin about 1" in- enough room for fingers to reach the pull cords.
The excess face fabric is trimmed, leaving enough to tuck under.
Thursday, September 15, 2011
Okay, back to the routine!
Vacation week is over, the hurricane week is over, and now it's time to get back to the blogging routine.
I did get new mini blinds for the workroom......... The best thing about them is that they are clean, plain, and I can angle the light. Thanks to John for putting them up for me!
Thanks to the hurricane, September sort of started a week late, but we're back in full swing now, working madly. There have been some big installations and best of all, new work is flowing in every day.
We recently finished this two-layer drapery treatment. The overdrape is a rod pocket interlined embroidered silk rod pocket on a 2" pole. Underneath, the pencil pleated striped panel will peek out. Both layers will be swooped to the side, tied back, and puddled. Both layers are hand sewn.
The beautiful floral silk came with a big flaw right in the middle of the goods.
Don't ask me how the manufacturer thought this darning repair job could be disguised. Although the vendor did send extra yardage to compensate, the flaw still interfered with the cut lengths, so we had to make short cuts and put in a smaller hem at the bottom, and a false pocket at the top.
The pocket is a single layer of beige lining, layered over the heading to hide its raw edge, pinned in place, and topstitched.
I love how this method reduces the bulk of fabric in the top.
And since the pocket is run railroaded, there are no clunky seams inside for the pole to catch on when it's being threaded through the pocket.
More tomorrow on this double layer treatment, focusing on the striped panel.
I did get new mini blinds for the workroom......... The best thing about them is that they are clean, plain, and I can angle the light. Thanks to John for putting them up for me!
Thanks to the hurricane, September sort of started a week late, but we're back in full swing now, working madly. There have been some big installations and best of all, new work is flowing in every day.
We recently finished this two-layer drapery treatment. The overdrape is a rod pocket interlined embroidered silk rod pocket on a 2" pole. Underneath, the pencil pleated striped panel will peek out. Both layers will be swooped to the side, tied back, and puddled. Both layers are hand sewn.
The beautiful floral silk came with a big flaw right in the middle of the goods.
Don't ask me how the manufacturer thought this darning repair job could be disguised. Although the vendor did send extra yardage to compensate, the flaw still interfered with the cut lengths, so we had to make short cuts and put in a smaller hem at the bottom, and a false pocket at the top.
The pocket is a single layer of beige lining, layered over the heading to hide its raw edge, pinned in place, and topstitched.
I love how this method reduces the bulk of fabric in the top.
And since the pocket is run railroaded, there are no clunky seams inside for the pole to catch on when it's being threaded through the pocket.
More tomorrow on this double layer treatment, focusing on the striped panel.
Wednesday, August 31, 2011
Hurricane Hiatus
Well, Leatherwood Design Co remained dry during Hurricane Irene. We had a flash flood during a Hudson River thunderstorm about 5 summers ago; luckily I was in the building at the time, and was able to rescue everything that was on the floor and we lost next to nothing. Since then, we've been very diligent (/obsessive) about taking precautions against any chance of water damage. Our landlord did an awesome job after that storm, creating very effective new drainage, but I am still leery of a repeat of that flood.
Everything at floor level is in plastic, or on pallets. Nevertheless, for Irene we moved virtually everything to table level; this was a hurricane, after all! I'm happy to report that there was not a drop of water in the building.
We finally got power and telephones and internet back, so things can start to get back to normal. I hate to waste a cleaning opportunity, though, so while everything is still up on the tables, we're getting under and behind places that haven't been cleaned since that flood......
.............including the windows.
The embarrassingly dusty windows.
When we moved into this space the five big windows had mini-blinds, and now, 11 years later, they are a dusty, crumpled mess. So today I took them all down and threw them out.
Now the big question is: what to put on the windows?
Oh, what possibilities!- a window treatment workroom choosing window treatments! Well......
I don't want shades, because I don't want to ever see bare windows when the shades are raised, or a wall of fabric when they're lowered. I do not want curtains, not even cafe curtains. I don't want fullness, I don't want silhouette, I don't want clutter. I don't want color, I don't want pattern, and I don't want different treatments on each window. I want lots of natural light, and I want to be able to control it. I want to be able to see out.
I want new mini-blinds.
I'm always surrounded by ever-changing pattern, color, line, and volume; I don't want distraction on my own windows while I'm working. Even though many workroom visitors say "but what a great opportunity to make and show off samples!!"...............
..........I want new mini-blinds.
Cheap, plain, white, mini-blinds.
Tomorrow's project!
I'm hoping to get back to normal working and posting right after Labor Day.
Thanks for reading!
Everything at floor level is in plastic, or on pallets. Nevertheless, for Irene we moved virtually everything to table level; this was a hurricane, after all! I'm happy to report that there was not a drop of water in the building.
We finally got power and telephones and internet back, so things can start to get back to normal. I hate to waste a cleaning opportunity, though, so while everything is still up on the tables, we're getting under and behind places that haven't been cleaned since that flood......
.............including the windows.
The embarrassingly dusty windows.
When we moved into this space the five big windows had mini-blinds, and now, 11 years later, they are a dusty, crumpled mess. So today I took them all down and threw them out.
Now the big question is: what to put on the windows?
Oh, what possibilities!- a window treatment workroom choosing window treatments! Well......
I don't want shades, because I don't want to ever see bare windows when the shades are raised, or a wall of fabric when they're lowered. I do not want curtains, not even cafe curtains. I don't want fullness, I don't want silhouette, I don't want clutter. I don't want color, I don't want pattern, and I don't want different treatments on each window. I want lots of natural light, and I want to be able to control it. I want to be able to see out.
I want new mini-blinds.
I'm always surrounded by ever-changing pattern, color, line, and volume; I don't want distraction on my own windows while I'm working. Even though many workroom visitors say "but what a great opportunity to make and show off samples!!"...............
..........I want new mini-blinds.
Cheap, plain, white, mini-blinds.
Tomorrow's project!
I'm hoping to get back to normal working and posting right after Labor Day.
Thanks for reading!
Wednesday, August 24, 2011
Drafting Scallops: "And all you got to do to join....."
There's been a run on scallops. That is, I've done my second scallop project in a month. Normally scallop projects are years between. In July it was the lavender scalloped drapery lead edge, for August it was a scalloped bottom for a Roman shade.
If I have to draft a third scallop job in September, I'll start to wonder if I missed the memo from the Organization of Scalloped Edgers. And if fifty folks come in and order scallops, I'll believe that it's a movement. And all you got to do to join, is start drafting those scallops- thank you Arlo!
Drafting scallops: stuff I learned from my momma.
She didn't teach me to draft scallops, per se, but she taught me how to use a grid and points and lines; compasses and squares and straightedges. I was a very little girl. I kept her company when she made posters for church or school events, and she explained every step of her process. My mom could make anything.
For these scallops, I drew parallel lines, thinking I wanted a 2" short point, but once I had the lines I knew I really wanted a 1.5" short point.
I refined the lines til I had something I liked.
I folded the template to get a mirror image, (you can see your lines through the paper if you use a black Sharpie), cut it in half,
then flipped it, made sure the scallop shape was the same upside down as right side up.
The shade was fully made before the scallop was cut and sewn. Actually I should say, sewn then cut. I love my purple pens- I draw all over the backs of shades- but the purple kept disappearing from the blackout lining so I had to draw in pencil. The weight bar pocket was sewn into the facing, then the facing sewn to the uncut scallop. The seam allowance was trimmed, clipped, and notched, turned to the right side, and one stitching line attaches the facing to the shade, at the point where the bottom rings will be attached.
Cute green trim applied:
The shade was strung with mesh tube shroud, cord idler pulleys, and a cord lock. Sorry no picture of it on the stand.
Subscribe to:
Posts (Atom)